Patterns for Hobbit Perler Beads
Here's a selection of fun projects for fused Hama and Perler bead craft patterns with a Hobbit and Lord of the Rings Tolkien theme for crafty fantasy fans of the book and movies.
If you're on the look out for LOTR and especially Hobbit Perler beads themed crafts then you'll still find that they are in a rather short supply online. I know this since I'm a big fan of this Tolkien based series as well as being an avid crafter too.
So I've put together this fun pattern page where you can use Perler or Hama fused beads and peg boards to create some fun projects that can be worked by older kids and also adult fans.
Note: This post may contain affiliate links for which I can be compensated.

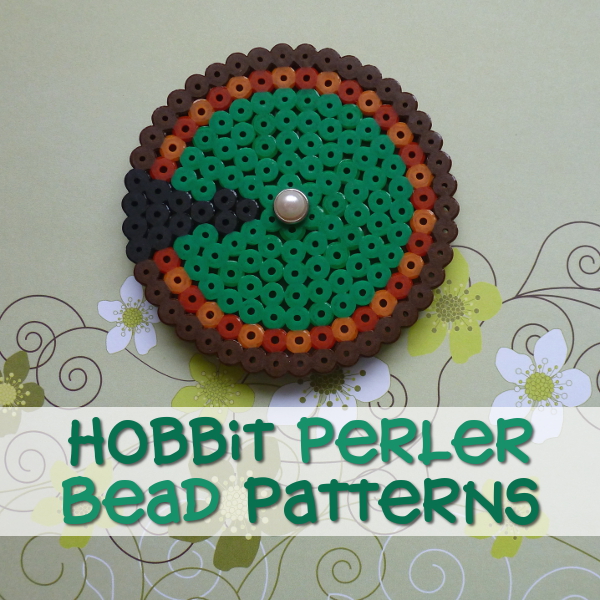
You'll find a step by step photo tutorial on making the iconic Bag End Hobbit door from Perler beads. You can then easily turn into a sweet magnet, brooch pin or even a hanging ornament when it is completed. And I also have some further ideas taken from the movies to show you too. I hope you have lots of beady fun.
I added an old-fashioned style black door hinge to make the design a little more interesting since there is no way to show the vertical lines of wood paneling or any detail like that on a small fused bead board. So this is my arty interpretation.
You're going to need a single yellow bead, lots of a medium color green, some black and either 2 or 3 shades of brown Perler Beads if possible.
You can make this with one shade of brown for the wood door surround but it looks flat and dull because I've tried it. The other item you need is a small circle pegboard.

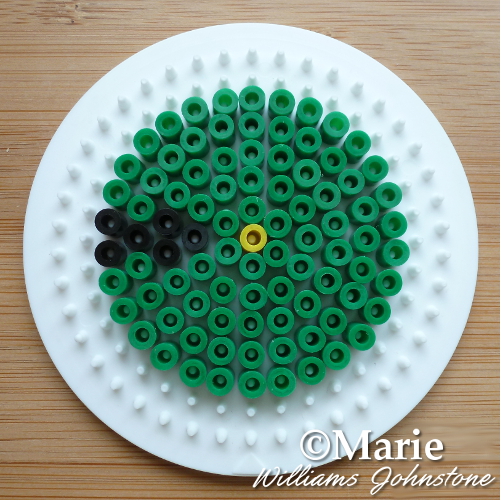
Step 1: This is the easiest step. Locate the exact middle peg of the circle pegboard and place one yellow bead on it.

Step 2: Your small Perler circle board may have a triangle on it around the edge. You can make creating this fused bead design much easier if you position the triangle so that it is middle bottom on the board as shown in the image for this step.
Work 2 circles of green beads around the yellow one - apart from the bead in the second row that is in the 9 o'clock position. That one should be black and is where the hinge pattern starts.

Step 3: It is easier to start working the black hinge pattern first with the next 5 beads for that and then you can fill in the expanding circles of green really easily.
You can see this design if you click on the image for step 3 and have a closer look at it. Once you've added the green beads, that part is done.

Step 4: You need 7 more black beads to finish off the hinge design right up to the edge of the peg board. Then you need to decide whether you are going to use 2 or 3 shades of brown for the 'wood' door surround.

Step 5: If you have 2 shades of brown then start from the top edge of the black hinge design on the inside row and add a darker brown, then lighter brown around the circular row and repeat till the end.
Start the outer row with the lighter brown, then add the darker shade so you alternate all the way around. This gives a lovely mottled effect. You can see this completed effect.
If you have 3 shades of brown then work the darkest shade around the outside edge of the circle board. Then work the row that is left in alternating shades of your other two browns. I prefer this design which you can see in the image.

Once an adult has ironed the completed design according to the fused bead manufacturer's instructions, you are free to embellish it as you please. I enjoy adding extra decoration such as mini brads, flat-backed beads, ribbon bows and more to enhance the finished design.
The only thing that Bilbo's Hobbit door really requires is a brass looking door knob because this is a very important description of this iconic door that the author, J.R.R. Tolkien, supplied.
An adult could hot fix a flat-backed gem or button in the middle - glue dots also work too and are safer to use. But I like brads because once in place, they cannot easily be broken off. The mini brads tend to work best because the prongs can normally slip through the natural Perler / Hama holes.
If the central hole needs widening, you can use a thick needle or a sharp, fine implement like a metal skewer to make it bigger for the brad to pass through.

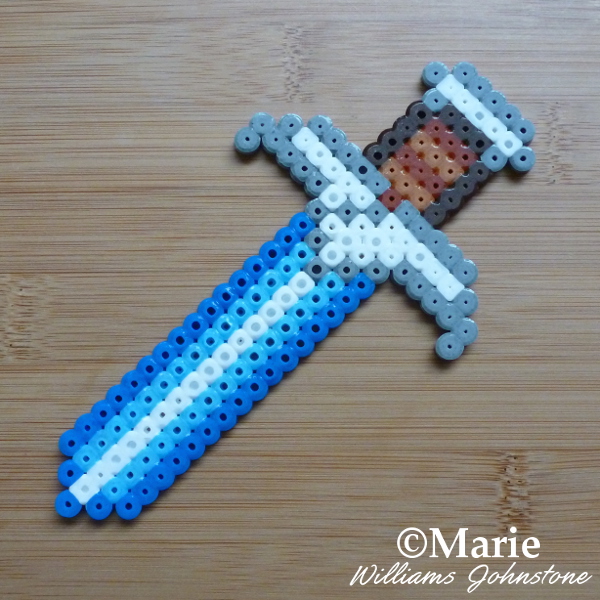
Sting is the sword that Bilbo acquires from the Troll Lair on his adventure with the dwarves in An Unexpected Journey.
The unique property of this sword which was made by Gondolin Elves is that it glows blue in warning every time orcs or goblins are nearby. I've used this idea in my sword designs which you can see above.
Go and Make This Sword Pattern with My Tutorial HERE
I actually based both designs on looking at a replica Hobbit sword and the larger design which is worked on a large square pegboard has pretty much nailed the look I was attempting to create with the elegant brown hilt of the handle and the curved triangular and elegant guard design.
The glowing blue is shown nicely with two shades of blue and a stripe of white down the middle of the blade. The smaller design has less detail but looks perfect as a necklace piece. I may make a tutorial on this in future so stay tuned.

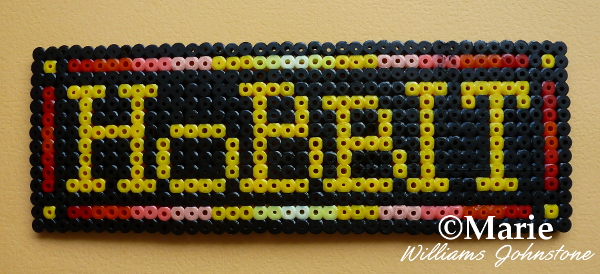
I made the Hobbit Logo design above as a door decoration. I love the dark black background of Perler beads with the bright yellow lettering.
Related Content You Should Also Love
Page Last Updated:
If you're on the look out for LOTR and especially Hobbit Perler beads themed crafts then you'll still find that they are in a rather short supply online. I know this since I'm a big fan of this Tolkien based series as well as being an avid crafter too.
So I've put together this fun pattern page where you can use Perler or Hama fused beads and peg boards to create some fun projects that can be worked by older kids and also adult fans.
Note: This post may contain affiliate links for which I can be compensated.
Patterns for Hobbit Perler Beads for Fantasy Fans and Crafters

You'll find a step by step photo tutorial on making the iconic Bag End Hobbit door from Perler beads. You can then easily turn into a sweet magnet, brooch pin or even a hanging ornament when it is completed. And I also have some further ideas taken from the movies to show you too. I hope you have lots of beady fun.
A Bag End Hobbit Hole Door Perler Bead Pattern
This door is based on that of Bag End which is the Hobbit home that belongs to Bilbo and then Frodo Baggins. This features in the movie An Unexpected Journey as well as The Lord of the Rings movies.I added an old-fashioned style black door hinge to make the design a little more interesting since there is no way to show the vertical lines of wood paneling or any detail like that on a small fused bead board. So this is my arty interpretation.
You're going to need a single yellow bead, lots of a medium color green, some black and either 2 or 3 shades of brown Perler Beads if possible.
You can make this with one shade of brown for the wood door surround but it looks flat and dull because I've tried it. The other item you need is a small circle pegboard.

Step 1: This is the easiest step. Locate the exact middle peg of the circle pegboard and place one yellow bead on it.

Step 2: Your small Perler circle board may have a triangle on it around the edge. You can make creating this fused bead design much easier if you position the triangle so that it is middle bottom on the board as shown in the image for this step.
Work 2 circles of green beads around the yellow one - apart from the bead in the second row that is in the 9 o'clock position. That one should be black and is where the hinge pattern starts.

Step 3: It is easier to start working the black hinge pattern first with the next 5 beads for that and then you can fill in the expanding circles of green really easily.
You can see this design if you click on the image for step 3 and have a closer look at it. Once you've added the green beads, that part is done.

Step 4: You need 7 more black beads to finish off the hinge design right up to the edge of the peg board. Then you need to decide whether you are going to use 2 or 3 shades of brown for the 'wood' door surround.

Step 5: If you have 2 shades of brown then start from the top edge of the black hinge design on the inside row and add a darker brown, then lighter brown around the circular row and repeat till the end.
Start the outer row with the lighter brown, then add the darker shade so you alternate all the way around. This gives a lovely mottled effect. You can see this completed effect.
If you have 3 shades of brown then work the darkest shade around the outside edge of the circle board. Then work the row that is left in alternating shades of your other two browns. I prefer this design which you can see in the image.

Once an adult has ironed the completed design according to the fused bead manufacturer's instructions, you are free to embellish it as you please. I enjoy adding extra decoration such as mini brads, flat-backed beads, ribbon bows and more to enhance the finished design.
The only thing that Bilbo's Hobbit door really requires is a brass looking door knob because this is a very important description of this iconic door that the author, J.R.R. Tolkien, supplied.
An adult could hot fix a flat-backed gem or button in the middle - glue dots also work too and are safer to use. But I like brads because once in place, they cannot easily be broken off. The mini brads tend to work best because the prongs can normally slip through the natural Perler / Hama holes.
If the central hole needs widening, you can use a thick needle or a sharp, fine implement like a metal skewer to make it bigger for the brad to pass through.
Now Make a Hobbit Perler Bead Sword Design

Sting is the sword that Bilbo acquires from the Troll Lair on his adventure with the dwarves in An Unexpected Journey.
The unique property of this sword which was made by Gondolin Elves is that it glows blue in warning every time orcs or goblins are nearby. I've used this idea in my sword designs which you can see above.
Go and Make This Sword Pattern with My Tutorial HERE
I actually based both designs on looking at a replica Hobbit sword and the larger design which is worked on a large square pegboard has pretty much nailed the look I was attempting to create with the elegant brown hilt of the handle and the curved triangular and elegant guard design.
The glowing blue is shown nicely with two shades of blue and a stripe of white down the middle of the blade. The smaller design has less detail but looks perfect as a necklace piece. I may make a tutorial on this in future so stay tuned.

I made the Hobbit Logo design above as a door decoration. I love the dark black background of Perler beads with the bright yellow lettering.
Related Content You Should Also Love
Page Last Updated:


Comments
Post a Comment
CraftyMarie is a craft themed website by Marie Williams Johnstone. I love to craft in the winter and garden in the summer. I make handmade cards, papercrafts, crochet and seasonal crafts. I enjoy many of the more traditional crafts and hobbies including sewing, embroidery and working with felt and fabric. Thanks for leaving me a comment. Comments do not show up until I approve them. Marie