Make a Double Fishtail Rubber Band Bracelet Without a Loom
Learn how to make a double fishtail rubber band bracelet without any loom equipment and just by using your own fingers instead. This step by step written photo tutorial also includes a video which shows you how it's done.
Making bracelets and unique pieces of jewelry from colorful rubber bands is a whole lot of fun. Luckily, you don't need any special tools or equipment in order to get started with this rubber band craft. All you need are your fingers, some bands and a clip to secure the ends of the design together properly.
Although this craft is largely touted as a kids craft and activity, there are plenty of adults who enjoy creating with these colorful and elastic bands and I'm one of them. My daughter and I first learned how to make these designs using our fingers and it is still one of the favorite ways to whip up a quick bracelet to wear.

Note: This post may contain affiliate links for which I can be compensated.
Safety Note: Obviously there are things that you should be careful about, as with any small items, such as not leaving the small parts unattended with a young child. Used sensibly and with adult supervision these rubber bands are a lot of fun to make cool items with.
Materials and Tools to Make a Double Fishtail Rubber Band Bracelet:
You don't need any kind of loom or weaving implement to start making some cool looking fishtail bracelet designs. You can also make other pieces of fun jewelry like necklaces and keychains from your colored rubber bands.
Luckily your fingers can be used instead of a loom. Find out how to make these bracelets without a loom and with this step by step photo instruction page below.

It is easiest to learn this double fishtail pattern by using 2 different colors and alternating them as you work it. When you know this pattern off by heart, you can then easily choose as many colors as you want and in the ordering that you would like too. But part of this design's appeal is the contrasting two colors repeated along the length.
NOTE: Color A refers to the first color (I picked black) and Color B to your second choice of color (I picked purple).
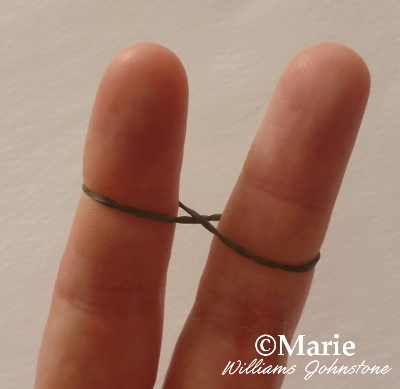
Using Color A, place this band around your index finger which is the finger that sits right next to your thumb. If you are right handed, you will probably want to use your left hand to hold the bands. And if you are left handed, you may prefer to use your right hand.
Twist this first band in the center which turns it into the shape of a figure of 8 and then stretch the other side over the top of your middle finger. Pull this band down a little on both fingers, leaving room for a new one to be placed on top.

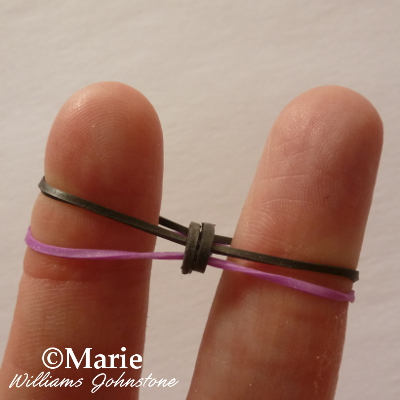
Using Color B, stretch this straight over both the fingers as shown in the second photo. There is no twist with this one - you just add it on.

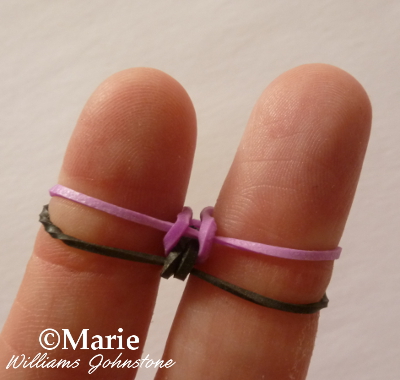
Using Color A, stretch this over both fingers again without the twist - just the same as with step 2.

Now you will start building your pattern by 'weaving' the bands. Get hold of the very bottom band on your index finger and stretch it up and over the other bands and right over the top of your finger and into the middle - between your index and middle finger.
Now get hold of the bottom band on your middle finger and repeat this process, stretching it up and over your finger and into the middle as shown on the photo.

This photo shows what your design should now look like and resemble - obviously just looking different because of the colors you've chosen.

Now use Color B and stretch it over both fingers without twisting it.

Now go back and repeat step 4 where you pull the very bottom band over into the middle on both sides.

Repeat this pattern from steps 3-7 and you will notice the fishtail design as it starts to grow from the middle of your fingers. You need to keep repeating this process until the whole design is large enough to make a bracelet or whatever else you want to make.
Watch the video and also learn how to finish the bracelet off properly below.
If You Enjoy This Craft, Save Your Hands and Learn About The Monster Loom
Enjoy this video demonstration which shows you the technique for this craft.

When you decide it is the right length, keep working the pattern BUT you don't add in any new bands, you just keep pulling the bottom band over your fingers until you have just one left.
Now attach either a C or an S shaped clip to the band on your index finger and once attached, pull this band off your hand. Then attach the clip to the remaining section on your middle finger and then remove from your hand completely.
Now you just need to attach the clip to the other end of your bracelet design to fasten it all off neatly. Enjoy the video demonstrations too.
Related Content You Should Also Love:
Page Last Updated:
Making bracelets and unique pieces of jewelry from colorful rubber bands is a whole lot of fun. Luckily, you don't need any special tools or equipment in order to get started with this rubber band craft. All you need are your fingers, some bands and a clip to secure the ends of the design together properly.
Although this craft is largely touted as a kids craft and activity, there are plenty of adults who enjoy creating with these colorful and elastic bands and I'm one of them. My daughter and I first learned how to make these designs using our fingers and it is still one of the favorite ways to whip up a quick bracelet to wear.

How to Make a Double Fishtail Rubber Band Bracelet WITHOUT a Loom and Using Your Fingers Instead
Note: This post may contain affiliate links for which I can be compensated.
Safety Note: Obviously there are things that you should be careful about, as with any small items, such as not leaving the small parts unattended with a young child. Used sensibly and with adult supervision these rubber bands are a lot of fun to make cool items with.
Materials and Tools to Make a Double Fishtail Rubber Band Bracelet:
- A Selection of Rubber Loom Bands: two different colors are good to learn with
- A Plastic C Clip or an S Clip to fasten the ends of the bracelet
- Your Fingers
You don't need any kind of loom or weaving implement to start making some cool looking fishtail bracelet designs. You can also make other pieces of fun jewelry like necklaces and keychains from your colored rubber bands.
Luckily your fingers can be used instead of a loom. Find out how to make these bracelets without a loom and with this step by step photo instruction page below.
Step 1

It is easiest to learn this double fishtail pattern by using 2 different colors and alternating them as you work it. When you know this pattern off by heart, you can then easily choose as many colors as you want and in the ordering that you would like too. But part of this design's appeal is the contrasting two colors repeated along the length.
NOTE: Color A refers to the first color (I picked black) and Color B to your second choice of color (I picked purple).
Using Color A, place this band around your index finger which is the finger that sits right next to your thumb. If you are right handed, you will probably want to use your left hand to hold the bands. And if you are left handed, you may prefer to use your right hand.
Twist this first band in the center which turns it into the shape of a figure of 8 and then stretch the other side over the top of your middle finger. Pull this band down a little on both fingers, leaving room for a new one to be placed on top.
Step 2

Using Color B, stretch this straight over both the fingers as shown in the second photo. There is no twist with this one - you just add it on.
Step 3

Using Color A, stretch this over both fingers again without the twist - just the same as with step 2.
Step 4

Now you will start building your pattern by 'weaving' the bands. Get hold of the very bottom band on your index finger and stretch it up and over the other bands and right over the top of your finger and into the middle - between your index and middle finger.
Now get hold of the bottom band on your middle finger and repeat this process, stretching it up and over your finger and into the middle as shown on the photo.
Step 5

This photo shows what your design should now look like and resemble - obviously just looking different because of the colors you've chosen.
Step 6

Now use Color B and stretch it over both fingers without twisting it.
Step 7

Now go back and repeat step 4 where you pull the very bottom band over into the middle on both sides.
Step 8

Repeat this pattern from steps 3-7 and you will notice the fishtail design as it starts to grow from the middle of your fingers. You need to keep repeating this process until the whole design is large enough to make a bracelet or whatever else you want to make.
Watch the video and also learn how to finish the bracelet off properly below.
If You Enjoy This Craft, Save Your Hands and Learn About The Monster Loom
Video Showing How to Make a Double Fishtail Bracelet
Enjoy this video demonstration which shows you the technique for this craft.
To Finish Your Double Fishtail Rubber Band Bracelet Design

When you decide it is the right length, keep working the pattern BUT you don't add in any new bands, you just keep pulling the bottom band over your fingers until you have just one left.
Now attach either a C or an S shaped clip to the band on your index finger and once attached, pull this band off your hand. Then attach the clip to the remaining section on your middle finger and then remove from your hand completely.
Now you just need to attach the clip to the other end of your bracelet design to fasten it all off neatly. Enjoy the video demonstrations too.
Related Content You Should Also Love:
Double Fishtail Loom Band Tutorial on the Monster Tail Loom
Make Easy Rainbow Loom Bracelets With Beads
More Crafts for Kids and Adults to Enjoy
Make Easy Rainbow Loom Bracelets With Beads
More Crafts for Kids and Adults to Enjoy
Page Last Updated:


Comments
Post a Comment
CraftyMarie is a craft themed website by Marie Williams Johnstone. I love to craft in the winter and garden in the summer. I make handmade cards, papercrafts, crochet and seasonal crafts. I enjoy many of the more traditional crafts and hobbies including sewing, embroidery and working with felt and fabric. Thanks for leaving me a comment. Comments do not show up until I approve them. Marie