How to Make Plushies Out of Felt for Beginners
Felt plushies are so much fun to make. You can create stuffed animals, dolls, houses, toy food, cute kawaii, mini monsters and so much more. You’re only limited by your imagination - and your sewing skills of course.
Like any new hobby, it can be overwhelming wondering how to get started. This complete guide shows you exactly how to make plushies out of felt. It's for beginners and those wanting a refresher course too. Let me guide you through all the essentials that you need to know so you can sit back and enjoy this cool craft.
Learn about what stitches you should know before you start making your plushies. And find out exactly what items you need to get started on your felt sewing journey. I've even included a complete beginner plush project for you, so you can begin crafting right away.
Note: This post may contain affiliate links for which I can be compensated.

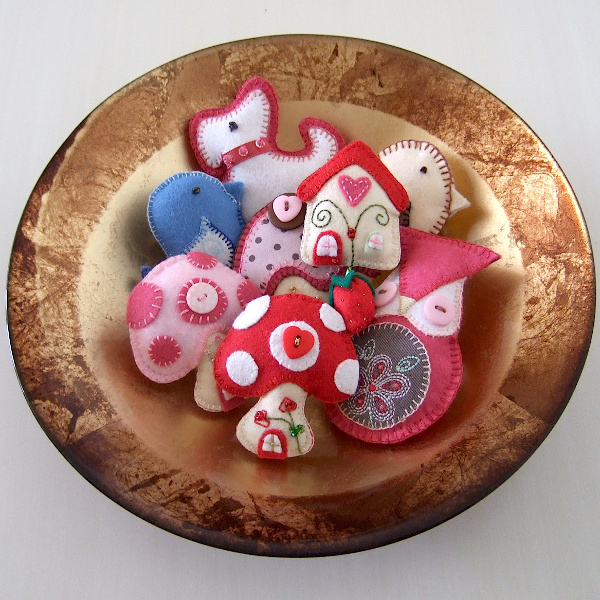
Small felt plushies, like mine here, often make ideal first beginner projects. You can easily turn them into hanging ornaments, brooch pins, scented drawer bags, bag clips, unique keychains and more.
Start Making Cute Felt Items Today!
There's a lot of information on this page - not to overwhelm you but to provide you with all the information that you really need to get started. I wish I'd had a complete newbie guide like this when I began making felt plushies many years ago.
✔ Read through this page carefully, once.
✔ Make a note of any items you will need for this craft as you go through.
✔ Come back to the top to learn or refresh your skills on the essential beginner stitch.
✔Get stuck in and have a go at making my beginner felt plush tutorial. This is a great practice piece to start with.
✔ Enjoy your new confidence at starting to sew cute plush felt projects.
✔ Bookmark my CraftyMarie site now for future inspiration, tips, tutorials and help.
I highly recommend that you work through and make my beginner practice piece tutorial because I have designed it especially for the absolute newbie.
It makes sense to work in order through my recommended tutorials before diving in too soon with projects that are too difficult. I can save you from getting disappointed with the results which often happens when people start in the wrong place. Now let's get to it.

This felt apple detail has been added purely using the basic running stitch in a few carefully chosen thread colors.
One massive myth about getting started with making felt items is that you will need to know lots of different hand stitches. That is simply not true. It doesn’t matter whether you are sewing flat felt items or plush ones, you don’t need to know loads of stitches or be some kind of embroidery expert.
In fact, there is only one stitch that you actually need to master. That is the very easy running stitch. You may know this by its other name which is straight stitch. It is the most basic hand stitch and one of the most useful too.
Any other stitch that you use with your felt sewing is entirely optional. Felt is an easy fabric to work with since the edges do not fray as most fabrics do.
The wonder of felt fabric means you do not need to hem any edges and nor do you need to learn any overcasting stitches which are often used on raw edges to prevent fraying.
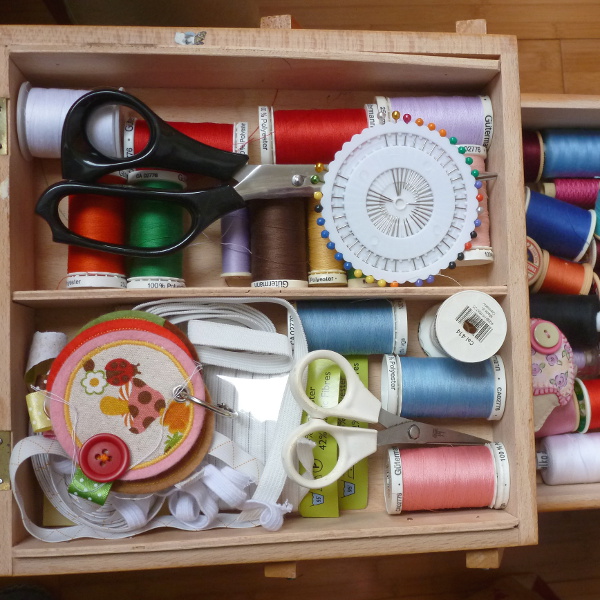
Listed here in this beginner guide are the absolute basics of what you will need to make felt plushies. There are many other hand sewing tools, equipment, supplies and items which you will find useful along the way but let's start with the essentials.
I'll make it easy for you as a newbie and stick to the absolute minimum of equipment and tools that you need in order to get started.
The Absolute Basics You Will Need:

To get started with making your very first felt plushies, getting yourself an assorted bundle of colored felt sheets is a great idea. There is nothing worse than starting out and not having any suitable colors to make your first items with.
I like to have a range of felt fabric to work with, from the less expensive and stiffer acrylic felts to the softer wool blend felt sheets which are more expensive. I do not normally use 100% wool felt because it costs a lot more and I actually don't particularly like the texture of it for sewing.
I have bought felt fabric from many places online including Etsy, Amazon and eBay. Now I try and support my local craft stores if I can instead. Plus it is easier to pick out my felt by feeling what the texture and thickness is like rather than buying online.
There are other types of filling and stuffing that you can use but, for the beginner, I would really recommend sticking with polyester filling because it is inexpensive and easy to use.
Filled felt shapes include items like plush toys, pincushions, handmade pillows, hanging ornaments and stuffed felt pin brooches.
My sewing needles are stored in a soft felt needle case. You could even make one of these for yourself as an easy project for your new hobby.

I use two main types of thread for sewing felt plushies. The first is polyester thread because it is very strong and durable which means it is hard to break easily.
This is ideal for sewing seams and anywhere that requires a stronger stitch. The strongest stitch you can sew by hand is backstitch and this is ideal for seams.
Strong and Durable Polyester Sewing Threads:
The polyester threads I always use are Gutermann - you need to be careful to choose polyester since they also make cotton threads. Cotton thread is lovely but not as tough so it snaps more easily.
Gutermann polyester threads come in a wide range of colors and sizes. For hand sewing, their smallest range of spools (normally 110 yards) should be more than sufficient to last a good while.
Soft and Beautiful Embroidery Floss:
For embroidery and more decorative features, I normally prefer to use embroidery floss. Although floss is much more prone to breakage than polyester threads, it is soft and really beautiful to stitch with.
Floss looks wonderful on the finished product too. You can get far better results with many embroidery stitches such as the French Knot which need more body.
Variegated embroidery floss is amazing. I adore these threads since they gradually change shade or color as you stitch. Used in moderation, they can make quite an ordinary project really have the wow factor.
Starting out as a beginner sewing plush items, you could just use whatever threads you already have to hand in order to keep costs to a minimum.
The small, sharp pointed scissors, like embroidery scissors, are useful for very small, detailed and precise cutting.
The much larger dressmaking shears are great for cutting out larger pieces of felt quickly and accurately.
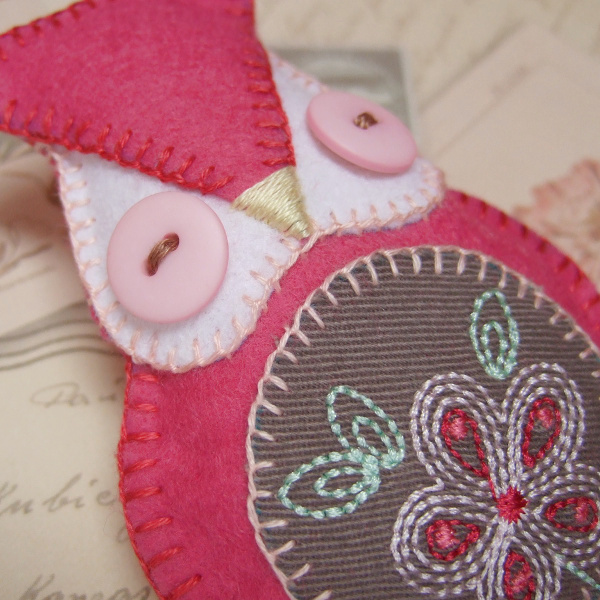
Most people who sew by hand have a preferred stitch that they love to do. Mine is blanket stitch. I absolutely love blanket stitch and you will see examples of it on many of my own handmade felt items.
I mostly use blanket stitch to join edges of felt together. I just love how the stitch looks even though I could just use a straight running stitch and I’d be able to finish the item a whole lot quicker.
The French knot can be a useful embroidery stitch to know since you can use that one to make the tiniest eyes on any miniature animals and creatures that you are making.
The French knot also happens to make good suggestions for little rose flowers too when adding in some small embroidery detail. It’s purely a decorative stitch and it isn’t one that you have to know. But you may find it useful to learn in time.
Here are the stitches that I recommend that you learn when you have time. But always start with getting the running stitch down to perfection first.
✔ Stitches for Outlines: Straight Running Stitch | Backstitch | Stem Stitch
✔ Stitches for Felt Applique: Straight Running Stitch | Backstitch | Blanket Stitch
✔ Decorative Embroidery Stitches: French Knots | Chain Stitch | Blanket Stitch
It is easiest to start first and practice stitches on flat pieces of felt. Perhaps pretend that you are playing with Fuzzy Felt shapes.
Using a small square (say 6 x 6 or 7 x 7 inches) as a background, practice cutting out some felt shapes and sewing them on top with different stitches. Sewing one piece of felt on top of a larger piece is known as felt applique.
You could make a scene of your choosing like building up an animal or make a purely abstract piece of art. Either way, you’ll get a feel for what stitches you like as well as what looks good – and what doesn’t.
When you know that you’re ready to move on to making your first plushie, then it is time for you to check out my beginner tutorial which is waiting below.
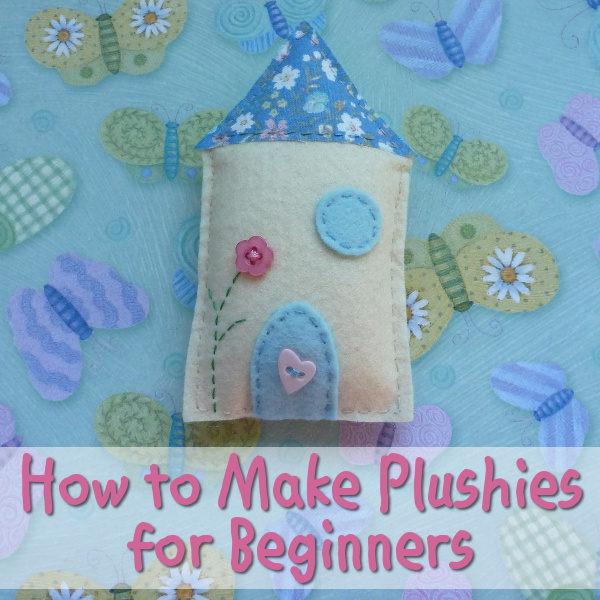
I'm going to start with a super easy practice tutorial for making a beginner felt plush. It is easy because it uses only a few small pieces of felt and just one simple running stitch.
This mini felt house plush is a very simple sewing project. I've designed it with the absolute beginner in mind and it is a great piece to learn with. When you discover more stitches, you'll be able to make even more impressive miniature houses.
You can find a more detailed tutorial to make this beginner felt house HERE
Turn it into a hanging ornament very simply by sewing a loop of ribbon or cord on the back when done. Alternatively, make it into a scented drawer sachet by popping a bag of dried herbs inside.

Draw out a very simple house shape onto a piece of card. You don't want a huge project to start out with because it would take too much sewing and filling for your first attempt. So keep the size under 6 inches tall for a reasonable first felt plush project.
I just drew a very quick house with a pointed roof. So a rough rectangle shape with a triangle right on top. Does it need to be straight? Not at all. Your house can be cute and quirky. After all, Medieval houses were never known to be perfectly straight.
Trace around this shape twice onto felt and cut it out. You can use a water soluble fabric marker to trace around the shape onto felt. You can also use a ballpoint pen on the reverse of the felt.
Learn all about Fabric Markers for Felt HERE
Learn About Drawing and Tracing Patterns onto Felt HERE
For the color of the house, I used a pale cream felt fabric. You can choose a different color if you prefer. I made another in pink. Pick colors that you love to make your design unique.
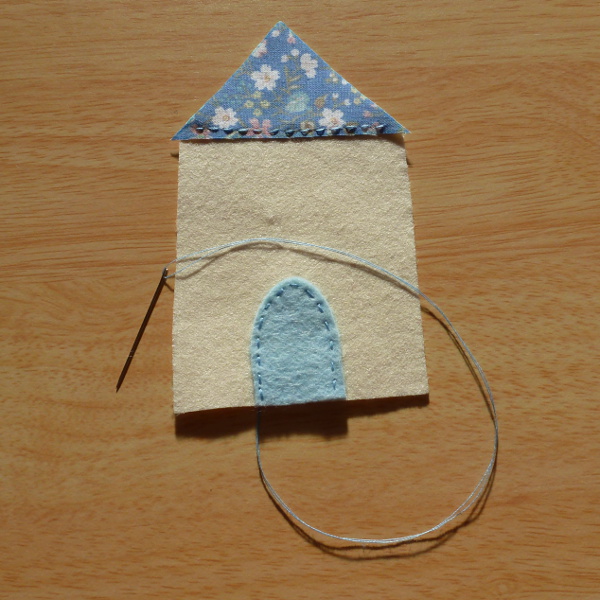
On one piece of the felt (what we'll call the front piece) you need to stitch some details for your plush home.
Using the card template I made in step 1, I cut a triangle roof from some blue patterned fabric. I sewed this on using running stitch just across the bottom side. The top sides will get sewn when we sew the plushie up.
I cut out a little door shape from blue felt and sew this on. The door and the roof are the absolute basics of your mini home. Next we'll add some extras to make it more unique and special.
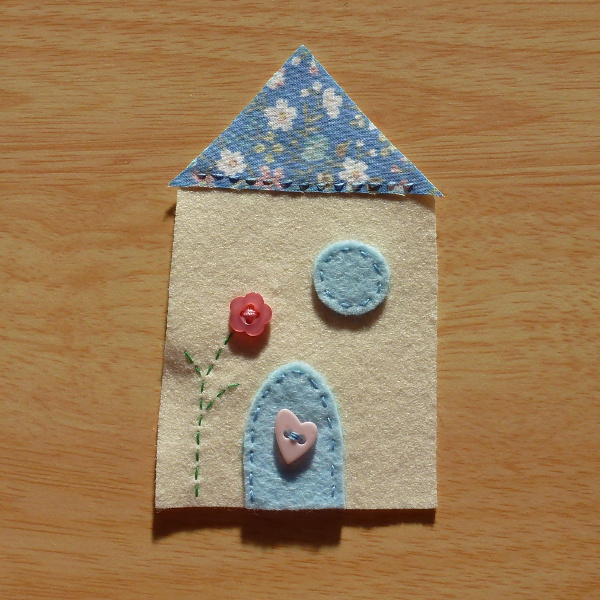
You can see I've added in some extra detail here. Mini felt homes are made special by the unique things that you add to them.
I added a round window, a heart button door knob and a flower button with stem and leaf detail just sewn with the simple running stitch in green.
Why not think about what little details you want to add to the front of your own felt plush. Perhaps you want to add on some beads, some trim or some features that are meaningful to you. Have a go at making your own designs.
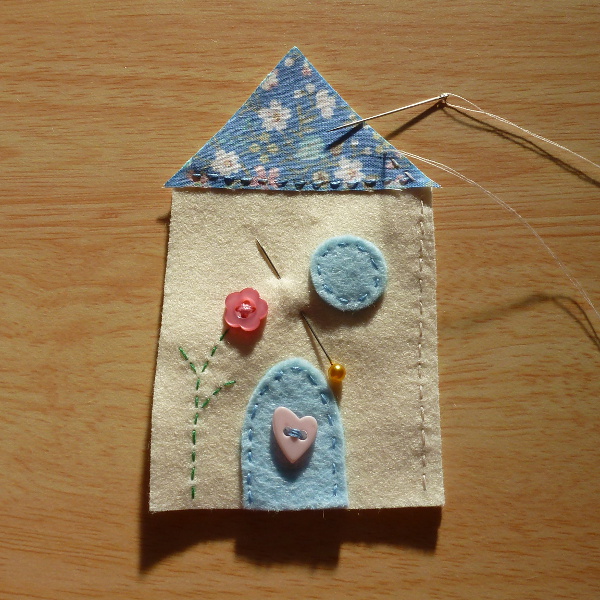
When you are done with the detail on the front of your felt plush, pin the back of your felt house shape onto the front. Try and match the sides up neatly before pinning.
With both front and back pieces of felt pinned, you can now sew around the sides - except for the bottom edge. The bottom must be left open for stuffing it with fiber fill.
I suggest starting from the bottom left or right and sewing up one side, over the roof and down the other side.
You only need to use a running stitch around the sides. To keep the stitches looking neat, try to keep an equal spacing from the edge of the felt.
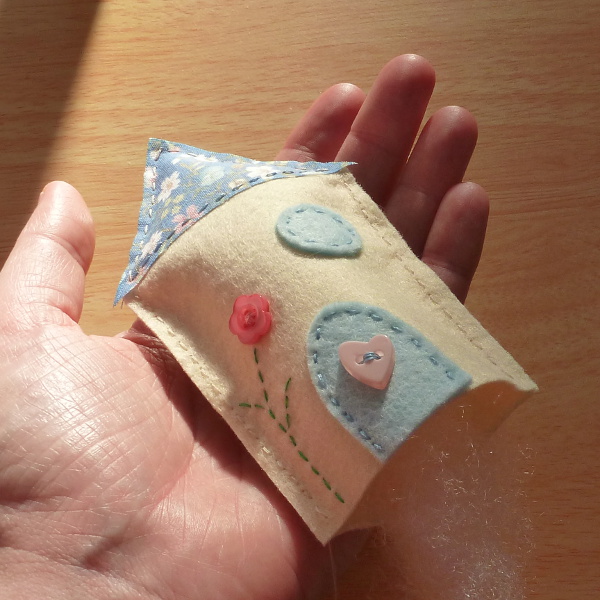
When you've sewn around all the sides except for the bottom, you can start to stuff the plush home with fiber fill.
Break off small pieces of fiber fill and push them right to the end of your little plush house. You may need to use your fingers or even a pencil to push the fiber into the corners to plump them out properly.
A typical beginner mistake is not adding in enough fiber fill to your plushie. You normally need a lot more than you think you do. Push it in firmly but not so hard as to break your stitching.
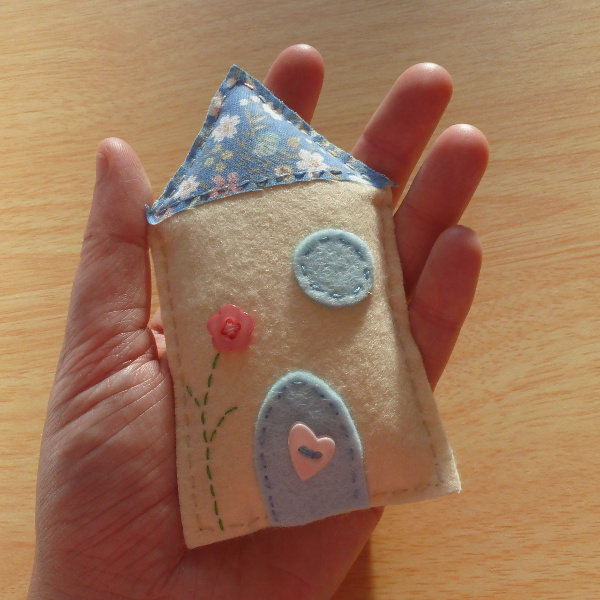
When you have filled your plushie up enough, you can sew along the bottom edge to complete the design and keep all the stuffing securely inside.
Get a More Detailed Tutorial to Make a Felt House HERE
Now See How to Make a Cute Little Bird Plush
Enjoy your very first hand sewn plush and feel proud of what you've just made. This is just the start. You can now begin to create even more wonderful creations once your confidence and sewing skills improve.
Some Ideas on What You Can Make:
My own specialty is miniature felt houses. I just love designing and creating all kinds of magical themed fairy homes. You will discover what you really love to make in time.
You can adapt most plush designs so that they hold a scented sachet to make a cute scented drawer liner. It is also easy to sew on some ribbon or cord to make a hanging ornament.
When you've completed this beginner plush project, come back to look for more beginner projects that you can work on. Enjoy your new skill at sewing with felt.
Related Content You Should Also Love:
Page Last Updated:
Like any new hobby, it can be overwhelming wondering how to get started. This complete guide shows you exactly how to make plushies out of felt. It's for beginners and those wanting a refresher course too. Let me guide you through all the essentials that you need to know so you can sit back and enjoy this cool craft.
Learn about what stitches you should know before you start making your plushies. And find out exactly what items you need to get started on your felt sewing journey. I've even included a complete beginner plush project for you, so you can begin crafting right away.
Note: This post may contain affiliate links for which I can be compensated.
How to Make Plushies Out of Felt for Beginners: Complete Guide

Small felt plushies, like mine here, often make ideal first beginner projects. You can easily turn them into hanging ornaments, brooch pins, scented drawer bags, bag clips, unique keychains and more.
Start Making Cute Felt Items Today!
There's a lot of information on this page - not to overwhelm you but to provide you with all the information that you really need to get started. I wish I'd had a complete newbie guide like this when I began making felt plushies many years ago.
✔ Read through this page carefully, once.
✔ Make a note of any items you will need for this craft as you go through.
✔ Come back to the top to learn or refresh your skills on the essential beginner stitch.
✔Get stuck in and have a go at making my beginner felt plush tutorial. This is a great practice piece to start with.
✔ Enjoy your new confidence at starting to sew cute plush felt projects.
✔ Bookmark my CraftyMarie site now for future inspiration, tips, tutorials and help.

I highly recommend that you work through and make my beginner practice piece tutorial because I have designed it especially for the absolute newbie.
It makes sense to work in order through my recommended tutorials before diving in too soon with projects that are too difficult. I can save you from getting disappointed with the results which often happens when people start in the wrong place. Now let's get to it.
Table of Contents
- Beginner Stitch for Making Plushies
- Rundown of What You Need to Start Making Felt Plushies
- More Useful Stitches for Sewing Plushies by Hand
- DIY Felt Plushie Tutorial for Beginners
- What to Make With Your Plushies
1: Beginner Stitch for Making Plushies

This felt apple detail has been added purely using the basic running stitch in a few carefully chosen thread colors.
One massive myth about getting started with making felt items is that you will need to know lots of different hand stitches. That is simply not true. It doesn’t matter whether you are sewing flat felt items or plush ones, you don’t need to know loads of stitches or be some kind of embroidery expert.
In fact, there is only one stitch that you actually need to master. That is the very easy running stitch. You may know this by its other name which is straight stitch. It is the most basic hand stitch and one of the most useful too.
📘 You may already know (or at least think you know) how to sew running stitch. However, I'd still recommend that you revisit the running stitch because you can learn such a lot from reading through it including what the stitch is used for. LEARN and relearn the running stitch here.
Any other stitch that you use with your felt sewing is entirely optional. Felt is an easy fabric to work with since the edges do not fray as most fabrics do.
The wonder of felt fabric means you do not need to hem any edges and nor do you need to learn any overcasting stitches which are often used on raw edges to prevent fraying.
2: Rundown of What You Need to Start Making Felt Plushies

Listed here in this beginner guide are the absolute basics of what you will need to make felt plushies. There are many other hand sewing tools, equipment, supplies and items which you will find useful along the way but let's start with the essentials.
I'll make it easy for you as a newbie and stick to the absolute minimum of equipment and tools that you need in order to get started.
The Absolute Basics You Will Need:
- Felt sheets in a selection of colors
- Fiber fill polyester stuffing - for making plushies
- Embroidery needles
- Threads for sewing with
- Scissors
1: Felt Sheets in a Selection of Colors

To get started with making your very first felt plushies, getting yourself an assorted bundle of colored felt sheets is a great idea. There is nothing worse than starting out and not having any suitable colors to make your first items with.
I like to have a range of felt fabric to work with, from the less expensive and stiffer acrylic felts to the softer wool blend felt sheets which are more expensive. I do not normally use 100% wool felt because it costs a lot more and I actually don't particularly like the texture of it for sewing.
⭐ As a beginner, I recommend that you buy some cheaper craft felt sheets in either acrylic (please read the reviews if buying online) or a wool blend. Grab a bundle of assorted colors which will make your initial projects much easier. And look for approx 8 x 12 inch sheets which are good sizes for you to start with.
I have bought felt fabric from many places online including Etsy, Amazon and eBay. Now I try and support my local craft stores if I can instead. Plus it is easier to pick out my felt by feeling what the texture and thickness is like rather than buying online.
2: Fiber Fill Polyester Stuffing
If you want to make filled felt shapes (instead of flat ones) you will need some polyester filling, also known as fiber fill. Fiber fill is the same type of filling that is often used for stuffing plush toys. It works brilliantly.There are other types of filling and stuffing that you can use but, for the beginner, I would really recommend sticking with polyester filling because it is inexpensive and easy to use.
Filled felt shapes include items like plush toys, pincushions, handmade pillows, hanging ornaments and stuffed felt pin brooches.
3: Embroidery Needles
If you don’t have any already, you’ll need a selection of embroidery needles. Some of mine are quite old now but they can and do last for years so long as you store them well.My sewing needles are stored in a soft felt needle case. You could even make one of these for yourself as an easy project for your new hobby.
4: Threads for Sewing Felt Plushies

I use two main types of thread for sewing felt plushies. The first is polyester thread because it is very strong and durable which means it is hard to break easily.
This is ideal for sewing seams and anywhere that requires a stronger stitch. The strongest stitch you can sew by hand is backstitch and this is ideal for seams.
Strong and Durable Polyester Sewing Threads:
The polyester threads I always use are Gutermann - you need to be careful to choose polyester since they also make cotton threads. Cotton thread is lovely but not as tough so it snaps more easily.
Gutermann polyester threads come in a wide range of colors and sizes. For hand sewing, their smallest range of spools (normally 110 yards) should be more than sufficient to last a good while.
Soft and Beautiful Embroidery Floss:
For embroidery and more decorative features, I normally prefer to use embroidery floss. Although floss is much more prone to breakage than polyester threads, it is soft and really beautiful to stitch with.
Floss looks wonderful on the finished product too. You can get far better results with many embroidery stitches such as the French Knot which need more body.
Variegated embroidery floss is amazing. I adore these threads since they gradually change shade or color as you stitch. Used in moderation, they can make quite an ordinary project really have the wow factor.
Starting out as a beginner sewing plush items, you could just use whatever threads you already have to hand in order to keep costs to a minimum.
5: Scissors
A range of very sharp fabric cutting scissors comes in handy. I have various sizes from small to large dressmaking shears. And I only use my felt scissors for cutting felt - never paper which tends to dull the blades much faster.The small, sharp pointed scissors, like embroidery scissors, are useful for very small, detailed and precise cutting.
The much larger dressmaking shears are great for cutting out larger pieces of felt quickly and accurately.
3: Other Useful Stitches for Sewing Plushies by Hand

Most people who sew by hand have a preferred stitch that they love to do. Mine is blanket stitch. I absolutely love blanket stitch and you will see examples of it on many of my own handmade felt items.
I mostly use blanket stitch to join edges of felt together. I just love how the stitch looks even though I could just use a straight running stitch and I’d be able to finish the item a whole lot quicker.
⭐ It’s actually much better to be able to sew a few stitches really well rather than trying to learn too many and not really mastering any of them at all.
The French knot can be a useful embroidery stitch to know since you can use that one to make the tiniest eyes on any miniature animals and creatures that you are making.
The French knot also happens to make good suggestions for little rose flowers too when adding in some small embroidery detail. It’s purely a decorative stitch and it isn’t one that you have to know. But you may find it useful to learn in time.
Here are the stitches that I recommend that you learn when you have time. But always start with getting the running stitch down to perfection first.
Useful First Stitches for Making Felt Plushies
✔ Stitches for Joining Edges: Straight Running Stitch | Blanket Stitch | Whip Stitch | Backstitch✔ Stitches for Outlines: Straight Running Stitch | Backstitch | Stem Stitch
✔ Stitches for Felt Applique: Straight Running Stitch | Backstitch | Blanket Stitch
✔ Decorative Embroidery Stitches: French Knots | Chain Stitch | Blanket Stitch
It is easiest to start first and practice stitches on flat pieces of felt. Perhaps pretend that you are playing with Fuzzy Felt shapes.
Using a small square (say 6 x 6 or 7 x 7 inches) as a background, practice cutting out some felt shapes and sewing them on top with different stitches. Sewing one piece of felt on top of a larger piece is known as felt applique.
You could make a scene of your choosing like building up an animal or make a purely abstract piece of art. Either way, you’ll get a feel for what stitches you like as well as what looks good – and what doesn’t.
When you know that you’re ready to move on to making your first plushie, then it is time for you to check out my beginner tutorial which is waiting below.
4: DIY Felt Plushie Tutorial for Beginners

I'm going to start with a super easy practice tutorial for making a beginner felt plush. It is easy because it uses only a few small pieces of felt and just one simple running stitch.
This mini felt house plush is a very simple sewing project. I've designed it with the absolute beginner in mind and it is a great piece to learn with. When you discover more stitches, you'll be able to make even more impressive miniature houses.
You can find a more detailed tutorial to make this beginner felt house HERE
Turn it into a hanging ornament very simply by sewing a loop of ribbon or cord on the back when done. Alternatively, make it into a scented drawer sachet by popping a bag of dried herbs inside.
Step 1: Drawing Your House Shapes on to Felt

Draw out a very simple house shape onto a piece of card. You don't want a huge project to start out with because it would take too much sewing and filling for your first attempt. So keep the size under 6 inches tall for a reasonable first felt plush project.
I just drew a very quick house with a pointed roof. So a rough rectangle shape with a triangle right on top. Does it need to be straight? Not at all. Your house can be cute and quirky. After all, Medieval houses were never known to be perfectly straight.
⭐ Alternatively, find a simple house pattern or shape online, print it off and then transfer the pattern onto felt and cut it out.
Trace around this shape twice onto felt and cut it out. You can use a water soluble fabric marker to trace around the shape onto felt. You can also use a ballpoint pen on the reverse of the felt.
Learn all about Fabric Markers for Felt HERE
Learn About Drawing and Tracing Patterns onto Felt HERE
For the color of the house, I used a pale cream felt fabric. You can choose a different color if you prefer. I made another in pink. Pick colors that you love to make your design unique.
Step 2: Adding in Roof and Door Details

On one piece of the felt (what we'll call the front piece) you need to stitch some details for your plush home.
Using the card template I made in step 1, I cut a triangle roof from some blue patterned fabric. I sewed this on using running stitch just across the bottom side. The top sides will get sewn when we sew the plushie up.
I cut out a little door shape from blue felt and sew this on. The door and the roof are the absolute basics of your mini home. Next we'll add some extras to make it more unique and special.
Step 3: Sewing on Some Cute Extras for Your Felt Home

You can see I've added in some extra detail here. Mini felt homes are made special by the unique things that you add to them.
I added a round window, a heart button door knob and a flower button with stem and leaf detail just sewn with the simple running stitch in green.
Why not think about what little details you want to add to the front of your own felt plush. Perhaps you want to add on some beads, some trim or some features that are meaningful to you. Have a go at making your own designs.
Step 4: Stitch Round the Sides of the Design

When you are done with the detail on the front of your felt plush, pin the back of your felt house shape onto the front. Try and match the sides up neatly before pinning.
With both front and back pieces of felt pinned, you can now sew around the sides - except for the bottom edge. The bottom must be left open for stuffing it with fiber fill.
I suggest starting from the bottom left or right and sewing up one side, over the roof and down the other side.
You only need to use a running stitch around the sides. To keep the stitches looking neat, try to keep an equal spacing from the edge of the felt.
Step 5: Fill Your Plush With Fiber Fill Stuffing

When you've sewn around all the sides except for the bottom, you can start to stuff the plush home with fiber fill.
Break off small pieces of fiber fill and push them right to the end of your little plush house. You may need to use your fingers or even a pencil to push the fiber into the corners to plump them out properly.
A typical beginner mistake is not adding in enough fiber fill to your plushie. You normally need a lot more than you think you do. Push it in firmly but not so hard as to break your stitching.
Step 6: Your Very First Beginner Plush

When you have filled your plushie up enough, you can sew along the bottom edge to complete the design and keep all the stuffing securely inside.
Get a More Detailed Tutorial to Make a Felt House HERE
Now See How to Make a Cute Little Bird Plush
Enjoy your very first hand sewn plush and feel proud of what you've just made. This is just the start. You can now begin to create even more wonderful creations once your confidence and sewing skills improve.
5: What to Make With Your Plushies
When most people think of plushies, they just think of handmade toys like dolls and cute animals. But plushies can be so much more than that. They can be just as functional as they are decorative.Some Ideas on What You Can Make:
- Hanging ornaments for Christmas trees and stands
- Wall hanging textile art
- Special scented drawer sachets and bags
- Unique plush pillows: match to room schemes
- Pincushions and pin keeps
- Plush felt brooches
- Keychains
- Mini bag clips
- Dolls and dollhouses
- Fairy homes and miniature felt houses
- Stuffed toys
- Felt animals
- Stuffie monsters
- Hair clips and clippies
My own specialty is miniature felt houses. I just love designing and creating all kinds of magical themed fairy homes. You will discover what you really love to make in time.
You can adapt most plush designs so that they hold a scented sachet to make a cute scented drawer liner. It is also easy to sew on some ribbon or cord to make a hanging ornament.
When you've completed this beginner plush project, come back to look for more beginner projects that you can work on. Enjoy your new skill at sewing with felt.
Related Content You Should Also Love:
How to Sew an Easy Felt House
Beginner Project: Sew an Easy Felt Pincushion
Hand Sewing Tools and Their Uses
Make a Felt Bird Ornament Tutorial
More Felt Sewing Crafts
Beginner Project: Sew an Easy Felt Pincushion
Hand Sewing Tools and Their Uses
Make a Felt Bird Ornament Tutorial
More Felt Sewing Crafts
Page Last Updated:


Comments
Post a Comment
CraftyMarie is a craft themed website by Marie Williams Johnstone. I love to craft in the winter and garden in the summer. I make handmade cards, papercrafts, crochet and seasonal crafts. I enjoy many of the more traditional crafts and hobbies including sewing, embroidery and working with felt and fabric. Thanks for leaving me a comment. Comments do not show up until I approve them. Marie