Easy Rainbow Loom Bracelets with Beads Tutorial
Apart from some beads and some of the stretchy colorful bands, you'll just need 2 pegs on any loom board. This means that you can use the mini MonsterTail, the standard Rainbow loom board or even just two prongs on a fork or a couple of pencils if you don't yet have any equipment.
The easiest version of making this beaded design is to use the same color of loom bands through the whole pattern and just change the color of the beads up instead. I show you how to make two alternating colors with this step by step photo tutorial but you can choose the style you want. Either way, these finished bracelets look fantastically cool.
Easy Rainbow Loom Bracelets with Beads Photo Tutorial and Detailed Instructions

Note: This post may contain affiliate links for which I can be compensated.
Materials and Tools:
- 48 Rainbow loom rubber bands in 2 colors: 24 of each color
- 19 Fused Perler Beads (you can get an equivalent brand of Hama beads at amazon.uk) or try out the larger pony beads instead
- A hook, optional
- A C clip or S clip to close off and secure the bracelet ends
- Any loom board: Rainbow or the Monster Tail loom
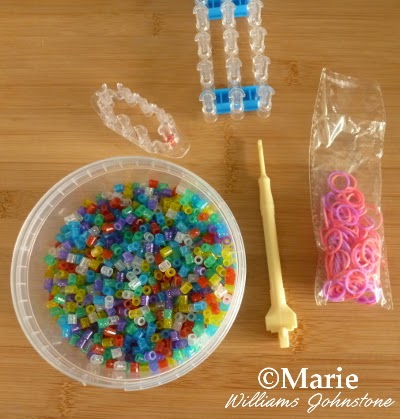
Step 1: This photo gives you a clear idea of what you will need for this easy beaded rubber band bracelet pattern tutorial. Any loom board will do so long as it has 2 pegs. You will use 2 outer pegs on a standard Rainbow loom board. Then you will also need a selection of bands and some beads.
I'm using the regular size Perler beads as listed in the materials above because we love to do Perler bead crafts too. You can use Hama or a similar alternative brand because these work well alongside the loom bands and they have a wide enough hole or opening for the bands to slip through. You may already have some appropriate beads in your stash.
You can also try out the larger style Pony Beads (also at amazon.co.uk) which will give quite a different look with much more prominent beading on show. You might need to put less beads on with this particular style. Whatever beads you use, be aware that the opening or hole needs to be wide enough to push the bands through successfully.
I've gone with a total of 48 bands for this design. This is enough to fit a very petite adult wrist or a child's wrist. You might need to adjust for more or less loom bands depending on how small or big the bracelet with beads needs to be.
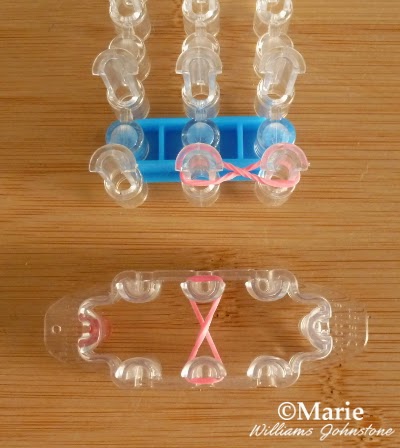
Step 2: Your first pattern step is to place a band (let's call this color A) into a figure of 8 shape over the 2 pegs. You can see this in the photo directly above.
You make this figure of 8 shape by placing one end of the band across one peg, twisting it in the middle and then stretching it over the second peg.
You need to work the first 4-6 bands of this design without adding any beads in order to keep the finished design nice and neat. I've tried and tested a number of combinations and that's my opinion after making plenty and seeing how they fit. I'm using 2 different colors of rubber bands for this tutorial but you could use just one color if you want to keep it even easier.
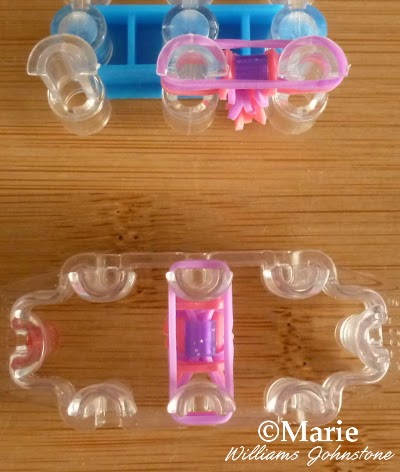
If you are using the MonsterTail: you need to use the middle 2 pegs on this loom board. You can see this mini board at the bottom of the photo above. The bracelet will form inside the middle of the loom.
If you are using a Rainbow or similar loom: you need to use two end or side pegs. My photos show this at the top of each picture. The bracelet will form on the outside of the loom.

Step 3: Using the same color band (Color A) stretch this one straight over the same two pegs. There is no twist here, just place it over from one peg to another.

Step 4: If you want to change to a different color choice of band, this is where you do it. Otherwise just use the same shade throughout the whole pattern. With your next band (Color B) just stretch it straight over the top of the two pegs. You now have a total of 3 bands on the loom.

Step 5: If you have a hook like the official Rainbow Loom Hook, you may want to use it here since it can be easier than fingers.
Get hold of the very bottom band (Color A) on the outside edge of one of the pegs and stretch it up and over the other two bands, over the top of the peg and into the middle section between the pegs. This is indicated in the photo above.
You need to repeat this with the bottom band on the other peg. When you've done this, you'll have one band sitting in the middle and two bands left on the pegs.
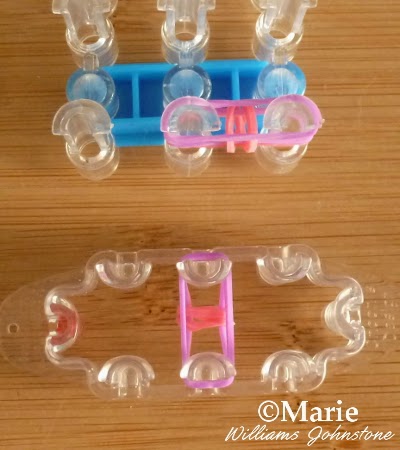
Step 6: With Color B (if you're alternating your colors) stretch it over the two pegs. You now have 3 bands over the pegs.

Step 7: Get hold of the bottom band (Color A) on one of the pegs and stretch it up and over the other rubber bands, over the top of the peg and into the middle section between the two pegs - this movement is indicated in the photo above. You need to repeat this same movement with the bottom band on the second peg.
Now repeat steps 6 and 7 two times more with a rubber band in Color A. Now you've got a total of six bands worked into the pattern which makes it long enough for you to start working some beads into the design.

Step 8: Now comes the fun part. You can choose to add beads on the bands as you go along but I prefer to add them onto bands first and make a pile to work from.
You'll notice with the Perler beads that the rubber bands only just fit through the opening. It helps to pinch one end of a band before squeezing it through the hole and pushing the bead into the middle. Actually, since it is a snug fit, the beads don't easily fall off again which is a bonus. I really like using glitter beads because they look especially pretty but there are lots of kinds of Perler Beads to choose from.
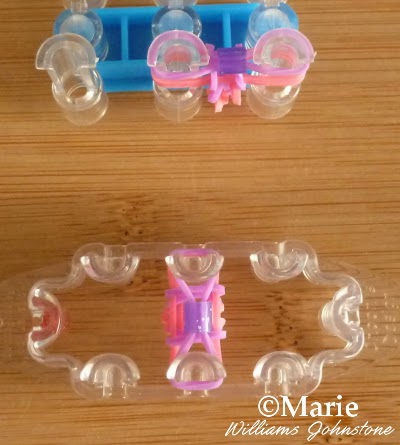
Step 9: Choose a band in Color B (if your alternating the rubber band colors) and pop a bead on if you haven't already. Move the bead into the middle and stretch one end over one of the pegs and the other end over the other.
You just need to take care that the Perler bead doesn't get pushed off in the process - and for bigger hands and fingers, this can be fiddly.

Step 10: Now get hold of the band right at the bottom of one of the pegs (Color A) and stretch it up and over the other two bands and over the top of the peg. Place it next to the side of the bead in the middle as indicated in the photo above.
Repeat the process with the band on the very bottom of the opposite peg and pull that over the other two bands and the top of the peg to sit it next to the Perler bead. This will make an edging on either side of the beads when your bracelet is finished.
Step 11: Choose a band in Color B (do not put a bead on this one) and stretch this over the two pegs. Now you have 3 bands stretched over the pegs.
Now repeat steps 9 to 11, following the pattern with your choice of colors, until you have approximately 19 beads added to your bracelet. As mentioned previously, you might want to adjust this depending on the size of your own wrist or the wrist of whoever is wearing the finished loom bracelet.
Next add on another 4-6 bands without any beads but working to the same pattern. The pattern is in steps 6 and 7 if you are having trouble remembering it.
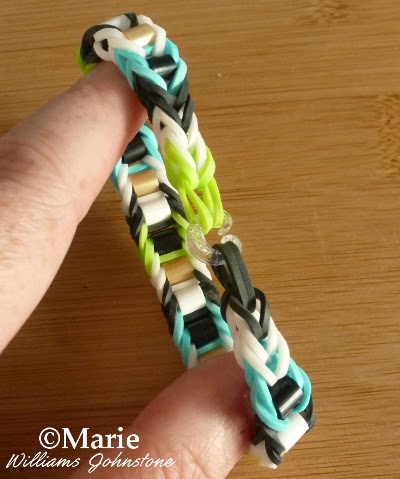
Step 12: Now you just repeat step 7 which is essentially just hooking over the bottom band over the other bands (you don't add on any new bands at this point) until you have just one rubber band left stretched over the loom.
You now need a clip to secure the ends of your bracelet design. You can use a C clip or an S clip or clasp. These can be purchased individually if you don't have any. Alternatively, tie through a rubber band and knot it closed instead. Slip the clip through the band stretched over one of the pegs and, once on the clip, remove the band from the peg. Now attach the clip to the band on the opposite peg.
You can now remove your bracelet from the loom. Hook the other end of the bracelet into the clip. I hope you've enjoyed reading my CraftyMarie article today and that it has helped you. Thanks for your visit and do enjoy your new fun piece of jewelry to wear.
Related Content You Should Also Love:
Make a Fishtail Pattern With a Loom
More Crafts for Kids and Adults
Maleficent Bands Bracelet with Charm
Page Last Updated:


Comments
Post a Comment
CraftyMarie is a craft themed website by Marie Williams Johnstone. I love to craft in the winter and garden in the summer. I make handmade cards, papercrafts, crochet and seasonal crafts. I enjoy many of the more traditional crafts and hobbies including sewing, embroidery and working with felt and fabric. Thanks for leaving me a comment. Comments do not show up until I approve them. Marie