How to Make a Tulle Wreath Step by Step
Tulle wreaths are fun and easy enough to make yourself for indoor party and occasion decorations. I'll be showing you exactly how to make a tulle wreath step by step with lots of photos included so you can follow along.
The advantage of making your own DIY tulle wreath is that you get to choose what your final design will look like. You can decide whether you want this to be large or small, what colors you want to use and even what shape because wreaths don't have to be circular in design.
I made this tulle wreath design for my daughter's birthday party and it has a simple base made from cardboard. I choose to use thick cardboard because that's what I had to hand. You can also buy or make a base and this will work with this tutorial as well.
Note: This post may contain affiliate links for which I can be compensated.

A cardboard, wire or styrofoam wreath base will all work with the same technique that I'm going to show you in this craft tutorial
What You Will Need for This Project
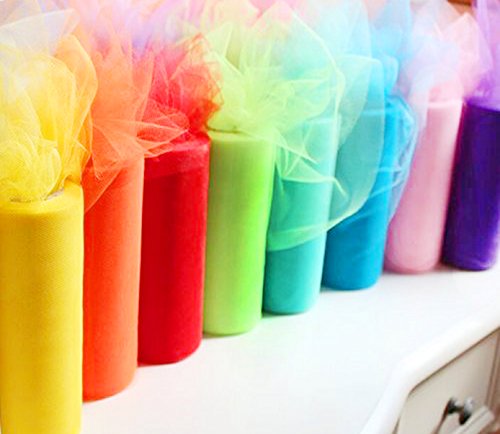
I ended up using 3 colors of tulle in shades of lavender, pale pink and gold along with some additional pink sparkly fabric remnants that also worked well too.


This netting fabric is fine for your indoor decorations and also to use outdoors during a dry day. It is not ideal to leave it out overnight or in damp or wet weather.
For outdoor decorations you should use a wire wreath base along with Deco mesh instead which is more suitable. I've used a cardboard base and tulle since this is an indoor adornment.
I love to recycle and use items that I have already before spending money buying up any new materials, so I made the base from thick cardboard courtesy of a large Amazon box.
I also cut up some of my daughter's old dressing-up costumes and recycled the netting from those. The other pieces of netting were part of my existing fabric stash.
You can also buy Tulle material in 3 inch, 6 inch widths and large bolts ready to cut up and use. Just because I use 2 inch widths doesn't mean you have to.
You can buy tulle netting on a spool and just cut off lengths to use in your project. This may result in a thicker and more padded looking finish.

Step 1: You can choose to either make or buy a base. Since this was for an indoor decoration and one that will not get wet, I opted for cardboard which I know works perfectly well and I made use of a very large Amazon box which is a great thickness.
Draw out a circle shape on to the cardboard and make it as large as you want the base of your finished wreath to be. I drew around the largest bowl we had which gave me the size I wanted. You could draw it freehand, use a compass or draw around a plate or a round tray. Cut the circle out.

Step 2: Now draw another circle on the inside of the cardboard about 2-3 inches away from the edge. I just did this freehand as it does not need to be exact. Then cut this middle section out using scissors or a craft knife.
If you need the cardboard to be sturdier, just stick together a few layers which will give you a really strong base to use. And it should last for a number of years too.

Step 3: You will need a lot of strips of tulle netting in 2-5 different colors and all about 2 inches wide and a minimum of 15 inches tall - you may want longer strips depending on the look you're going for.
I suggest testing out tying a strip on to your base first to decide how long you want it before cutting all of your your strips to size. You may also choose to just stick with the width of this fabric as taken directly from a spool.
You can see that my strips are not particularly neat since they really don't need to be and they are not exact in terms of sizing. You don't need to be a perfectionist to get a great looking finished product - you'll really just waste time when you could be making other decorations and items.

Step 4: Once you have some strips cut ready (I can't tell you how many since it will vary greatly on how large your base or frame is and how full and thick you want it all to look) you can start tying them on.
Some people knot the strips on but I prefer a simple wrap technique which works as follows. Fold the strip in half. Pass the folded mid-section of your strip underneath the left side of the cardboard base as shown before moving to the next step.

Step 5: Take hold of the folded mid-section and pass the two ends of the tulle strip over the cardboard base and push them through the free space in the middle of the strip on the other side.
So you are taking the left ends of the netting strip and passing them through the space made by the shape of the strip on the right.

Step 6: Gently tug the ends of your strip up and over to the left side. Pull firmly to make a secure tie with the strip around the base. Carry on working on the left, pulling the base down towards you as you add on more strips of netting.

Step 7: To get my colors on fairly evenly, I like to place one color of strip on first all around the frame - leaving evenly spaced gaps between each one as shown. This means you get a nice even spread of color around the base.

Step 8: Then I add a second color of netting strips next to the original color - so in this case I add in a lavender purple shade.

Step 9: Next add in a third color which in my case is pink.

Step 10: And lastly I added on some strips in a pale sparkle pink. If there are still any gaps showing around the base, you'll need to add in more strips to cover those before moving on.
The whole cardboard base should be well covered and you should not be able to see the cardboard or the base of your frame at all once done.

Step 11: I chose some pink cord to tie on as a length for hanging the finished wreath up. This was placed where I wanted the top of the decoration to be.

Step 12: Next I used a glue gun to fix on some pom poms made using the same fabric which are made from my tulle pom pom craft tutorial. You can glue on any other decorative elements that you like such as a yarn pom pom as well.

Step 13: I also added on a matching little tulle pom pom onto the top of the hanging cord.

Step 14: I tied a hanging decorative frame tied on at the back of the wreath, you'll see this has the number 7 which is how old my daughter was on this particular birthday.
I planned this as something I could cut off after the event and then pop on a new one for her next birthday. That way I can re-use the decoration every year.

Step 15: Here you can see the hanging chipboard number as seen from the front with a bow to finish it off. If you enjoy making wreaths, once you realize that they're really not as hard as you thought to create, you might want to take this craft further by purchasing some better quality materials.
You can get a sturdy hanger for display on a door, wire or styrofoam bases to wrap your designs onto and a book which teaches you how to make them from deco mesh which is a material that is suitable for outdoor use too. Have fun learning to make these decorations for any occasion.
Related Content You Should Also Love
Page Last Updated:
The advantage of making your own DIY tulle wreath is that you get to choose what your final design will look like. You can decide whether you want this to be large or small, what colors you want to use and even what shape because wreaths don't have to be circular in design.
I made this tulle wreath design for my daughter's birthday party and it has a simple base made from cardboard. I choose to use thick cardboard because that's what I had to hand. You can also buy or make a base and this will work with this tutorial as well.
Note: This post may contain affiliate links for which I can be compensated.
How to Make a Tulle Wreath With Step by Step Photo Instructions
You don't need any special or expensive tools to make a tulle wreath. They are also quick for you to make once you know how it is done.A cardboard, wire or styrofoam wreath base will all work with the same technique that I'm going to show you in this craft tutorial
What You Will Need for This Project
- Twine, cord or ribbon to hang up the completed design
- Tulle netting in a selection of 2-5 colors with strips approx 2 inches wide by 15 inches long
- Some thick cardboard or a wreath base made from wire or styrofoam
- Embellishments: I used pom poms and ribbon
- Scissors
- Glue gun or a strong adhesive
I ended up using 3 colors of tulle in shades of lavender, pale pink and gold along with some additional pink sparkly fabric remnants that also worked well too.

This netting fabric is fine for your indoor decorations and also to use outdoors during a dry day. It is not ideal to leave it out overnight or in damp or wet weather.
For outdoor decorations you should use a wire wreath base along with Deco mesh instead which is more suitable. I've used a cardboard base and tulle since this is an indoor adornment.
I love to recycle and use items that I have already before spending money buying up any new materials, so I made the base from thick cardboard courtesy of a large Amazon box.
I also cut up some of my daughter's old dressing-up costumes and recycled the netting from those. The other pieces of netting were part of my existing fabric stash.
Tutorial on How to Make a Tulle Wreath with Step by Step Photo Instructions
Tulle is ideal as a fabric for this since it holds a shape quite well whereas a lot of fabrics will just hang limply off your completed design.You can also buy Tulle material in 3 inch, 6 inch widths and large bolts ready to cut up and use. Just because I use 2 inch widths doesn't mean you have to.
You can buy tulle netting on a spool and just cut off lengths to use in your project. This may result in a thicker and more padded looking finish.
Step 1: You can choose to either make or buy a base. Since this was for an indoor decoration and one that will not get wet, I opted for cardboard which I know works perfectly well and I made use of a very large Amazon box which is a great thickness.
Draw out a circle shape on to the cardboard and make it as large as you want the base of your finished wreath to be. I drew around the largest bowl we had which gave me the size I wanted. You could draw it freehand, use a compass or draw around a plate or a round tray. Cut the circle out.
Step 2: Now draw another circle on the inside of the cardboard about 2-3 inches away from the edge. I just did this freehand as it does not need to be exact. Then cut this middle section out using scissors or a craft knife.
If you need the cardboard to be sturdier, just stick together a few layers which will give you a really strong base to use. And it should last for a number of years too.
Step 3: You will need a lot of strips of tulle netting in 2-5 different colors and all about 2 inches wide and a minimum of 15 inches tall - you may want longer strips depending on the look you're going for.
I suggest testing out tying a strip on to your base first to decide how long you want it before cutting all of your your strips to size. You may also choose to just stick with the width of this fabric as taken directly from a spool.
You can see that my strips are not particularly neat since they really don't need to be and they are not exact in terms of sizing. You don't need to be a perfectionist to get a great looking finished product - you'll really just waste time when you could be making other decorations and items.
Step 4: Once you have some strips cut ready (I can't tell you how many since it will vary greatly on how large your base or frame is and how full and thick you want it all to look) you can start tying them on.
Some people knot the strips on but I prefer a simple wrap technique which works as follows. Fold the strip in half. Pass the folded mid-section of your strip underneath the left side of the cardboard base as shown before moving to the next step.
Step 5: Take hold of the folded mid-section and pass the two ends of the tulle strip over the cardboard base and push them through the free space in the middle of the strip on the other side.
So you are taking the left ends of the netting strip and passing them through the space made by the shape of the strip on the right.
Step 6: Gently tug the ends of your strip up and over to the left side. Pull firmly to make a secure tie with the strip around the base. Carry on working on the left, pulling the base down towards you as you add on more strips of netting.
Step 7: To get my colors on fairly evenly, I like to place one color of strip on first all around the frame - leaving evenly spaced gaps between each one as shown. This means you get a nice even spread of color around the base.
Step 8: Then I add a second color of netting strips next to the original color - so in this case I add in a lavender purple shade.
Step 9: Next add in a third color which in my case is pink.
Step 10: And lastly I added on some strips in a pale sparkle pink. If there are still any gaps showing around the base, you'll need to add in more strips to cover those before moving on.
The whole cardboard base should be well covered and you should not be able to see the cardboard or the base of your frame at all once done.
Step 11: I chose some pink cord to tie on as a length for hanging the finished wreath up. This was placed where I wanted the top of the decoration to be.
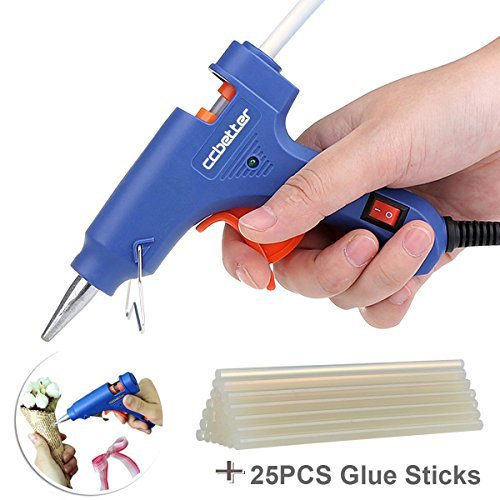

Step 12: Next I used a glue gun to fix on some pom poms made using the same fabric which are made from my tulle pom pom craft tutorial. You can glue on any other decorative elements that you like such as a yarn pom pom as well.
Step 13: I also added on a matching little tulle pom pom onto the top of the hanging cord.
Step 14: I tied a hanging decorative frame tied on at the back of the wreath, you'll see this has the number 7 which is how old my daughter was on this particular birthday.
I planned this as something I could cut off after the event and then pop on a new one for her next birthday. That way I can re-use the decoration every year.
Step 15: Here you can see the hanging chipboard number as seen from the front with a bow to finish it off. If you enjoy making wreaths, once you realize that they're really not as hard as you thought to create, you might want to take this craft further by purchasing some better quality materials.
You can get a sturdy hanger for display on a door, wire or styrofoam bases to wrap your designs onto and a book which teaches you how to make them from deco mesh which is a material that is suitable for outdoor use too. Have fun learning to make these decorations for any occasion.
Related Content You Should Also Love
How you Tie Tulle onto a Wreath Ring
How to Make Your Own Cardboard Wreath Form or Base
How to Make Tulle Pom Poms
Turn a Wire Hanger into a DIY Wreath Form
Summer Birthday Party Hand Made Decorations
How to Make Your Own Cardboard Wreath Form or Base
How to Make Tulle Pom Poms
Turn a Wire Hanger into a DIY Wreath Form
Summer Birthday Party Hand Made Decorations
Page Last Updated:


Comments
Post a Comment
CraftyMarie is a craft themed website by Marie Williams Johnstone. I love to craft in the winter and garden in the summer. I make handmade cards, papercrafts, crochet and seasonal crafts. I enjoy many of the more traditional crafts and hobbies including sewing, embroidery and working with felt and fabric. Thanks for leaving me a comment. Comments do not show up until I approve them. Marie