Double Fishtail Loom Band Tutorial Monster Tail

The Monster Tail rubber band loom board is a small device, some people call it a mini loom for that reason, and it's designed for creating all kinds of really cool looking fishtail pattern bracelets and other fun items.
This double fishtail loom band tutorial is a pretty easy, beginner design pattern. It is great to get started with if you've never make a stretchy band bracelet before. In fact, this is the one pattern that should have been included, but wasn't, in the instruction manual.
This photo tutorial provides clear and step by step instructions on how you can make a really cool looking, alternating color rubber band bracelet on the Monster Tail. And, because it only uses just two pegs, you can also work this pattern on either your fingers or on another style of Rainbow Loom board.
Note: This post contains affiliate links for which I may be compensated.
Fun Double Fishtail Loom Band Tutorial for the Monster Tail Loom
Materials and Tools Needed:
- A selection of rubber loom bands in 2 colors
- A Monster Tail Mini Loom (Review of this loom here on CraftyMarie)
- The Monster Tail Hook which included in the loom set above
- A C or S clip to fasten the ends of the bracelet

Step 1: For this tutorial, I recommend that you stick to using just two different colors while you learn how to work up this pattern. When you know the design off by heart, you can add in more colors easily without getting confused.
You'll need around 40 rubber bands altogether with 20 in one color and 20 in another. This amount will make up a bracelet that can fit an older child and a small wrist size adult. You can vary the number to suit your own requirements.

Step 2: Working this design is faster if you separate the colors into two piles to pick from as you create your bracelet. Or you may already have them organized in a box with separate compartments which is a great idea when you do a lot of this craft.
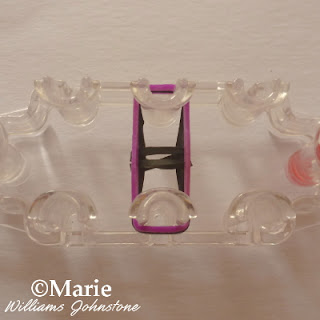
With your first color (Color A) place it over one of the middle pegs on the loom, twist it in the middle and then place it on the peg opposite as shown in the photo. This makes a figure of 8 shape. Now push the band down so you can make room for the next one.

Step 3: With your second choice of color (Color B) stretch the band right across the same two central pegs as before but this time do not make a twist in the middle. You just stretch the band over to make a rectangle shape. Now move the bands down a little to make way for the next.

Step 4: Pick up a band in Color A and stretch this over the same middle pegs just exactly in the same way as you did back in step 3 with no twist. There are now three bands across the middle of your Monster loom.

Step 5: You can use your fingers but you’ll probably find it easier to use the hook to take hold of the very bottom band on the outside edge of one of the pegs (this should be Color A) and use the hook to pull it up and over the other two bands.

Step 6: Pull the band from step 5, right over the peg and into the very middle of the Monster loom as shown in the photo above.* You then need to repeat step 5 and 6 up to the asterisk symbol (*) with the opposite peg.
You should now have the very first band that you placed on the Monster Tail positioned in the center of the design being worked. You might want to just push the bands down a little on the pegs before moving on to the next step.

Step 7: Pick up a band in Color B and just stretch it over the same central pegs in the plain rectangle shape.

Step 8: Exactly as you did before, take hold of your hook and get hold of the band right at the bottom of one of the pegs. Pull this band up and over the other two bands on the outside of the peg and place it in the middle of your design. Repeat this process on the opposite side.

Step 9: All you are really doing now is repeating this design process from step 4 – step 8 and you’ll start to see this alternating double fishtail pattern start to form down the middle of your Monster loom. You can see what that looks like in this photo here taken from underneath.

Step 10: Simply continue working this pattern until the design becomes large enough to make a bracelet – or whatever you wanted to make. For reference, I need approx 40 bands to fit around my very petite adult wrist. My almost 8 year old needed approx 28.
If you are unsure, try wrapping it around the wrist while it is still attached to the loom. It will stretch quite a bit so bear in mind that your finished version will have some elasticity to it.

Step 11: When you think the pattern is large enough then work through these steps as follows to finish it off.
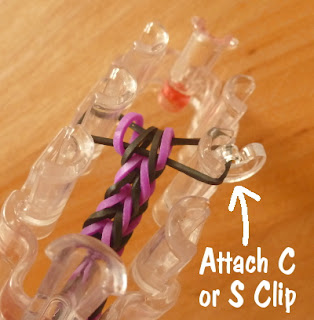
All you need to do is keep pulling up the band right at the bottom and into the middle but (very important) do not add on any new bands as you would normally. Instead work until there is just one band left stretched over the pegs as shown in the photo.
Now you need to get hold of a C clip or an S clip to secure the ends. I prefer a C clip because they are easier to use. Attach a clip to a band on one side of the loom as shown.

Step 12: Now you have one side of the band attached to a clip, pull this side right off the peg and move it over to the opposite side to the band on the peg there. You need to pop this band onto your clip too. Now you can remove the whole design from the MonsterTail board.

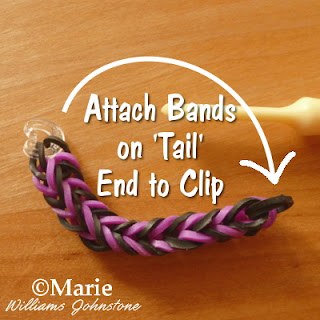
Step 13: You can see in this photo how you now have one end of the bracelet secured to a C clip so it cannot unravel or come apart. The other end needs to be attached to the clip as well. Carefully get hold of these ends and push them through the opening on the clip.

Step 14: You can clearly see the alternating colors of black and magenta in this small bracelet design here. This pattern works really well with two contrasting colors. However, once you know this design off by heart, you can use other combinations too.
Adults and kids can both enjoy this craft which makes it ideal as more of a family activity. When you've got the hang of how to make this particular design, give it a go with more than 2 colors and maybe even a whole rainbow of shades for a really fun look.
Related Content You Should Also Love:
Make a Double Fishtail Rubber Band Bracelet Without a Loom
Rubber Band Bracelet with Beads Tutorial
The Monster Tail Rainbow Loom
Make a Maleficent Loom Bracelet Design with Charm
More Crafts for Kids and Adults
Rubber Band Bracelet with Beads Tutorial
The Monster Tail Rainbow Loom
Make a Maleficent Loom Bracelet Design with Charm
More Crafts for Kids and Adults
Page Last Updated:


Comments
Post a Comment
CraftyMarie is a craft themed website by Marie Williams Johnstone. I love to craft in the winter and garden in the summer. I make handmade cards, papercrafts, crochet and seasonal crafts. I enjoy many of the more traditional crafts and hobbies including sewing, embroidery and working with felt and fabric. Thanks for leaving me a comment. Comments do not show up until I approve them. Marie