Popsicle Card Tutorial and Free Template
A fun paper craft project ideal for birthdays is to create a novel popsicle shaped card which is ideal to give out at any time of year and especially in the warmer summer months.
Included is a free printable popsicle card template that you can use by saving it first to your own computer and then printing it off. This fun photo tutorial will walk you through how to make up, decorate and embellish a cute shaped handmade card.
So, if you're stuck on a fun crafting activity or need something to do on a rainy day, come look at how you can make up this delicious, sweet iced treat. This is 'guaranteed' to be much better for you than the real thing.
Note: This post may contain affiliate links for which I can be compensated.

Materials and Tools Needed to Make this Popsicle Shaped Card

Image Credit: photo belongs to the author.
Step 1: unless you want to draw out your own design or use a cutting machine to make a template for you, you'll need to print out the free template pattern provided here, further down, on this page.
It's better to print this onto some cardstock if you can so you can then trace around it as many times as you need to.
I found some fun colored popsicle sticks to use in some hot summer shades as well as some cool looking scrapbook paper to match.
I like scrapbook paper with fun polka dots designs and iced treat motifs on them. Themes like this are just perfect for this paper craft project.

Image Credit: photo belongs to the author.
Step 2: you need a greetings card blank. Alternatively, you can fold or score and fold a piece of colored cardstock yourself to make your own.
Unfold the blank greetings card and lay it face up on the table or the surface before you.
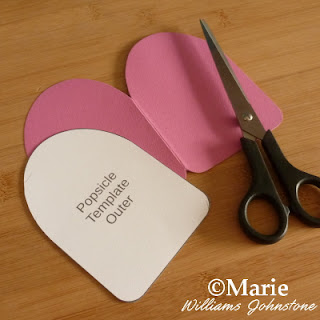
Now cut out the popsicle template which is the larger, outer section called popsicle template outer.
You need to place the left side of this outer template right up against the fold or crease that is running down the greetings card blank as shown. Now draw around it gently with a pencil.

Image Credit: photo belongs to the author.
Step 3: fold the greetings card blank back up and you should now be able to carefully cut around the pencil marks that you drew to reveal the popsicle shape.
Do take care not to cut down the folded crease of the card blank. If you open it back up again when you’ve finished cutting around it with scissors, it should look a bit like the one in the photo above.

Image Credit: photo belongs to the author.
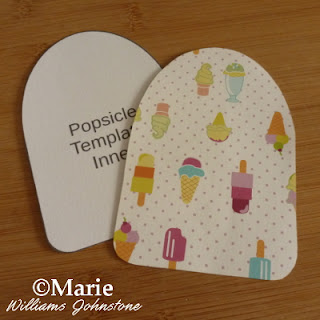
Step 4: now you can use the smaller template provided, the template inner, to draw around onto some patterned paper. Here's some fun suggestions for craft and summer scrapbook paper below. Look for hot and bright colors which work well for a summer theme like this one.
I found this really great summer scrapbook design which features polka dots and iced treats in bright and summery shades and colors.
Draw around the template and cut this paper out. It's going straight on the front of the card.

Image Credit: photo belongs to the author.
Step 5: the patterned paper will stick neatly on the front of the blank card front. I like to use double sided tape to stick down larger pieces of paper when making cards but you can use whatever type of adhesive that you're used to.
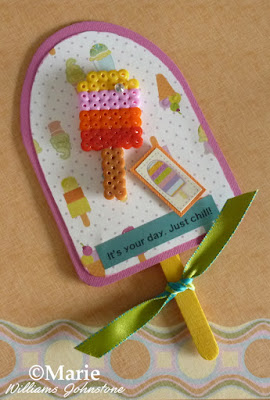
I stuck one of my popsicle perler bead designs on the front. See the provided pattern tutorial for that by clicking on the link.

Image Credit: photo belongs to the author.
Dymo Machines at Amazon.com | Dymo Machines at Amazon.co.uk
Step 6: I really like my Dymo Letratag and find it useful not just for labeling things around the home but I also like to use it for adding short pieces of text and greetings onto handmade projects like this one.
I like the fact that you can get lots of different colors of tape to choose from as well. It's handy when you want to say your own thing.
I added in some text here on a metallic blue tape that reads: It's your day. Just chill!

Image Credit: photo belongs to the author.
Step 7: you can glue the wooden craft popsicle stick inside the almost finished card as shown or stick it right at the back. It's really just down to personal preference.
You could use some sticky glue dots, a little un-watered PVA or white glue or a hot glue gun.

Image Credit: photo belongs to the author.
Step 8: here's the finished design which has had a piece of colored ribbon tied around the stick and a sticker design added on to the front as well.
Have fun deciding how you are going to embellish and decorate yours. Don't forget to print the template below.
Image Credit: photo belongs to the author.
Note: This free popsicle card printable is for your personal use only. You are welcome to blog about how you've used this freebie along with your own photos providing that you include a link back to this page.
The template comes with a few greeting suggestions and sentiments that you can use as well. You can use this design for scrapbooking craft projects and not just card making. Have fun creating some cool designs.
Related Content You Should Also Love:
Page Last Updated:
Included is a free printable popsicle card template that you can use by saving it first to your own computer and then printing it off. This fun photo tutorial will walk you through how to make up, decorate and embellish a cute shaped handmade card.
So, if you're stuck on a fun crafting activity or need something to do on a rainy day, come look at how you can make up this delicious, sweet iced treat. This is 'guaranteed' to be much better for you than the real thing.
Note: This post may contain affiliate links for which I can be compensated.
Free Popsicle Card Template and Craft Tutorial

Materials and Tools Needed to Make this Popsicle Shaped Card
- Popsicle shaped card template (free template is provided on this page)
- A card blank or some cardstock to Make Your Own
- Some popsicle craft sticks (mine are 4.5 inches tall)
- Summer themed paper to decorate
- Chosen embellishments
- Glues/adhesive
- And scissors

Image Credit: photo belongs to the author.
Step 1: unless you want to draw out your own design or use a cutting machine to make a template for you, you'll need to print out the free template pattern provided here, further down, on this page.
It's better to print this onto some cardstock if you can so you can then trace around it as many times as you need to.
I found some fun colored popsicle sticks to use in some hot summer shades as well as some cool looking scrapbook paper to match.
I like scrapbook paper with fun polka dots designs and iced treat motifs on them. Themes like this are just perfect for this paper craft project.

Image Credit: photo belongs to the author.
Step 2: you need a greetings card blank. Alternatively, you can fold or score and fold a piece of colored cardstock yourself to make your own.
Unfold the blank greetings card and lay it face up on the table or the surface before you.
Now cut out the popsicle template which is the larger, outer section called popsicle template outer.
You need to place the left side of this outer template right up against the fold or crease that is running down the greetings card blank as shown. Now draw around it gently with a pencil.

Image Credit: photo belongs to the author.
Step 3: fold the greetings card blank back up and you should now be able to carefully cut around the pencil marks that you drew to reveal the popsicle shape.
Do take care not to cut down the folded crease of the card blank. If you open it back up again when you’ve finished cutting around it with scissors, it should look a bit like the one in the photo above.

Image Credit: photo belongs to the author.
Step 4: now you can use the smaller template provided, the template inner, to draw around onto some patterned paper. Here's some fun suggestions for craft and summer scrapbook paper below. Look for hot and bright colors which work well for a summer theme like this one.
I found this really great summer scrapbook design which features polka dots and iced treats in bright and summery shades and colors.
Draw around the template and cut this paper out. It's going straight on the front of the card.

Image Credit: photo belongs to the author.
Step 5: the patterned paper will stick neatly on the front of the blank card front. I like to use double sided tape to stick down larger pieces of paper when making cards but you can use whatever type of adhesive that you're used to.
I stuck one of my popsicle perler bead designs on the front. See the provided pattern tutorial for that by clicking on the link.

Image Credit: photo belongs to the author.
Dymo Machines at Amazon.com | Dymo Machines at Amazon.co.uk
Step 6: I really like my Dymo Letratag and find it useful not just for labeling things around the home but I also like to use it for adding short pieces of text and greetings onto handmade projects like this one.
I like the fact that you can get lots of different colors of tape to choose from as well. It's handy when you want to say your own thing.
I added in some text here on a metallic blue tape that reads: It's your day. Just chill!

Image Credit: photo belongs to the author.
Step 7: you can glue the wooden craft popsicle stick inside the almost finished card as shown or stick it right at the back. It's really just down to personal preference.
You could use some sticky glue dots, a little un-watered PVA or white glue or a hot glue gun.

Image Credit: photo belongs to the author.
Step 8: here's the finished design which has had a piece of colored ribbon tied around the stick and a sticker design added on to the front as well.
Have fun deciding how you are going to embellish and decorate yours. Don't forget to print the template below.
Click on the image to open up the full size which is best for printing and choose "Save As" or "Save Image As" to download it.
Image Credit: photo belongs to the author.
Note: This free popsicle card printable is for your personal use only. You are welcome to blog about how you've used this freebie along with your own photos providing that you include a link back to this page.
The template comes with a few greeting suggestions and sentiments that you can use as well. You can use this design for scrapbooking craft projects and not just card making. Have fun creating some cool designs.
Related Content You Should Also Love:
NOW Make a Fun 3D Pop-Up Box Card
Tutorial to Make Popsicle Perler Bead Designs
Make a Popsicle Stick Beach Hut
Lots of Hot Summer Crafts for Everyone
Even More Card Making Projects
Tutorial to Make Popsicle Perler Bead Designs
Make a Popsicle Stick Beach Hut
Lots of Hot Summer Crafts for Everyone
Even More Card Making Projects
Page Last Updated:


Comments
Post a Comment
CraftyMarie is a craft themed website by Marie Williams Johnstone. I love to craft in the winter and garden in the summer. I make handmade cards, papercrafts, crochet and seasonal crafts. I enjoy many of the more traditional crafts and hobbies including sewing, embroidery and working with felt and fabric. Thanks for leaving me a comment. Comments do not show up until I approve them. Marie