How to Make Small Felt Roses: Easy Mini Flower Craft
Miniature felt flowers make great embellishments for so many craft projects as well as to finish off fashion and hair accessories such as headbands and hair clips.
I'll show you how to make (the cutest) mini felt roses that can by made with both no-sew and sewing methods - whichever you prefer.
This is also an easy and simple craft tutorial. The only difficulty is with the size because these are such small embellishments. But I'll offer lots of advice too on how to cope with working in a smaller scale.
Note: This post may contain affiliate links for which I can be compensated.

Felt flowers always come in useful for adding a touch of beauty into a project. Roses are probably one of the most popular flowers of all time and luckily it is rather simple to make your own versions on a small scale.
I use the easy method of making rolled felt roses which works much better with smaller versions of this flower. I prefer to hand sew these flowers as I make them, they don't need much stitching, but you can use glue instead for a no-sew method and I'll explain how.
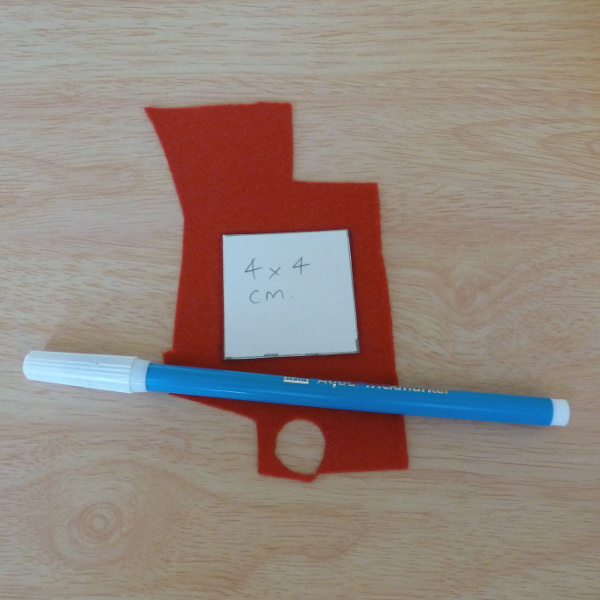
Entirely optional, but because I make a lot of felt roses, I use a cardboard template which just makes it much quicker to draw and cut the right size each time.
I make my small felt roses with a 4x4 centimeter square (yes I did say centimeter, not inches) or a 3x3 cm one which is the smallest I can comfortably make.
These make finished flowers between 1.5 and 3 cm wide. When making these for the first time, I suggest trying them on a much larger scale.
On your chosen felt color for the rose flower, cut out a square. I'm using 4x4 cm but advise you to use 10x10 if this is your first ever attempt and not just a refresh.
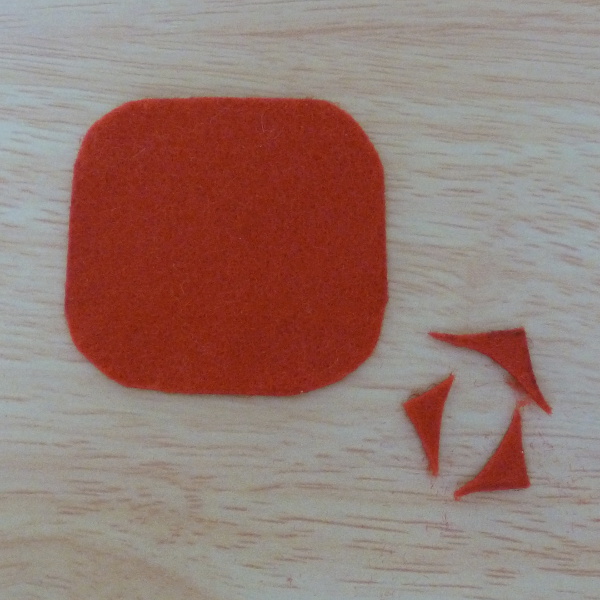
Snip off all the corners of the square in a curve. You only need to cut off a very small amount to curve the corners so it may be best to use a small pair of scissors if you have them.
This now looks more like a circle but it's actually just a square with rounded off corners.

Next you need to cut a spiral shape into the felt. The smaller your felt piece, the smaller the scissors you might need to use.
Cutting a spiral looks much harder than it is. Start cutting into the side of the felt and twist the fabric around to keep gradually cutting around the inside.
NOTE: For the shape of the rolled felt rose to really work, you must start off cutting a wider strip and gradually make it thinner as you cut.
If you are concerned about cutting a spiral, practice drawing some spiral shapes on paper first. Then use a temporary marker like a water soluble fabric marking pen to draw the shape onto the felt before you cut it.
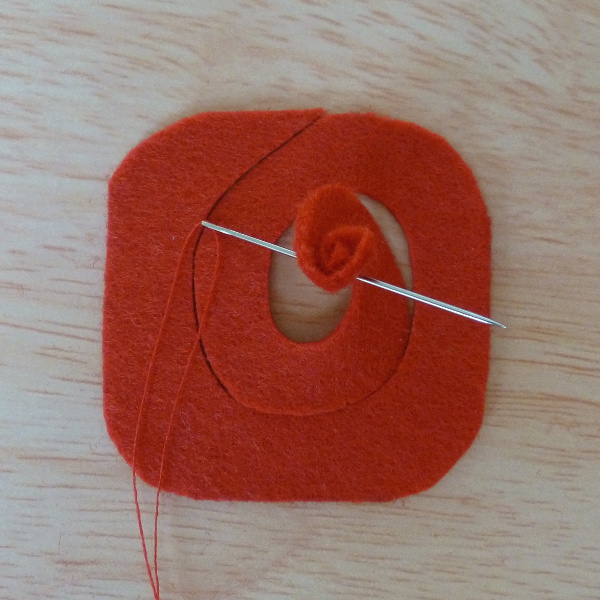
Start to tightly roll the spiral from the narrower end of the strip which is in the middle of the felt piece. The smaller your felt piece is to start with, the harder and more fiddly the rolling becomes. This is why I do recommend that you practice on larger pieces first.
After getting just an initial roll going, as is shown in the photo above, you can secure the bottom with some glue for a no-sew method.
I prefer to choose some thread as close to the felt color as possible and make just a few stitches near the bottom of the rolled felt to secure it. If you use thread, leave the thread there while you roll. No need to keep tying off and on again.

After you've made the initial piece of rolled felt secure with glue or thread, there is no need to do that again until the whole flower is rolled up.
You can secure it at different points as you roll but this is likely to make for a bulkier rose flower and especially if you are using glue instead of stitching. You can see that my thread is still attached to the bottom.

This photo gives you an idea of what the reverse of the felt should look like as you are constructing the flower.
I like to try and line up the bottom edges fairly neatly as I go because then the finished embellishment looks neater when viewed from the side.
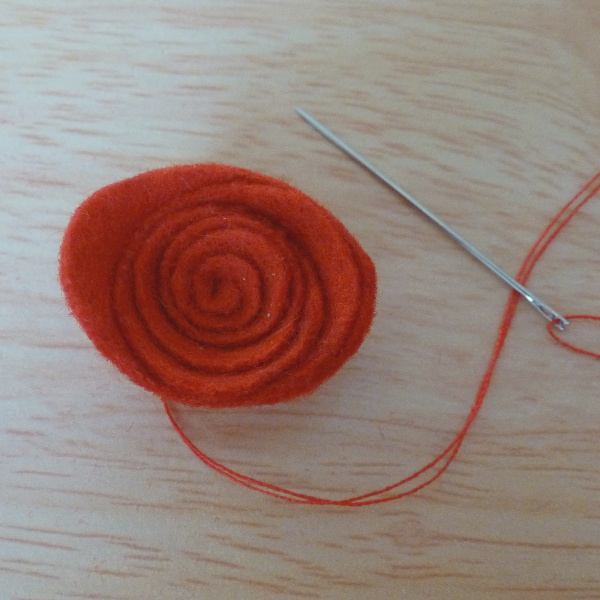
When you roll to the end, you need to secure the felt into place. If you are using glue, you need to secure the last section of felt to keep it wrapped. If you are not adding any leaves at the bottom, some glue at the very bottom will help to keep the flower shape intact.
If you are sewing, carefully sew the felt right at the very bottom of your rose flower. Take extra care not to sew at the sides because this would be visible from a side viewing of your roses. Leave the thread on if you want to add a bead otherwise you can knot it off.
If you prefer to use glue to secure the felt at the end of rolling instead of stitching, do that instead.
This video uses a similar technique to make these roses. They cut a circle instead of a square with rounded corners and they cut the leaves in a different way. Overall it is similar except for the fact it is put together using a glue gun.
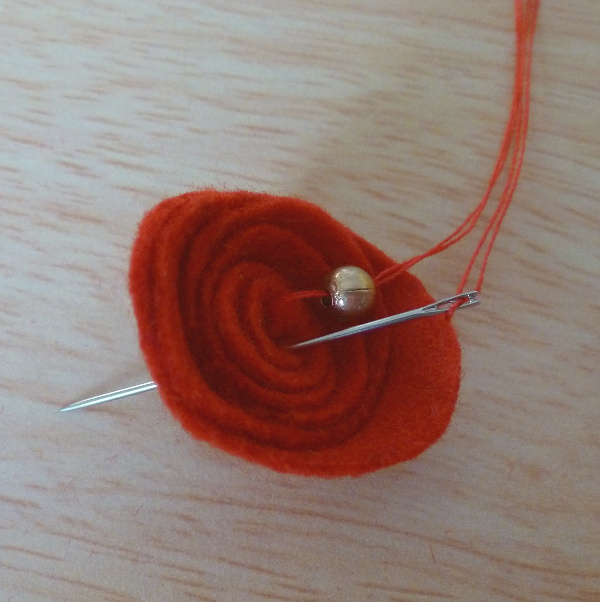
I love to add a bead into the middle of the felt flower. Here I've gone for a gold color bead which makes a great contrast with the red - lovely for a festive touch.
Hopefully you left the thread on if you sewed your flower. Now it is an easy job of placing the needle up through the middle of the rose, adding on a bead and placing the needle back down. Now you can knot the thread and cut it off.
Alternatively, you can glue the bead or central detail into place. You may prefer to add in a small button or charm instead.
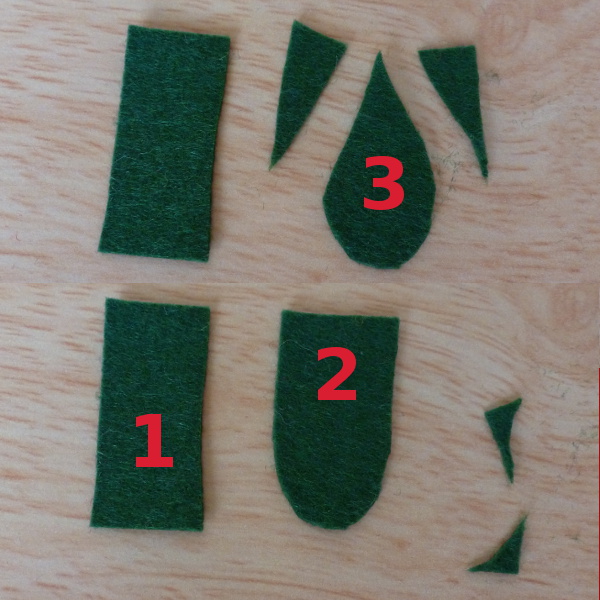
You may want to add on a couple of green leaves to the bottom of your felt roses. Here's how I cut them into shape.
I cut a couple of rectangular shapes out of green felt which you can see labeled 1 in the photo. I tend to judge by eye what size I need but for the very tiny 4x4 or 3x3 cm roses as explained in step 1, I cut rectangles about 1.5cm by 2.5cm.
Once you have your rectangles, the shapes are easy to cut. First you need to round off the corners just at one end as shown by the label 2.
Then you snip from about the middle of each side down to a point in the center as shown by label 3. This makes very easy tear shape leaves. No real need for a template which would also be fiddly to draw around.

Once you have a pair of green felt leaves, arrange them together (I like them in a V shape) and place them on the back of the flower.
You may need to cut them smaller if they are too large for your design. Otherwise they can be glued to the back or sewn on using a matching green thread.
Just make sure all the glue or stitching is right on the underside where it cannot be seen once attached to your chosen project.
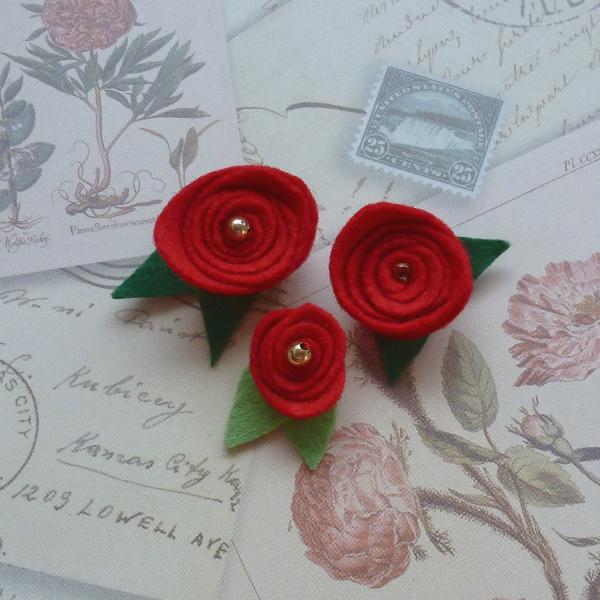
Have fun making all the rose flowers you need as embellishments for your crafts and fashion accessories. These tiny designs look beautiful on hair clips and clippies without being overpowering in size.
Turn slightly larger felt roses into wearable brooch pins by sewing a small clasp or safety pin to the back of the design.
You can add them onto necklaces, rings, hairbands, bracelets, bags, ornaments and decorative designs for the home. Roses come in all kinds of colors and shades so you don't need to stick to just red or pink varieties. Match the colors in with the project you're working on.
Related Content You Should Also Love:
Page Last Updated:
I'll show you how to make (the cutest) mini felt roses that can by made with both no-sew and sewing methods - whichever you prefer.
This is also an easy and simple craft tutorial. The only difficulty is with the size because these are such small embellishments. But I'll offer lots of advice too on how to cope with working in a smaller scale.
Note: This post may contain affiliate links for which I can be compensated.
How to Make Small Felt Roses: Cute Mini Embellishments for Your Crafts

Felt flowers always come in useful for adding a touch of beauty into a project. Roses are probably one of the most popular flowers of all time and luckily it is rather simple to make your own versions on a small scale.
I use the easy method of making rolled felt roses which works much better with smaller versions of this flower. I prefer to hand sew these flowers as I make them, they don't need much stitching, but you can use glue instead for a no-sew method and I'll explain how.
What You Need to Make Small Felt Roses
- Craft felt with one color for the rose flower and another for the leaves
- Some matching thread and a needle or glue
- Optional beads for the middle of the felt roses
- Scissors, small and medium sizes if you have them
- A ruler and temporary fabric marker is useful
Step 1: Cut a Square of Felt for the Rose Flower

Entirely optional, but because I make a lot of felt roses, I use a cardboard template which just makes it much quicker to draw and cut the right size each time.
I make my small felt roses with a 4x4 centimeter square (yes I did say centimeter, not inches) or a 3x3 cm one which is the smallest I can comfortably make.
These make finished flowers between 1.5 and 3 cm wide. When making these for the first time, I suggest trying them on a much larger scale.
⭐ I would strongly advise that you first start with a 10 by 10 cm square because you want to be able to focus on the technique initially. When you've nailed how easy these are to make, you can gradually make your roses smaller until you get to a size you are happy with.
On your chosen felt color for the rose flower, cut out a square. I'm using 4x4 cm but advise you to use 10x10 if this is your first ever attempt and not just a refresh.
Step 2: Round Off the Corners of the Square

Snip off all the corners of the square in a curve. You only need to cut off a very small amount to curve the corners so it may be best to use a small pair of scissors if you have them.
This now looks more like a circle but it's actually just a square with rounded off corners.
Step 3: Cut the Felt into a Spiral Shape

Next you need to cut a spiral shape into the felt. The smaller your felt piece, the smaller the scissors you might need to use.
Cutting a spiral looks much harder than it is. Start cutting into the side of the felt and twist the fabric around to keep gradually cutting around the inside.
NOTE: For the shape of the rolled felt rose to really work, you must start off cutting a wider strip and gradually make it thinner as you cut.
If you are concerned about cutting a spiral, practice drawing some spiral shapes on paper first. Then use a temporary marker like a water soluble fabric marking pen to draw the shape onto the felt before you cut it.
Step 4: Start to Roll the Felt and Secure by Sewing or Glue

Start to tightly roll the spiral from the narrower end of the strip which is in the middle of the felt piece. The smaller your felt piece is to start with, the harder and more fiddly the rolling becomes. This is why I do recommend that you practice on larger pieces first.
⭐ If using glue for a no-sew method of making small felt roses, you can use a glue gun - preferably a mini glue gun for more precision - or some glue such as Aleene's Tacky Glue. You just need a small dab near the bottom of the rolled felt to keep it in place before rolling some more.
After getting just an initial roll going, as is shown in the photo above, you can secure the bottom with some glue for a no-sew method.
I prefer to choose some thread as close to the felt color as possible and make just a few stitches near the bottom of the rolled felt to secure it. If you use thread, leave the thread there while you roll. No need to keep tying off and on again.
Step 5: Keep on Rolling the Felt Strip Around Itself

After you've made the initial piece of rolled felt secure with glue or thread, there is no need to do that again until the whole flower is rolled up.
You can secure it at different points as you roll but this is likely to make for a bulkier rose flower and especially if you are using glue instead of stitching. You can see that my thread is still attached to the bottom.
Step 6: A Glimpse of the Reverse as You Roll

This photo gives you an idea of what the reverse of the felt should look like as you are constructing the flower.
I like to try and line up the bottom edges fairly neatly as I go because then the finished embellishment looks neater when viewed from the side.
Step 7: The Pretty Mini Rose Flower Almost Complete

When you roll to the end, you need to secure the felt into place. If you are using glue, you need to secure the last section of felt to keep it wrapped. If you are not adding any leaves at the bottom, some glue at the very bottom will help to keep the flower shape intact.
If you are sewing, carefully sew the felt right at the very bottom of your rose flower. Take extra care not to sew at the sides because this would be visible from a side viewing of your roses. Leave the thread on if you want to add a bead otherwise you can knot it off.
If you prefer to use glue to secure the felt at the end of rolling instead of stitching, do that instead.
Video Showing the Felt Roses Technique
This video uses a similar technique to make these roses. They cut a circle instead of a square with rounded corners and they cut the leaves in a different way. Overall it is similar except for the fact it is put together using a glue gun.
Sewing a Bead into the Middle of the Rose Flower

I love to add a bead into the middle of the felt flower. Here I've gone for a gold color bead which makes a great contrast with the red - lovely for a festive touch.
Hopefully you left the thread on if you sewed your flower. Now it is an easy job of placing the needle up through the middle of the rose, adding on a bead and placing the needle back down. Now you can knot the thread and cut it off.
Alternatively, you can glue the bead or central detail into place. You may prefer to add in a small button or charm instead.
Step 9: Cutting Leaf Shapes from Small Rectangles

You may want to add on a couple of green leaves to the bottom of your felt roses. Here's how I cut them into shape.
I cut a couple of rectangular shapes out of green felt which you can see labeled 1 in the photo. I tend to judge by eye what size I need but for the very tiny 4x4 or 3x3 cm roses as explained in step 1, I cut rectangles about 1.5cm by 2.5cm.
Once you have your rectangles, the shapes are easy to cut. First you need to round off the corners just at one end as shown by the label 2.
Then you snip from about the middle of each side down to a point in the center as shown by label 3. This makes very easy tear shape leaves. No real need for a template which would also be fiddly to draw around.
Step 10: Attach the Leaves to the Base of the Flower

Once you have a pair of green felt leaves, arrange them together (I like them in a V shape) and place them on the back of the flower.
You may need to cut them smaller if they are too large for your design. Otherwise they can be glued to the back or sewn on using a matching green thread.
Just make sure all the glue or stitching is right on the underside where it cannot be seen once attached to your chosen project.
Enjoy Making Your Small Felt Roses

Have fun making all the rose flowers you need as embellishments for your crafts and fashion accessories. These tiny designs look beautiful on hair clips and clippies without being overpowering in size.
Turn slightly larger felt roses into wearable brooch pins by sewing a small clasp or safety pin to the back of the design.
You can add them onto necklaces, rings, hairbands, bracelets, bags, ornaments and decorative designs for the home. Roses come in all kinds of colors and shades so you don't need to stick to just red or pink varieties. Match the colors in with the project you're working on.
Related Content You Should Also Love:
Origami Rose Paper Folding Tutorials
CraftyMarie's Ultimate Guide to Craft Felt
How to Sew Plushies for Complete Beginners
Garden Potting Shed Felt Applique
Even More Felt Sewing Crafts
CraftyMarie's Ultimate Guide to Craft Felt
How to Sew Plushies for Complete Beginners
Garden Potting Shed Felt Applique
Even More Felt Sewing Crafts
Page Last Updated:


Comments
Post a Comment
CraftyMarie is a craft themed website by Marie Williams Johnstone. I love to craft in the winter and garden in the summer. I make handmade cards, papercrafts, crochet and seasonal crafts. I enjoy many of the more traditional crafts and hobbies including sewing, embroidery and working with felt and fabric. Thanks for leaving me a comment. Comments do not show up until I approve them. Marie