How to Make Tulle Pom Poms: Fast and Easy
Normally you'd use yarn to make these fluffy and decorative balls. However, this semi-transparent netted fabric offers a much more sophisticated and elegant look ideal for weddings and baby showers.
Sheer tulle netting fabric makes for some really elegant and sophisticated looking pom poms. Learn how to make Tulle pom poms with this easy and fast method. Add the completed embellishments to garlands, hanging decor, wands, sticks and other craft projects.
Tulle is lighter than yarn and you don't need to use as much of this unique fabric since this stiffer material holds it's shape really well.
Note: This post may contain affiliate links for which I can be compensated.

Tulle netting is a really beautiful and sheer fabric that is most commonly used to add volume and some sophisticated layering into dresses and long gowns.
Because it has a particularly feminine quality to it, it is really ideal for using to add to party decor for girls, baby showers and also weddings. That is just what I envisioned in mind when I set out to make these pretty and unusual tulle pom poms.
Yarn or strong thin twine to tie
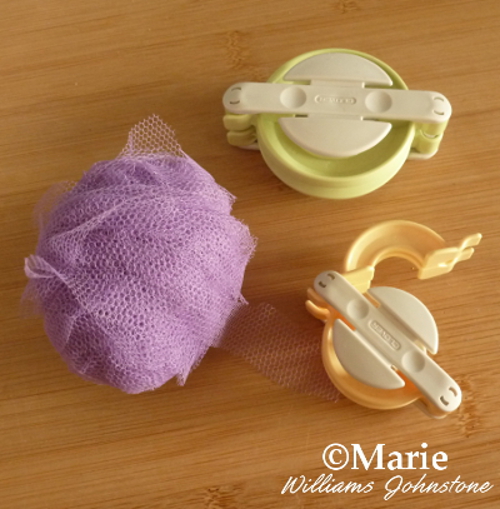
Pom pom maker - I use the Clover ones
Sharp pair of small scissors
Tulle netting comes in different options. I prefer to buy mine by the yard as big sections of fabric because I then have lots of options with what to use it for - the downside is that this has to be cut down into thin strips for making up the poms.
The other common option for buying it is with thinner spools of this fabric which often come in 3 inch or 6 inch widths. With the thinner width, you could get away with folding it as you wrap which means you wouldn't have to cut it down to size.
I prefer not to buy it in these smaller sizes because it becomes less useful for other projects where I need wider pieces.
You can make VERY large tulle pom poms by tightly wrapping the fabric around the width of a book, tying off in the middle and cutting. This works fine for larger wedding, shower, party and home decorations but doesn't give such a neat finish.
For smaller tulle pom poms needed for celebration wreaths, garlands or even clothing or fashion accessories where detail counts, I recommend making them with the pom pom makers as shown below.

You can cut any large square or rectangle of this netted fabric into strips as follows. Start at the bottom left corner and snip approx 1 - 2 inches into the fabric laid out in front of you.
Keep cutting the same rough measurement from the left side in order to cut a strip. When you approach a corner, do not snip off. Pull the fabric round so the top side is now on the left and cut around the corner and carry on cutting up this new side.
Do the same for every corner and wrap the strip of tulle you're cutting into a ball as you go. You can see how I have cut around the corner in the photo.

Note: You don't need to make a ball of tulle if you already bought your netting as a thin strip.
My favorite pom pom makers to use are the Clover ones which are very sturdy and comfortable to hold which is so important when you need to make a lot of these things. I like the green and yellow sizes but you can choose any size that you want.

The start of your tulle will soon get covered with additional wraps around. Start at one end of the 'arm' and work towards the other end.

So you don't need wrap loads of this around the maker. As you make these, you will get to learn what your own preference is for how much to use but you can certainly get away with less wrapping.

All you need to do is to slide the strip of tulle through the middle section between the left (wrapped) pair of arms and the right (unwrapped) pair. Then continue wrapping the second arm.


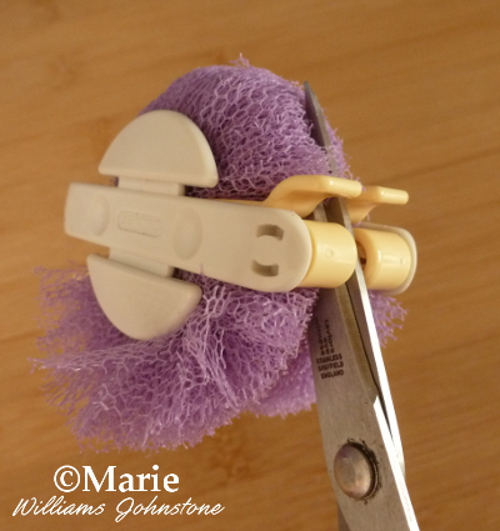
Push your scissor blades in between the middle of a left 'arm' and a right 'arm' as shown and start to cut round. Cut all the way around.

I use yarn to tie with but you could use thin twine. I did try sewing thread but that just breaks for me.
Pull the yarn around the center of your maker and tie a double knot really tightly. I then tie another one on the other side to be secure.


Once you start making these, they are so quick and easy to whip up with the Clover makers that you will probably want to buy a range of sizes so you can cover a wide variety of projects. Try out using variegated yarn too as I love the effect that gives with introducing lots of color.
If you enjoy working with this netted fabric, come see my tutorial on using it to make a tulle wreath which is ideal for birthdays and fun occasions.
Related Content You Should Also Love
Page Last Updated:
Sheer tulle netting fabric makes for some really elegant and sophisticated looking pom poms. Learn how to make Tulle pom poms with this easy and fast method. Add the completed embellishments to garlands, hanging decor, wands, sticks and other craft projects.
Tulle is lighter than yarn and you don't need to use as much of this unique fabric since this stiffer material holds it's shape really well.
Note: This post may contain affiliate links for which I can be compensated.
How to Make Tulle Pom Poms: Fast and Easy Method Great for Weddings, Showers and More

Tulle netting is a really beautiful and sheer fabric that is most commonly used to add volume and some sophisticated layering into dresses and long gowns.
Because it has a particularly feminine quality to it, it is really ideal for using to add to party decor for girls, baby showers and also weddings. That is just what I envisioned in mind when I set out to make these pretty and unusual tulle pom poms.
What You Need to Make Tulle Pom Poms
Tulle netting - bought or, alternatively cut into thin stripsYarn or strong thin twine to tie
Pom pom maker - I use the Clover ones
Sharp pair of small scissors
Tulle netting comes in different options. I prefer to buy mine by the yard as big sections of fabric because I then have lots of options with what to use it for - the downside is that this has to be cut down into thin strips for making up the poms.
The other common option for buying it is with thinner spools of this fabric which often come in 3 inch or 6 inch widths. With the thinner width, you could get away with folding it as you wrap which means you wouldn't have to cut it down to size.
I prefer not to buy it in these smaller sizes because it becomes less useful for other projects where I need wider pieces.
You can make VERY large tulle pom poms by tightly wrapping the fabric around the width of a book, tying off in the middle and cutting. This works fine for larger wedding, shower, party and home decorations but doesn't give such a neat finish.
For smaller tulle pom poms needed for celebration wreaths, garlands or even clothing or fashion accessories where detail counts, I recommend making them with the pom pom makers as shown below.

Step 1: Cut the Tulle into Strips If You Need To
If you have a very thin width of tulle, say 3 inches, you may get away without needing to cut it down since you can fold it thinner for wrapping with. However, I prefer to buy wide pieces of tulle so that I can use the pieces for any type of project.You can cut any large square or rectangle of this netted fabric into strips as follows. Start at the bottom left corner and snip approx 1 - 2 inches into the fabric laid out in front of you.
Keep cutting the same rough measurement from the left side in order to cut a strip. When you approach a corner, do not snip off. Pull the fabric round so the top side is now on the left and cut around the corner and carry on cutting up this new side.
Do the same for every corner and wrap the strip of tulle you're cutting into a ball as you go. You can see how I have cut around the corner in the photo.

Step 2: Wrap the Strip into a Ball of Tulle Netting
Follow the cutting directions above to make one long continuous strip of netting which you can wrap like a ball of yarn. Once you have your ball, you can start making.Note: You don't need to make a ball of tulle if you already bought your netting as a thin strip.
My favorite pom pom makers to use are the Clover ones which are very sturdy and comfortable to hold which is so important when you need to make a lot of these things. I like the green and yellow sizes but you can choose any size that you want.

Step 3: Start Wrapping the Netting Around the Pom Pom Maker
Once you have your ball of netting, you can start wrapping. With a Clover device that means pulling out one pair of 'arms' to begin wrapping around.The start of your tulle will soon get covered with additional wraps around. Start at one end of the 'arm' and work towards the other end.

Step 4: Wrapping the Netting Around the Arm of the Device
Unlike yarn where I would advise to make your wrapping nice and plump, tulle is a different fabric entirely. It is stiffer and will hold a shape better instead of yarn which will just droop if there isn't enough of it to hold all the strands in place.So you don't need wrap loads of this around the maker. As you make these, you will get to learn what your own preference is for how much to use but you can certainly get away with less wrapping.

Step 5: Wrapping the Second Arm of the Clover Gadget
Once one 'arm' section is covered, you can push it back down into the body of the maker, pull out the other pair of arms and start wrapping around them.All you need to do is to slide the strip of tulle through the middle section between the left (wrapped) pair of arms and the right (unwrapped) pair. Then continue wrapping the second arm.

Step 6: Continuing to Wrap the Tulle
You want to achieve the same kind of thickness on this pair of arms as the previous pair to get a really even look on your finished piece. I do this by looking from the top to see if the wrapped widths look similar. When they do, I know it is time to stop.
Step 7: Close Up the Device and Snip Off the End
When wrapping is finished, push down the pair of arms towards the middle to close the maker up completely. Snip off the end of the strip of tulle.
Step 8: Cut Around the Middle of the Pom Pom Maker
Now it is time to cut around the Clover maker with a small, sharp pair of scissors. I use my embroidery scissors as they are the perfect size.Push your scissor blades in between the middle of a left 'arm' and a right 'arm' as shown and start to cut round. Cut all the way around.

Step 9: Tying Yarn or Twine Around the Middle of the Pom Pom
Once all the fabric is cut, you must tie it before you open the maker or everything will fall out into a big mess of netting.I use yarn to tie with but you could use thin twine. I did try sewing thread but that just breaks for me.
Pull the yarn around the center of your maker and tie a double knot really tightly. I then tie another one on the other side to be secure.

Step 10: Opening Up the Clover Pom Pom Maker
Once it is all tied up, you can free the 'arms' of the maker by pushing them up as shown.
Step 11: Pulling the Maker Apart to Release the Pom Pom
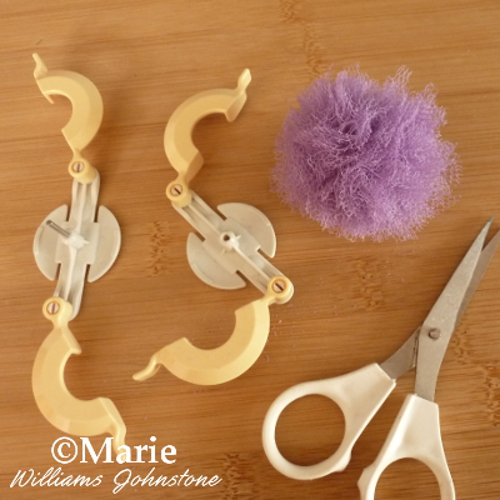
Now you need to use each hand to grasp on the left and the right of your pom - pull the maker apart to reveal your handmade piece.
Step 12: Completed Tulle Pom Pom
Once your pom is released, you can trim as you like. I try not to trim much as I like it to look a bit more natural. Now you can go wild making all these sophisticated little balls for your crafty projects.
Once you start making these, they are so quick and easy to whip up with the Clover makers that you will probably want to buy a range of sizes so you can cover a wide variety of projects. Try out using variegated yarn too as I love the effect that gives with introducing lots of color.
If you enjoy working with this netted fabric, come see my tutorial on using it to make a tulle wreath which is ideal for birthdays and fun occasions.
Related Content You Should Also Love
How to Make Fabric Pom Poms
How to Make a Tulle Wreath
Make a Pom Pom Wand Tutorial
All About Clover Pom Pom Makers
Summer Birthday Party Hand Made Decorations
How to Make a Tulle Wreath
Make a Pom Pom Wand Tutorial
All About Clover Pom Pom Makers
Summer Birthday Party Hand Made Decorations
Page Last Updated:


Why didn't I think of using tulle! Making pom poms is very addictive, and we have a big pom-pom project coming up in our household to decorate a papier-mache tree that we've made on our daughter's bedroom wall. Thanks for sharing
ReplyDelete