How to Make a Fabric Pom Pom Craft Tutorial
You can easily create some rather fun looking and modern style pom poms out of a number of different materials and not just the standard wool based yarn. I enjoy making the more traditional yarn versions as well as modern ones too.
Fabric versions of these fun pom pom embellishments look a little scrappy and shabby chic because they have those raw cut edges and also, depending on the type of material used, some fraying too. Fabric makes for a fun look that can really suit a number of more modern craft projects.
You may want to use them for garlands, cushion and pillow embellishments, occasion wreaths, bags and more. See how to make a fabric pom pom craft with this easy, step by step tutorial.
Note: This post contains affiliate links for which I may be compensated.

These days I tend to focus more on fashioning pom poms from fabrics like tulle, satin and even cotton which creates a really modern and edgy look and feel.
Tools and Materials that you Need:
Your choice of fabric
Some pom pom makers. I use the Clover ones
Scissors and some yarn or thin cord for tying

Step 1: You need a fair amount of fabric to make each pom pom ball. I've been using some from my own stash which measures around 25 x 15 inches and I can expect to get 2-3 made from the Green Clover maker pom which is 2.5 inches or 4-5 made from the smaller yellow one.
It's great fun to experiment with different fabrics to get different effects from solid colors to busy patterns, dull matt cotton surfaces or shiny satins. Each one gives a slightly different look which is fun to see once finished. The process remains the same for whatever you choose to use.
Start by cutting out a square or a rectangle of your chosen fabric. You need to start cutting it into one long continuous strip. I like strips that are anywhere between 1-2 inches wide.
You can try thinner or wider strips to see what you prefer but there's no need to measure anything out, just eyeball the width you want and cut roughly to that size.
Start cutting a strip down one outside edge and, when you hit a corner, stop 1-2 inches before you get to the end of the fabric and then turn your scissors around to carry on cutting the same sized strip. I just cut a long length, then wrap the strip up a bit before cutting some more as needed.

Step 2: Pull out one pair of arms on the Clover maker. If you're using another brand then this may be a similar process or you'll need to refer to your instructions for that tool.
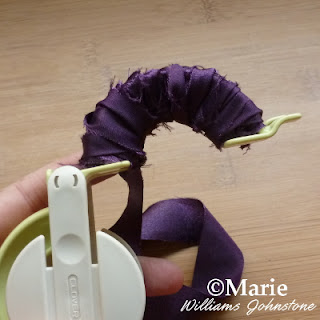
Start to wrap from the outside end as is shown in the photo. You want to pull the fabric a little taut as you wrap but not too tight.

Step 3: Keep on wrapping until you get to the other side of the pair of arms then you need to wrap back the other way and repeat until you can only just manage to squeeze the arms back into the middle of the Clover maker.
If you can't squeeze or push the arms back in then you've added too much fabric and will need to undo a bit of the wrapping until they do.

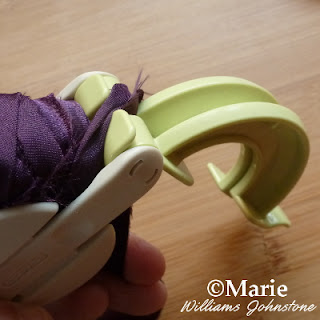
Step 4: When one pair of arms are fully wrapped, push the arms back into the middle, extend out the other pair of arms and you need to pass the fabric strip through the center area as shown on the photo before you start wrapping over and across to the other side.

Step 5: Start wrapping the other pair of arms in exactly the same way until you can only just squeeze or push this section back into the middle of the pom pom maker which indicates that it's done.

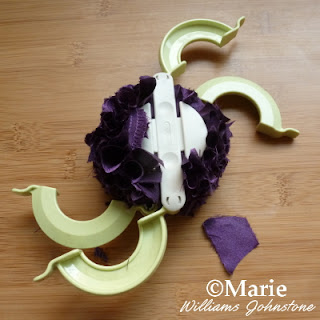
Step 6: Here's my fully wrapped Clover pom pom maker. Once both of the arms have been pushed back into the middle, you can snip the end of the fabric strip off as shown.

Step 7: This part may seem a little counter intuitive but you now need to keep the Clover Pom Maker closed up while you use a small pair of scissors (sharp embroidery ones work well for me) to cut all around the middle. There's just enough space to cut through with a small but strong pair of scissors.

Step 8: Still keeping it closed, you now need to use some yarn, twine or thin but strong cord to tie around the middle of the device.
You will see where to position the cord or yarn when you've cut the fabric. Pull the knot tight around the middle and do a double knot to secure. Snip off the ends.

Step 9: Now it's all been tied off securely, you can pull and open out the arm sections. Don't be alarmed if a few stray pieces of material fall out when you do since this is normal.

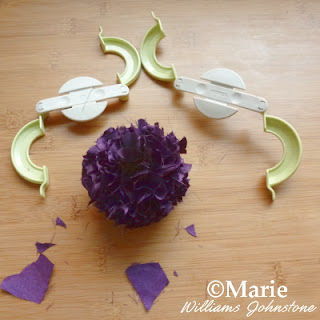
Step 10: Now the arms are extended, take one hand on each white central circle section and pull these apart to release your fabric pom pom ball. I love the texture you get on this and my favorite is to use satin fabrics or Tulle netting with this technique.
I'd advise against using these for items that will be washed because of the raw edges and threads that can come loose but they are perfect for projects where they are used as temporary birthday and Holiday crafts and decorations
Related Content You Should Also Love:
Page Last Updated:
Fabric versions of these fun pom pom embellishments look a little scrappy and shabby chic because they have those raw cut edges and also, depending on the type of material used, some fraying too. Fabric makes for a fun look that can really suit a number of more modern craft projects.
You may want to use them for garlands, cushion and pillow embellishments, occasion wreaths, bags and more. See how to make a fabric pom pom craft with this easy, step by step tutorial.
Note: This post contains affiliate links for which I may be compensated.
Step by Step Instructions on How to Make a Fabric Pom Pom

These days I tend to focus more on fashioning pom poms from fabrics like tulle, satin and even cotton which creates a really modern and edgy look and feel.
Tools and Materials that you Need:
Your choice of fabric
Some pom pom makers. I use the Clover ones
Scissors and some yarn or thin cord for tying

Step 1: You need a fair amount of fabric to make each pom pom ball. I've been using some from my own stash which measures around 25 x 15 inches and I can expect to get 2-3 made from the Green Clover maker pom which is 2.5 inches or 4-5 made from the smaller yellow one.
It's great fun to experiment with different fabrics to get different effects from solid colors to busy patterns, dull matt cotton surfaces or shiny satins. Each one gives a slightly different look which is fun to see once finished. The process remains the same for whatever you choose to use.
Start by cutting out a square or a rectangle of your chosen fabric. You need to start cutting it into one long continuous strip. I like strips that are anywhere between 1-2 inches wide.
You can try thinner or wider strips to see what you prefer but there's no need to measure anything out, just eyeball the width you want and cut roughly to that size.
Start cutting a strip down one outside edge and, when you hit a corner, stop 1-2 inches before you get to the end of the fabric and then turn your scissors around to carry on cutting the same sized strip. I just cut a long length, then wrap the strip up a bit before cutting some more as needed.

Step 2: Pull out one pair of arms on the Clover maker. If you're using another brand then this may be a similar process or you'll need to refer to your instructions for that tool.
Start to wrap from the outside end as is shown in the photo. You want to pull the fabric a little taut as you wrap but not too tight.

Step 3: Keep on wrapping until you get to the other side of the pair of arms then you need to wrap back the other way and repeat until you can only just manage to squeeze the arms back into the middle of the Clover maker.
If you can't squeeze or push the arms back in then you've added too much fabric and will need to undo a bit of the wrapping until they do.

Step 4: When one pair of arms are fully wrapped, push the arms back into the middle, extend out the other pair of arms and you need to pass the fabric strip through the center area as shown on the photo before you start wrapping over and across to the other side.

Step 5: Start wrapping the other pair of arms in exactly the same way until you can only just squeeze or push this section back into the middle of the pom pom maker which indicates that it's done.

Step 6: Here's my fully wrapped Clover pom pom maker. Once both of the arms have been pushed back into the middle, you can snip the end of the fabric strip off as shown.

Step 7: This part may seem a little counter intuitive but you now need to keep the Clover Pom Maker closed up while you use a small pair of scissors (sharp embroidery ones work well for me) to cut all around the middle. There's just enough space to cut through with a small but strong pair of scissors.

Step 8: Still keeping it closed, you now need to use some yarn, twine or thin but strong cord to tie around the middle of the device.
You will see where to position the cord or yarn when you've cut the fabric. Pull the knot tight around the middle and do a double knot to secure. Snip off the ends.

Step 9: Now it's all been tied off securely, you can pull and open out the arm sections. Don't be alarmed if a few stray pieces of material fall out when you do since this is normal.

Step 10: Now the arms are extended, take one hand on each white central circle section and pull these apart to release your fabric pom pom ball. I love the texture you get on this and my favorite is to use satin fabrics or Tulle netting with this technique.
I'd advise against using these for items that will be washed because of the raw edges and threads that can come loose but they are perfect for projects where they are used as temporary birthday and Holiday crafts and decorations
Related Content You Should Also Love:
Here's My Tutorial on Making These from Tulle
Tutorial to Make a Cute Pom Pom Wand
The Clover Pom Pom Maker
How to Make a DIY Tulle Wreath
More Fabric and Felt Crafts to Enjoy
Tutorial to Make a Cute Pom Pom Wand
The Clover Pom Pom Maker
How to Make a DIY Tulle Wreath
More Fabric and Felt Crafts to Enjoy
Page Last Updated:


Comments
Post a Comment
CraftyMarie is a craft themed website by Marie Williams Johnstone. I love to craft in the winter and garden in the summer. I make handmade cards, papercrafts, crochet and seasonal crafts. I enjoy many of the more traditional crafts and hobbies including sewing, embroidery and working with felt and fabric. Thanks for leaving me a comment. Comments do not show up until I approve them. Marie