How to Make Tassels With Yarn and Wool Tutorial
Wool and yarn tassels are used to make wonderful decorative embellishments that you can add to blankets, hats, cushions, garlands, throws, banners, clothes and more. Tassels made from yarn look particularly good during the winter season.
With this how to make tassels with yarn and wool tutorial, you'll find easy and informative photo instructions on making these decorations. They are simple to make and kids as well as adults can create tassels quite quickly. You don't need any special equipment either.
Use yarn in one shade to match up with the project it is for or, alternatively, think up your own brilliant color combinations. Yarn tassels work especially well with crocheted and knitted items and can be mixed and matched up with other crafts too.
Note: This post may contain affiliate links for which I can be compensated.

Image Credit: photo belongs to the author.
Making tassels with yarn and wool is luckily very easy and simple to do. You don't need a lot of equipment or anything that you are not likely to have already.
What you will need is a piece of sturdy card or plastic to wrap around, some yarn and some scissors. I also use a crochet hook for neatening things off at the end but this is not essential.

Image Credit: photo belongs to the author.
To make tassels with yarn, you can use any acrylic, cotton or wool yarn that you have. You can use one color of yarn or several different colors to make your tassels. I have a tutorial on making multicolor tassels here.
Because it is quicker, I'm going to show you how to make tassels with 3 strands of yarn in one go. It is exactly the same process using only 1 strand of yarn but it will take longer to make each tassel.
You need a piece of sturdy card or flat plastic to wrap around. I used an old greeting card. The size of this card or plastic from top to bottom should be approximately how big or small you want your finished tassel to be.
Take the ends from three balls of yarn or however many you want to wind into a tassel. If you have just one ball of yarn, that's fine, the wrapping time will just take longer.
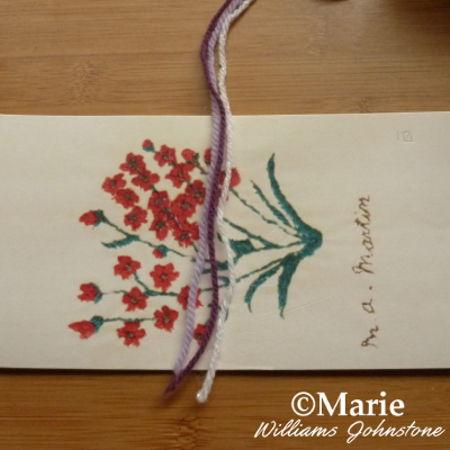
Lay the ends of the yarn over the top of your piece of card, so their ends hang just over the bottom as shown in the photo above.

Image Credit: photo belongs to the author.
Hold however many ends of yarn that you have and start wrapping the strand around the piece of card. If you have more than one strand then you need to grasp them all in your hand and wrap them at the same time.
The wrapping process is much quicker when you have more strands of yarn being wrapped together. I needed to wrap mine about 10 times around the card using 3 strands.
You may have to experiment with more or less wraps around the card. It really depends how many strands of yarn you are winding round and how thick or thin you want each completed tassel to be.

Image Credit: photo belongs to the author.
Once you have finished all the wrapping you want to make your yarn tassel, snip off the strand ends that are still attached still to the balls of yarn. If you're neat, you will cut these so they come down to the bottom of the piece of card.
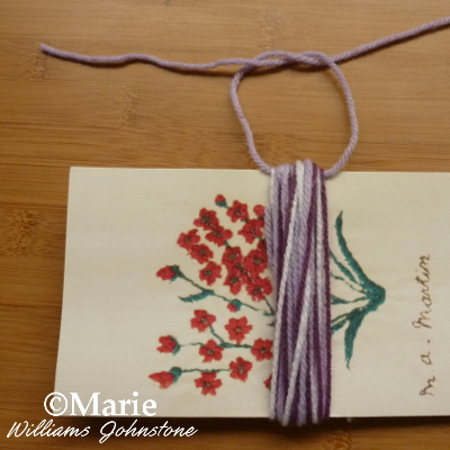
Hold these strands down. If you've wound the tassel tightly enough it shouldn't just unravel. Keep the card piece down on a flat surface in front of you as in the photo.
Choose a color of yarn from one of the colors that you used for winding. Cut off a longish length - around 10 inches or 25 cm should be enough.
Slip one end of this cut yarn under the top of the wound yarn on the card. Once underneath, pull the strand along a little way until it is roughly central and then tie it into a tight knot. A normal double knot is great and will hold everything together.

Image Credit: photo belongs to the author.
Now you've secured the unfinished tassel at the top with a knot, you can now cut across the bottom to make the individual tassel strands.
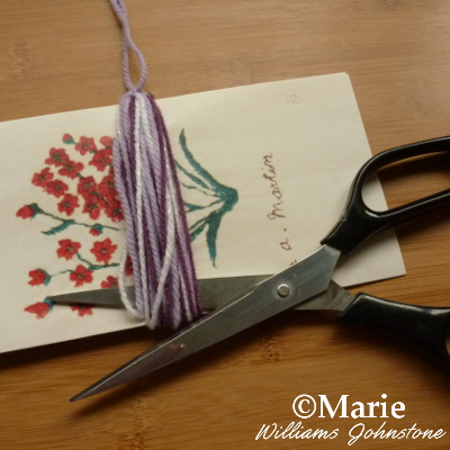
Slide the back blade of the scissors only at the front of the card but behind all the yarn strands as shown in the photo.
A decent pair of fabric scissors should be able to snip all the way through with no problems. Now you can remove the piece of card.

Image Credit: photo belongs to the author.
You can see that the ends of the tassel here in the photo don't look all that neat. However, it is best to tidy these ends up once your tassel is made.
The strand of yarn that you used to tie the top with should be pulled upwards and kept separate from the rest of the strands. You can see these at the very top of the photo. I use these to tie the finished tassels onto other projects.
The next step is to form the rounded or oval shaped head of the tassel. You need to cut off another long strand in a color matching up with the project.
Eyeball approximately the top third of the yarn strands and tie a knot tightly around. I like to smooth all the strands into place before tying the knot.
NEXT - TRY MY CROCHET TASSEL GARLAND TUTORIAL
I then smooth down the excess yarns in the middle which tied off the head area. Sometimes I use a use a crochet hook to pull them through the middle knot which has tied off the head area of the tassel. The ends then become part of the actual tassel.
Use a big pair of scissors to snip all the ends at the bottom straight across so they look neat and tidy. Now you've made a tassel from yarn, you should be able to see how easy it is to make and use it for all kinds of crafty projects. Let me know what you use it for in the comments below.
Related Content You Should Also Love:
Page Last Updated:
With this how to make tassels with yarn and wool tutorial, you'll find easy and informative photo instructions on making these decorations. They are simple to make and kids as well as adults can create tassels quite quickly. You don't need any special equipment either.
Use yarn in one shade to match up with the project it is for or, alternatively, think up your own brilliant color combinations. Yarn tassels work especially well with crocheted and knitted items and can be mixed and matched up with other crafts too.
Note: This post may contain affiliate links for which I can be compensated.
How to Make Tassels With Yarn and Wool: Complete Photo Instructions and Tutorial

Image Credit: photo belongs to the author.
Making tassels with yarn and wool is luckily very easy and simple to do. You don't need a lot of equipment or anything that you are not likely to have already.
What you will need is a piece of sturdy card or plastic to wrap around, some yarn and some scissors. I also use a crochet hook for neatening things off at the end but this is not essential.
Step 1: Start Making Yarn and Wool Tassels: What You Need

Image Credit: photo belongs to the author.
To make tassels with yarn, you can use any acrylic, cotton or wool yarn that you have. You can use one color of yarn or several different colors to make your tassels. I have a tutorial on making multicolor tassels here.
Because it is quicker, I'm going to show you how to make tassels with 3 strands of yarn in one go. It is exactly the same process using only 1 strand of yarn but it will take longer to make each tassel.
You need a piece of sturdy card or flat plastic to wrap around. I used an old greeting card. The size of this card or plastic from top to bottom should be approximately how big or small you want your finished tassel to be.
Take the ends from three balls of yarn or however many you want to wind into a tassel. If you have just one ball of yarn, that's fine, the wrapping time will just take longer.
Lay the ends of the yarn over the top of your piece of card, so their ends hang just over the bottom as shown in the photo above.
Step 2: Start Wrapping the Yarn

Image Credit: photo belongs to the author.
Hold however many ends of yarn that you have and start wrapping the strand around the piece of card. If you have more than one strand then you need to grasp them all in your hand and wrap them at the same time.
The wrapping process is much quicker when you have more strands of yarn being wrapped together. I needed to wrap mine about 10 times around the card using 3 strands.
You may have to experiment with more or less wraps around the card. It really depends how many strands of yarn you are winding round and how thick or thin you want each completed tassel to be.
Step 3: Securing the Yarn Tassel With a Knot

Image Credit: photo belongs to the author.
Once you have finished all the wrapping you want to make your yarn tassel, snip off the strand ends that are still attached still to the balls of yarn. If you're neat, you will cut these so they come down to the bottom of the piece of card.
Hold these strands down. If you've wound the tassel tightly enough it shouldn't just unravel. Keep the card piece down on a flat surface in front of you as in the photo.
Choose a color of yarn from one of the colors that you used for winding. Cut off a longish length - around 10 inches or 25 cm should be enough.
Slip one end of this cut yarn under the top of the wound yarn on the card. Once underneath, pull the strand along a little way until it is roughly central and then tie it into a tight knot. A normal double knot is great and will hold everything together.
Step 4: Cut Your Tassel Off the Card

Image Credit: photo belongs to the author.
Now you've secured the unfinished tassel at the top with a knot, you can now cut across the bottom to make the individual tassel strands.
Slide the back blade of the scissors only at the front of the card but behind all the yarn strands as shown in the photo.
A decent pair of fabric scissors should be able to snip all the way through with no problems. Now you can remove the piece of card.
Step 5: Finishing Off the Yarn Tassel

Image Credit: photo belongs to the author.
You can see that the ends of the tassel here in the photo don't look all that neat. However, it is best to tidy these ends up once your tassel is made.
The strand of yarn that you used to tie the top with should be pulled upwards and kept separate from the rest of the strands. You can see these at the very top of the photo. I use these to tie the finished tassels onto other projects.
The next step is to form the rounded or oval shaped head of the tassel. You need to cut off another long strand in a color matching up with the project.
Eyeball approximately the top third of the yarn strands and tie a knot tightly around. I like to smooth all the strands into place before tying the knot.
NEXT - TRY MY CROCHET TASSEL GARLAND TUTORIAL
I then smooth down the excess yarns in the middle which tied off the head area. Sometimes I use a use a crochet hook to pull them through the middle knot which has tied off the head area of the tassel. The ends then become part of the actual tassel.
Use a big pair of scissors to snip all the ends at the bottom straight across so they look neat and tidy. Now you've made a tassel from yarn, you should be able to see how easy it is to make and use it for all kinds of crafty projects. Let me know what you use it for in the comments below.
Related Content You Should Also Love:
How to Make Multicolor Yarn Tassels
How to Make a Crochet Tassel Garland
Crochet Pennant Banner Bunting Craft Projects
More Crochet Crafts to Enjoy
How to Make a Crochet Tassel Garland
Crochet Pennant Banner Bunting Craft Projects
More Crochet Crafts to Enjoy
Page Last Updated:


Comments
Post a Comment
CraftyMarie is a craft themed website by Marie Williams Johnstone. I love to craft in the winter and garden in the summer. I make handmade cards, papercrafts, crochet and seasonal crafts. I enjoy many of the more traditional crafts and hobbies including sewing, embroidery and working with felt and fabric. Thanks for leaving me a comment. Comments do not show up until I approve them. Marie