3D Decoupage Tutorial and Instructions with Photos

One of my all time favorite paper crafts is a traditional one known by a range of names which include 3D decoupage, papier tole and paper tole. The 3D decoupage tutorial shown here includes step by step instructions for you to follow.
3D decoupage is a great way to build up some pretty layered and dimensional paper based pictures and designs for framed art, handmade cards, special gift tags and even scrapbook pages. The completed images with the three dimensional layers to them are something that will be admired and enjoyed from many angles.
This wonderful paper craft activity is very relaxing and something you can enjoy when you have an hour or two to spare. This tutorial shows you how to use a 3D decoupage or paper tole sheet to create a finished, dimensional design.
Note: This post may contain affiliate links for which I can be compensated.
3D Decoupage Tutorial and Instructions Using Printed Pattern Sheets
Materials and Tools Needed for this Paper Craft:
- A printed 3D decoupage sheet or 3-6 copies of a photo or design
- 3D foam squares or a roll of 3D craft foam tape
- Scissors in a variety of sizes from small decoupage scissors to medium or a craft knife
- A cutting mat if you are using a craft knife
If you've never worked with adhesive craft foam squares before, they are very easy to use. The squares are already cut down to size for you. Simply remove them from the backing paper and stick them down on to your project.
Equipment Needed for You to Do 3D Decoupage
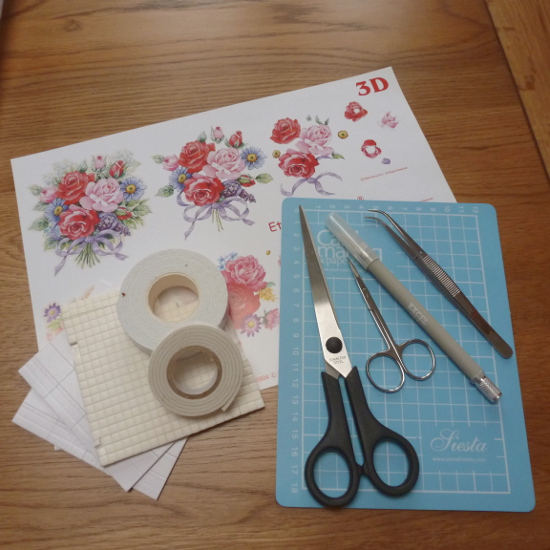
Image Credit: photo belongs to the author.
Learn about ALL the tools you need for 3D Decoupage on my equipment page here.
The photo shows the equipment and tools that I often use to complete this paper craft. I have a 3D decoupage design sheet with printed images which are all ready to cut out.
You can also get die cut decoupage sheets which mean that you don't need to do any cutting. Learn all about this no scissor method with my die cut decoupage tutorial here.
Floral scenes are particularly nice to layer up and make useful embellishments for many greeting card occasions and also gift tags. If you do not have a decoupage sheet, you can use several copies of one photo or print to achieve exactly the same thing.
I prefer to use the adhesive foam squares but you can also get foam tape on a roll that you cut down to the size that you want.
A variety of scissors are useful so that you can quickly cut around bigger areas as well as into very detailed parts. I occasionally use a craft knife although I much prefer to use a pair of small decoupage scissors as much as possible.
Step 1: Work 3D Decoupage from the Largest Printed Piece

Image Credit: photo belongs to the author.
Some sheets, which are often called 3D papier tole die cuts or die cut decoupage require no cutting. Simply press out each shape from the sheet and layer it up in the order given.
These pre-cut die cut sheets are fun and very easy to use if you don't like a lot of cutting and also if you want the look of decoupage much faster. Learn about die cut decoupage here.
Most of the traditional decoupage sheets have a specific order to work from and may use numbers or letters to order each piece for layering.
Some sheets, like the one shown above, have no numbers and assume that you already know to work from the largest design piece first because this will be placed right at the back.
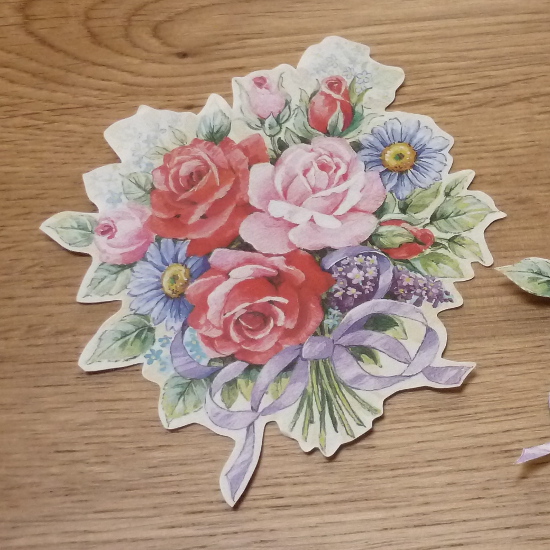
Image Credit: photo belongs to the author.
With 3D decoupage, you normally work from the largest part of a design and then add the next largest part of the design on top.
Pieces that you layer up tend to gradually get smaller and more detailed.
Cut or punch out the largest piece of the printed design.
Step 2: A Craft Knife Sometimes Works Best for this Paper Craft
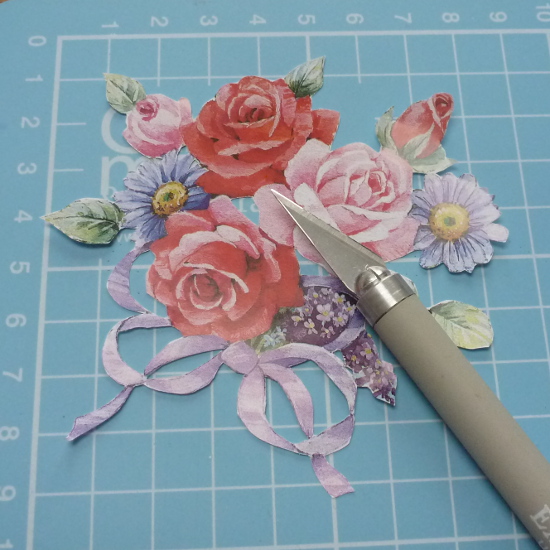
Image Credit: photo belongs to the author.
Identify the next design element to cut or punch out on your sheet. This is normally the next biggest in size if it is not numbered.
Sometimes pattern sheets will leave solid white spaces in the printed design and you can cut these away. If these occur in the middle of a design, you may need to use a craft knife to remove them.
Getting used to a craft knife can take a bit of time. Along with the craft knife, you will also need a cutting mat to work on top of in order to protect your work surface.
Take your time with using a craft knife because it can be easy to make mistakes with them.
Carefully put the point of the knife where you need to start cutting and pull the blade slowly down the design.
You might need to rotate the design as you cut round it. Not all decoupage sheets are like this and there are many that can simply be cut with small decoupage scissors.
Step 3: Using the Adhesive Foam Squares for 3D Decoupage
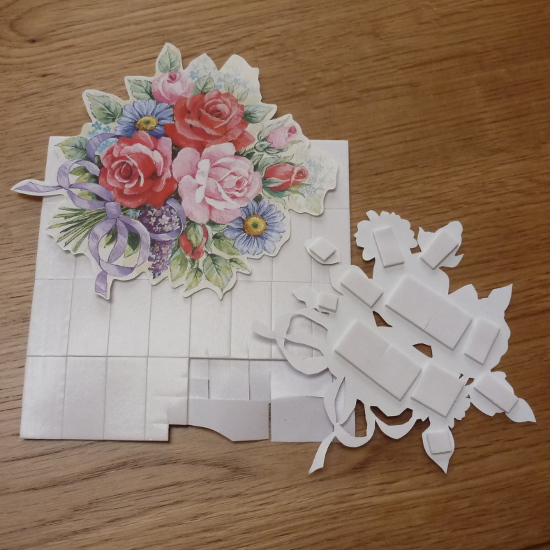
Image Credit: photo belongs to the author.
Once you've cut or punched out your second largest design piece, you need to stick some adhesive foam squares on the back of it. Learn how to use foam squares here.
Alternatively, you can use silicone glue adhesive although that is out of the scope of these instructions.
You don't need these adhesive squares to cover every bit of the back of the design. You can spread them out. Sometimes the foam squares are too big to fit in an area so you can cut them down to size with scissors.
Once all the squares are on, remove the backing papers from the 3D foam pads and carefully place this design layer over the top of the first. Take care to match it up with the printed design.
3D foam squares are easy to use and will add some height and dimension in the different layers of your design. You can also use silicone glue but that takes a bit more time and patience to work with.
Step 4: Make Use of Craft Tweezers
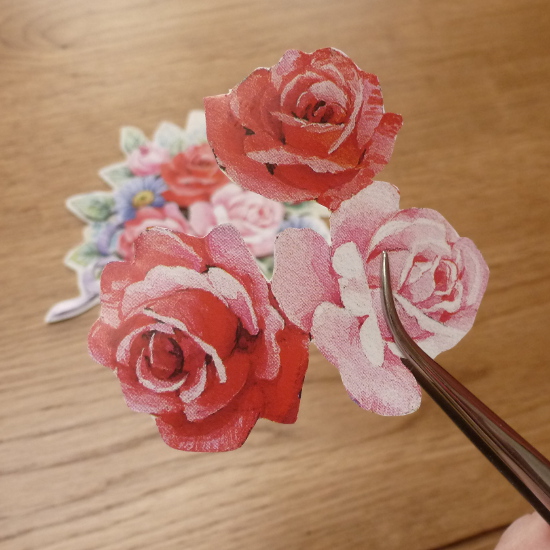
Image Credit: photo belongs to the author.
Carry on working on cutting or punching out the next layer of your design.
Stick adhesive pads on the back and then fix layers in place on your growing paper embellishment.
I like to use curved craft tweezers to help me put each layer in the right place. They also help with getting the backs off from the sticky foam pads.
Step 5: Embellishing Your 3D Decoupage Paper Design Further

Image Credit: photo belongs to the author.
Once your three-dimensional design is complete, you can embellish it further by adding on glitter glue, stickers, gems, ribbon, beads and more.
I really like to use Stickles glitter glue which is very easy to apply where you want a bit of added sparkle.
You can use the completed dimensional designs for handmade cards, scrapbook layouts, framed pictures, hanging ornaments, gift boxes, gift tags, and as decorations around the home.
Light House 3D Decoupage Paper Tole Kit Flowers Paper Tole 3D Kit 8x10
 Window Floral Paper Tole 3D Kit 8x10
 America Beautiful Paper Tole 3D Craft Kit
 Flowers Paper Tole 3D Kit 8x10
 Window Floral Paper Tole 3D Kit 8x10
 America Beautiful Paper Tole 3D Craft Kit
Handmade Card Made with a Floral 3D Decoupage Sheet

Image Credit: photo belongs to the author.
If you opt to get sheets that require cutting instead of the die cut papier tole options, a really good pair of small and sharp scissors will make that task easier.
I like to use a range of sizes and have a tiny pair for decoupage that can cut with a great level of detail and precision.
Some people prefer to use a craft knife for this craft. I use a knife when I need to cut away areas from the middle of a design.
Otherwise I prefer to use scissors because they are easier to work with. You will find a method of working for this activity which you prefer.
You Also Get Die Cut Versions of these Design Sheets Too
I happen to really love the process of cutting using scissors and craft knives to make some very precise, tiny and detailed snips in the paper decoupage sheets.
However, there are many reasons why you might not wish to cut out these images by hand. Time constraints or dexterity issues may mean that cutting is not the best idea.
Learn how to do die cut decoupage with my tutorial here.
That's where these die cut decoupage and papier tole sheets are just perfect. These printed design sheets make it very easy for you to still enjoy this craft without the need to use any scissors.
Simply press the shapes out from their backing sheet and layer them up in order. The sheets are sometimes numbered for you so that you can quickly see how to use the pieces to create the design.
3D decoupage projects range from basic methods shown here up to more advanced ones. I love this craft because there is so much scope for taking the basic techniques further.
You can really make this as easy or as challenging as you prefer. It is a good craft that you can sit at and work on quietly, something to enjoy and take slowly.
If you particularly enjoy using scissors then you should love using these decoupage sheets because there is a lot of cutting involved.
If you don't enjoy cutting, look for the special die cut sheets that come with designs that you can simply press out. I find it very restful to sit and cut out designs and it reminds me of crafts that I enjoyed as a child such as making paper dolls.
When pieces of the design are either cut of punched from the sheets, you layer them up over each other using 3D foam pads or a thick adhesive called silicone glue. This method eventually creates a dimensional picture.
Related Content You Should Also Love:
Beginner Tutorial on How to Do Paper Tole
3D Decoupage and Paper Tole Equipment and Supplies
Die Cut Decoupage How To
3D Foam Squares and Dimensional Adhesives
More on 3D Decoupage and Paper Tole
3D Decoupage and Paper Tole Equipment and Supplies
Die Cut Decoupage How To
3D Foam Squares and Dimensional Adhesives
More on 3D Decoupage and Paper Tole
Page Last Updated:


Comments
Post a Comment
CraftyMarie is a craft themed website by Marie Williams Johnstone. I love to craft in the winter and garden in the summer. I make handmade cards, papercrafts, crochet and seasonal crafts. I enjoy many of the more traditional crafts and hobbies including sewing, embroidery and working with felt and fabric. Thanks for leaving me a comment. Comments do not show up until I approve them. Marie