Easiest Hand Stitch: How to for Beginners With Pictures
When you are new to sewing with felt, it's understandable that you want to focus on what you can make rather than learn a whole load of stitches.
There are lots of different hand sewn stitches but the main basic one you should know is called the running stitch. Luckily this is also the easiest hand stitch that you can learn too.
Even if you already think you know how this basic straight stitch works, you'll still learn valuable information on using this hand stitch with pictures just perfect for beginners and upwards.
Note: This post may contain affiliate links for which I can be compensated.

Table of Contents
How to Work Running Stitch
Working Running Stitch Around a Corner
Getting a Really Neat Running Stitch Along an Edge
A Faster Method of Sewing Running Stitch
Running Stitch Uses and Examples With Felt
Running stitch, also known as straight stitch, is a really simple and easy hand stitch for anyone to learn. It is often taught as a basic first stitch to children when they are learning how to sew and also to adult learners who are new to sewing.
The stitch is very versatile and you could sew most beginner felt plushies and small items just by using this alone. It can be used as both a functional stitch as well as a decorative one.
In sewing small plushies, ornaments and toys, running stitch is most often used to quickly and easily sew two pieces of felt together. It makes a fairly strong seam and can also be worked around the edge of the felt pieces ready to fill the insides with toy stuffing or fiber fill.
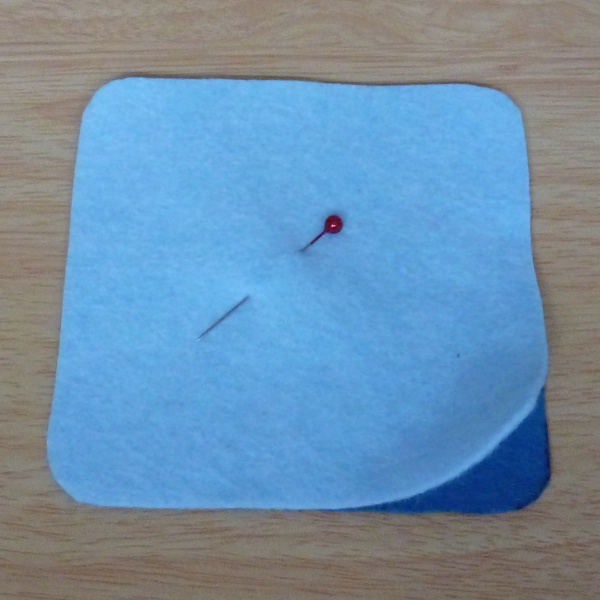
To demonstrate running stitch, I've pinned together one light blue felt square and a dark blue felt square so you can see the different pieces easily during the sewing process.
Felt is the ideal material to practice all your stitches on because it doesn't fray.
I am using a black thread for contrast. Normally I would use a color thread that matches up with the color of the felt. Since you need to see the finished stitching, I'm using black for good contrast.

When sewing a smaller piece of fabric onto felt or even felt onto felt (which is known as applique) you'd normally sew near the edge of the top piece of fabric. With decorative sewing, where you start depends entirely on the look you're going for.
When sewing small felt ornaments, plushies and toys, the seam allowance (area between the edge of the fabric and the stitch line) is normally going to be quite small. I am used to hand sewing about 4-5mm away from the cut edge. You will need to practice until you find how close to the edge you prefer to sew.
Thread your needle and knot the end. Push your threaded needle through from the back of the felt to the front.

You can see the knot at the back on the darker blue felt in the photo above. The rest of the thread on the needle has been pulled through to the front.

You can go in any direction that you prefer with straight or running stitch, even diagonally and following round curves, but for this example I'm sewing along the left side of the edge.
Place the needle tip where you want to make your first stitch and push it down through the layers of felt.
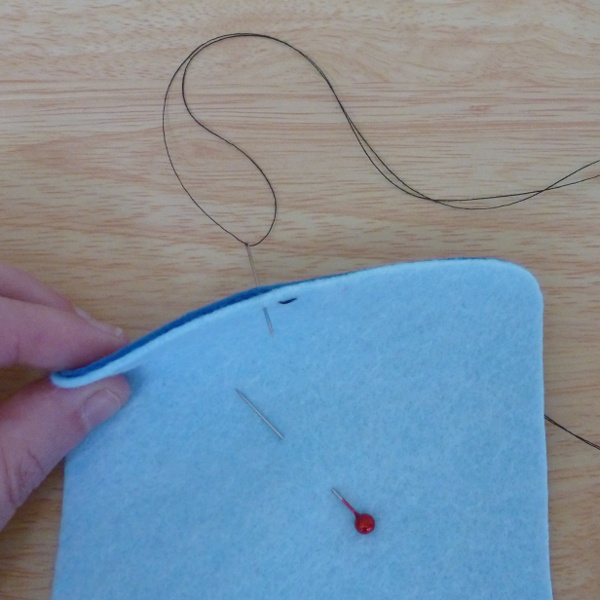
Carrying on in the same direction, leave the desired spacing that you want between the stitches and push the tip of your needle through from the back to the front of your fabric.
Pull the thread all the way through to the front. Don't pull too tightly, you want to make sure that all the thread comes through without pulling it too hard.
If you pull the thread too tightly, you could snap the thread or pucker the fabric.

As well as trying to keep to a straight line around the edge of the felt, practice trying to make the stitches a similar size and with the same sized gaps between.
Learn how to sew this easy stitch using this video as a guide. It also shows you how to gather the fabric or material to create a ruffled effect.
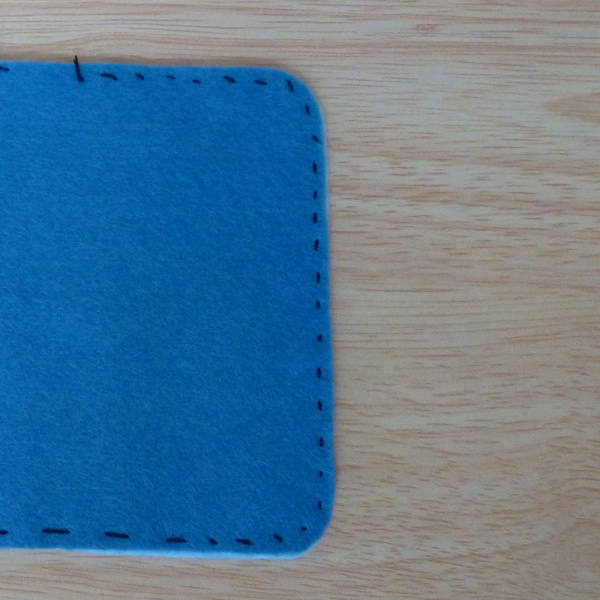
This photo shows what the stitches look like on the back or reverse side. They are not as neat as the running stitches on the front.
This makes running stitch ideal for items where they will be viewed mostly from the front side such as tree ornaments but a little less ideal for items which are often viewed from both sides. So that is something to bear in mind when you start a felt project.
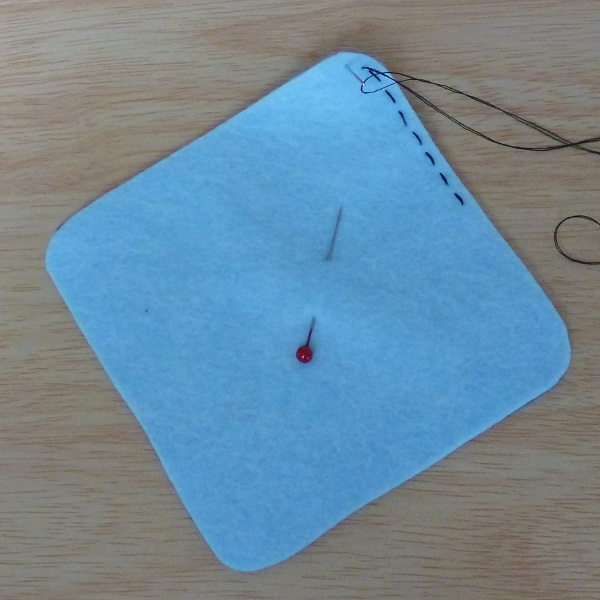
Corners are not as tricky as they look. You may just have to think for a fraction longer about where your stitches will go.
Even around a corner, you want to keep the stitches the same distance away from the edge as you do with a straight line.
When working corners you may sometimes need to make the individual stitches a bit smaller or the gaps between a little smaller just to get the look right. Knowing what will work best really does come with practice.
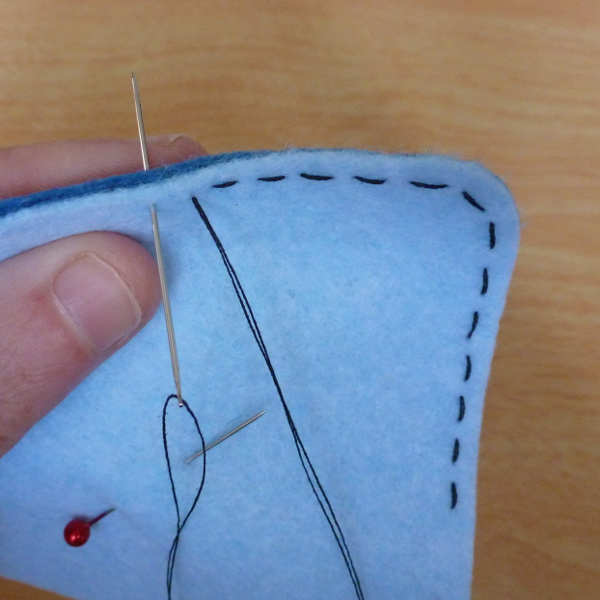
Getting really neat at sewing this straight stitch by hand comes with a lot of practice. You want to try and get into a rhythm of the needle going up and down through the felt layers and producing similar sized stitches and gaps. You also need to bear in mind the correct spacing away from the edging.
I find that it helps me to hold the felt between my forefinger and thumb. I use my forefinger at the back of the felt as a guideline for the needle.
The needle glides just over the top of my finger, forwards and back. As I work along the edge, my fingers automatically move the felt forward so I can continue along with the line of stitches.
I also turn the felt pieces around between my thumb and forefinger when I need to work around a corner or along a different side. My hands always stay in the same position but the fabric moves.
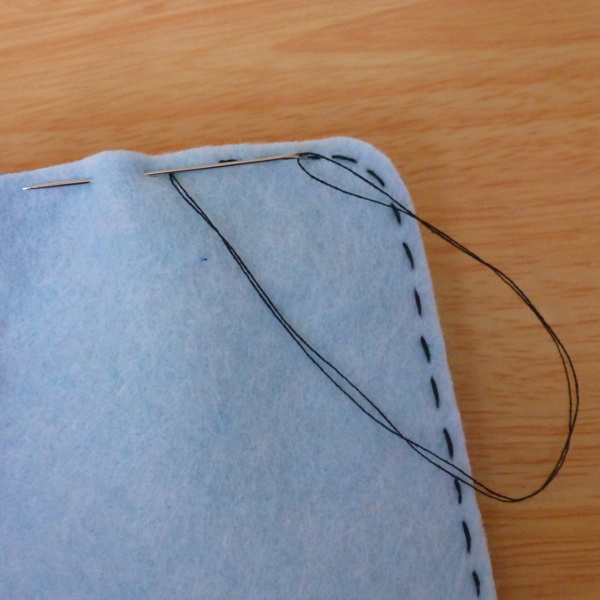
The usual way to hand stitch is by using what is known as the stabbing method. This is where the needle goes fully up and down through the fabric as you make a stitch.
My stitch tutorials will all focus on the stabbing method because taking one stitch at a time is the most accurate way to hand stitch and get neatly sized and spaced stitches.
My running stitch step by step tutorial at the start of this post, showed you the stabbing method of working this straight stitch.
When you make small items from felt such as ornaments and miniature plushies, having stitches that look neat is even more important because you will notice the stitches even more on smaller creations.

However, if the look of the stitches is not an issue, you may prefer a faster method of sewing running stitch which is called the sewing method.
Start your running stitch off in the same way by knotting the thread and bringing the threaded needle through to the front of the fabric.
From then on, your needle no longer passes fully to the back of the fabric. Instead it stays at the front and merely weaves in and out of the fabric to create several stitches at once.
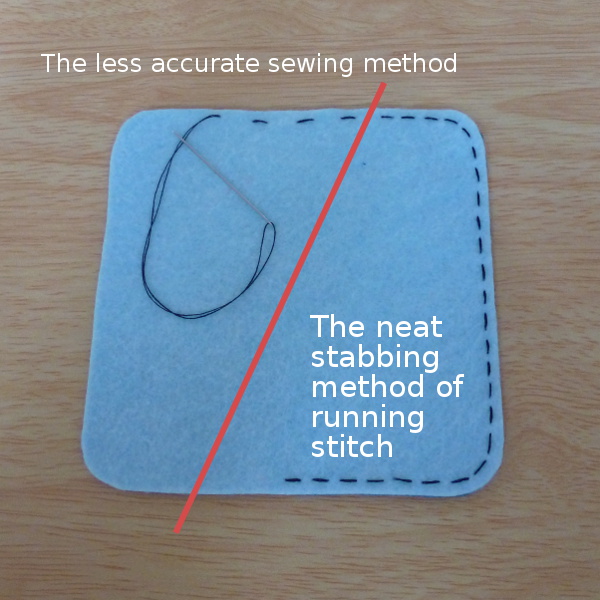
Using this sewing method where the needle weaves through the fabric, it is difficult to produce very small stitches even if you are able to get them evenly spaced.
You can see from my example above that I end up with larger gaps between each stitch and I also find it tricky to keep stitches in line with the edge.
This method is indeed faster to work but it is also a lot less accurate. For that reason, I only use this technique when the stitches will not be seen or because I am basting*.
*Basting is making temporary stitches to secure something and then the stitches are removed when they are no longer needed.
This makes it a good stitch for constructing felt ornaments, making collectible plush toys and many other felt and fabric crafts.
Apart from its obvious functional side, it can be used a lot in decorative sewing and also embroidery too.

On this miniature felt pin, I used running stitch to create a patterned fill stitch to create the hedgehog spines in a darker shade of brown.
The simple rows of tiny straight stitches are more than enough to suggest the spines of this woodland creature.

Image Credit: Original image shared by bluemorphos on Pixabay with a CC License
This is an example of running stitch applique. The brown wing of the bird has been attached to the green body using a simple running stitch around the edge.
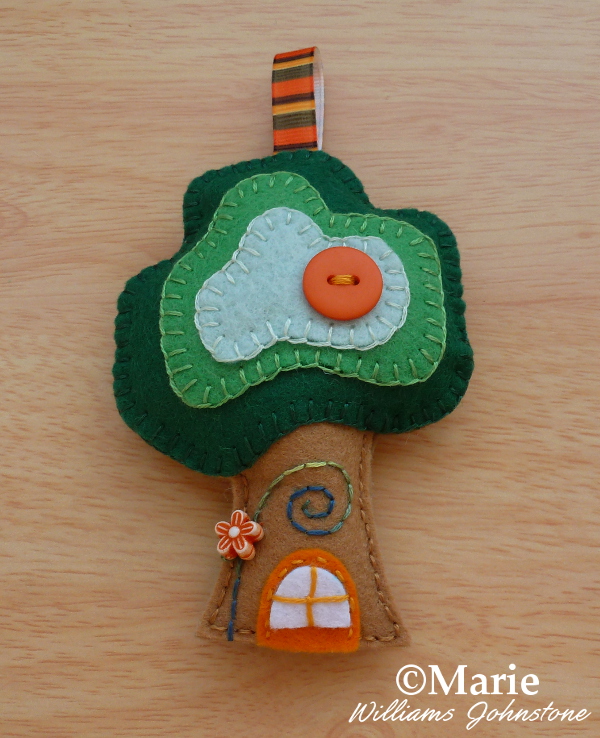
Running stitch can become a little more exciting and decorative when you use it in curved lines instead of straight. You can see the curved lines above the door in this felt tree house design.
I often use a temporary fabric marker to draw curved lines like this out. This provides a handy guide to follow once I start stitching.
In this example above, I used variegated embroidery floss which changes color as you sew. This floss changed from dark to light green which is perfect for my felt tree house vine.
Ways to Use Running Stitch With Felt Crafts:
If you are just beginning to sew by hand, you should come see my plushies for beginners page which tells you all you need to know about making felt plushies. It also provides your very first starter tutorial.
Related Content You Should Also Love:
Page Last Updated:
There are lots of different hand sewn stitches but the main basic one you should know is called the running stitch. Luckily this is also the easiest hand stitch that you can learn too.
Even if you already think you know how this basic straight stitch works, you'll still learn valuable information on using this hand stitch with pictures just perfect for beginners and upwards.
Note: This post may contain affiliate links for which I can be compensated.
Running Stitch is the Easiest Hand Stitch You Can Learn and So Versatile

Table of Contents
How to Work Running Stitch
Working Running Stitch Around a Corner
Getting a Really Neat Running Stitch Along an Edge
A Faster Method of Sewing Running Stitch
Running Stitch Uses and Examples With Felt
Running stitch, also known as straight stitch, is a really simple and easy hand stitch for anyone to learn. It is often taught as a basic first stitch to children when they are learning how to sew and also to adult learners who are new to sewing.
The stitch is very versatile and you could sew most beginner felt plushies and small items just by using this alone. It can be used as both a functional stitch as well as a decorative one.
In sewing small plushies, ornaments and toys, running stitch is most often used to quickly and easily sew two pieces of felt together. It makes a fairly strong seam and can also be worked around the edge of the felt pieces ready to fill the insides with toy stuffing or fiber fill.
How to Work the Easiest Hand Stitch: Running Stitch With Pictures

Step 1: Pinning Two Felt Pieces Together
Although this stitch can be used in a variety of ways, most often running stitch is used to sew together two pieces of fabric. These could be stitched together to make a flat item or to make a stuffed design which is filled with fiber fill - like a plushie or tree ornament.To demonstrate running stitch, I've pinned together one light blue felt square and a dark blue felt square so you can see the different pieces easily during the sewing process.
Felt is the ideal material to practice all your stitches on because it doesn't fray.
I am using a black thread for contrast. Normally I would use a color thread that matches up with the color of the felt. Since you need to see the finished stitching, I'm using black for good contrast.

Step 2: Decide on Your Starting Point for Sewing
You first need to decide where to start sewing. In the case of sewing together and joining two pieces of felt, you'd normally start near the edge.When sewing a smaller piece of fabric onto felt or even felt onto felt (which is known as applique) you'd normally sew near the edge of the top piece of fabric. With decorative sewing, where you start depends entirely on the look you're going for.
When sewing small felt ornaments, plushies and toys, the seam allowance (area between the edge of the fabric and the stitch line) is normally going to be quite small. I am used to hand sewing about 4-5mm away from the cut edge. You will need to practice until you find how close to the edge you prefer to sew.
Thread your needle and knot the end. Push your threaded needle through from the back of the felt to the front.

Step 3: Pull the Thread to Secure the Knot at the Back
Carefully pull the thread through all the way to the front of the felt. This will leave the knot snugly in place at the back.
⭐ If you have more than one layer of fabric that you are sewing, as I do here, you can hide the initial knot by placing it at the back of the top layer of fabric instead. Simply start by sewing from the back of the top layer instead of the bottom one. This will insert the knot between the layers and is a neater way of starting off.
You can see the knot at the back on the darker blue felt in the photo above. The rest of the thread on the needle has been pulled through to the front.

Step 4: Push the Needle Down to Make Your First Running Stitch
Move the tip of the needle in the direction that you want to sew. We are sewing along the edge of the felt so I've moved about 5-6mm to the left from where the thread originally came up.You can go in any direction that you prefer with straight or running stitch, even diagonally and following round curves, but for this example I'm sewing along the left side of the edge.
Place the needle tip where you want to make your first stitch and push it down through the layers of felt.

Step 5: Forming the Second Stitch
Make sure that the thread is pulled all the way through to the back of the felt.Carrying on in the same direction, leave the desired spacing that you want between the stitches and push the tip of your needle through from the back to the front of your fabric.
Pull the thread all the way through to the front. Don't pull too tightly, you want to make sure that all the thread comes through without pulling it too hard.
If you pull the thread too tightly, you could snap the thread or pucker the fabric.

Step 6: Working the Running Stitch Really is Easy
Now you know how to form stitches, carry on with steps 4 and 5, weaving your needle down through the felt and back up through the felt to create your running stitches.
⭐ Although the stitches are very visible in my photos, normally you'd choose a thread close to the main color of the felt or fabric. When you use a thread which is a similar color to the fabric, the stitches don't stand out nearly so much.
As well as trying to keep to a straight line around the edge of the felt, practice trying to make the stitches a similar size and with the same sized gaps between.
Video on How to Sew Running Stitch by Hand
Learn how to sew this easy stitch using this video as a guide. It also shows you how to gather the fabric or material to create a ruffled effect.

This photo shows what the stitches look like on the back or reverse side. They are not as neat as the running stitches on the front.
This makes running stitch ideal for items where they will be viewed mostly from the front side such as tree ornaments but a little less ideal for items which are often viewed from both sides. So that is something to bear in mind when you start a felt project.

Practice Straight Lines Before Working Around Corners
You'll need to make sure that you understand how this stitch works and be confident at producing straight lines with it before starting on corners.Corners are not as tricky as they look. You may just have to think for a fraction longer about where your stitches will go.
Even around a corner, you want to keep the stitches the same distance away from the edge as you do with a straight line.
⭐ If it helps, use a water soluble marking pen to draw out the line around the corner which your stitches need to follow. A water soluble fabric marking pen can be dabbed off later, after your stitches are in place.
When working corners you may sometimes need to make the individual stitches a bit smaller or the gaps between a little smaller just to get the look right. Knowing what will work best really does come with practice.
Getting a Really Neat Running Stitch Along an Edge

Getting really neat at sewing this straight stitch by hand comes with a lot of practice. You want to try and get into a rhythm of the needle going up and down through the felt layers and producing similar sized stitches and gaps. You also need to bear in mind the correct spacing away from the edging.
I find that it helps me to hold the felt between my forefinger and thumb. I use my forefinger at the back of the felt as a guideline for the needle.
The needle glides just over the top of my finger, forwards and back. As I work along the edge, my fingers automatically move the felt forward so I can continue along with the line of stitches.
I also turn the felt pieces around between my thumb and forefinger when I need to work around a corner or along a different side. My hands always stay in the same position but the fabric moves.
A Faster Method of Sewing Running Stitch

The usual way to hand stitch is by using what is known as the stabbing method. This is where the needle goes fully up and down through the fabric as you make a stitch.
My stitch tutorials will all focus on the stabbing method because taking one stitch at a time is the most accurate way to hand stitch and get neatly sized and spaced stitches.
My running stitch step by step tutorial at the start of this post, showed you the stabbing method of working this straight stitch.
When you make small items from felt such as ornaments and miniature plushies, having stitches that look neat is even more important because you will notice the stitches even more on smaller creations.

However, if the look of the stitches is not an issue, you may prefer a faster method of sewing running stitch which is called the sewing method.
Start your running stitch off in the same way by knotting the thread and bringing the threaded needle through to the front of the fabric.
From then on, your needle no longer passes fully to the back of the fabric. Instead it stays at the front and merely weaves in and out of the fabric to create several stitches at once.

Using this sewing method where the needle weaves through the fabric, it is difficult to produce very small stitches even if you are able to get them evenly spaced.
You can see from my example above that I end up with larger gaps between each stitch and I also find it tricky to keep stitches in line with the edge.
This method is indeed faster to work but it is also a lot less accurate. For that reason, I only use this technique when the stitches will not be seen or because I am basting*.
*Basting is making temporary stitches to secure something and then the stitches are removed when they are no longer needed.
Running Stitch Uses and Examples With Felt
Running stitch is a really good stitch for sewing together layers of felt as I've demonstrated. It is easy and quick to sew and provides a fairly strong seam. For an even stronger seam, you need to learn to sew backstitch.This makes it a good stitch for constructing felt ornaments, making collectible plush toys and many other felt and fabric crafts.
Apart from its obvious functional side, it can be used a lot in decorative sewing and also embroidery too.

On this miniature felt pin, I used running stitch to create a patterned fill stitch to create the hedgehog spines in a darker shade of brown.
The simple rows of tiny straight stitches are more than enough to suggest the spines of this woodland creature.

Image Credit: Original image shared by bluemorphos on Pixabay with a CC License
This is an example of running stitch applique. The brown wing of the bird has been attached to the green body using a simple running stitch around the edge.

Running stitch can become a little more exciting and decorative when you use it in curved lines instead of straight. You can see the curved lines above the door in this felt tree house design.
I often use a temporary fabric marker to draw curved lines like this out. This provides a handy guide to follow once I start stitching.
In this example above, I used variegated embroidery floss which changes color as you sew. This floss changed from dark to light green which is perfect for my felt tree house vine.
Ways to Use Running Stitch With Felt Crafts:
- ✔ Sewing layers of felt together for construction purposes
- ✔ Securing fabric or trim on top of felt
- ✔ Applique: sewing a smaller piece of felt or fabric onto a bigger piece - usually to create a pretty design
- ✔ Creating ruffles in fabric by gathering
- ✔ Outlining a design on the felt as a decorative stitched motif
- ✔ Using the straight stitches as a decorative fill pattern
- ✔ Basting: making temporary stitches to hold fabrics in place
- ✔ Decorative embroidery: enhancing a design with stitches
If you are just beginning to sew by hand, you should come see my plushies for beginners page which tells you all you need to know about making felt plushies. It also provides your very first starter tutorial.
Related Content You Should Also Love:
Essential Sewing Supplies for Beginners
What is the Strongest Hand Stitch?
Learn How to Hand Sew Blanket Stitch
How to Sew Plushies for Beginners
More Fabric and Felt Crafts
What is the Strongest Hand Stitch?
Learn How to Hand Sew Blanket Stitch
How to Sew Plushies for Beginners
More Fabric and Felt Crafts
Page Last Updated:


Comments
Post a Comment
CraftyMarie is a craft themed website by Marie Williams Johnstone. I love to craft in the winter and garden in the summer. I make handmade cards, papercrafts, crochet and seasonal crafts. I enjoy many of the more traditional crafts and hobbies including sewing, embroidery and working with felt and fabric. Thanks for leaving me a comment. Comments do not show up until I approve them. Marie