What is the Strongest Stitch by Hand and Why You Need It
Backstitch is the strongest stitch that you can sew by hand. It is also thankfully one of the easier stitches to learn too which makes it an ideal beginner sewing stitch.
Although a simple running stitch is fine for the majority of the time when sewing with felt, sometimes you need something even more durable, especially if making handmade toys that could be roughly handled.
Discover all about backstitch and what is the strongest stitch by hand that you can work. Get a step by step stitch tutorial on how it is worked as well as why you need to know how to use it.
Note: This post may contain affiliate links for which I can be compensated.

Table of Contents
What is the Strongest Stitch?
How to Work Backstitch
Tips on Working the Backstitch by Hand
What is This Strong Back Stitch Used for?
Backstitch is the strongest stitch that you can sew by hand. This makes it one of the top stitches that you should learn how to work for your own sewing projects.
Knowing how to sew a really durable and tough stitch is going to prove invaluable to your sewing knowledge - especially if you are making items to sell.
A simple running or straight stitch can be pretty tough and hard to break, especially if you use polyester thread which is very strong. Backstitch is even stronger though because the stitches overlap on the wrong side making the line of stitches even tougher to break.
If you are not yet familiar with how to work a running stitch, please visit my tutorial for this and practice until it is very familiar. You really should know how to sew that before attempting backstitch.
For good contrast, I am using a black polyester thread. Normally I'd match the color of the thread with the color of the felt. Since I need to show you the finished stitching, I'm using a black for good contrast.

You may be sewing around the seams of felt plushies, plush toys and dolls or items that need a tougher join to hold them together well.
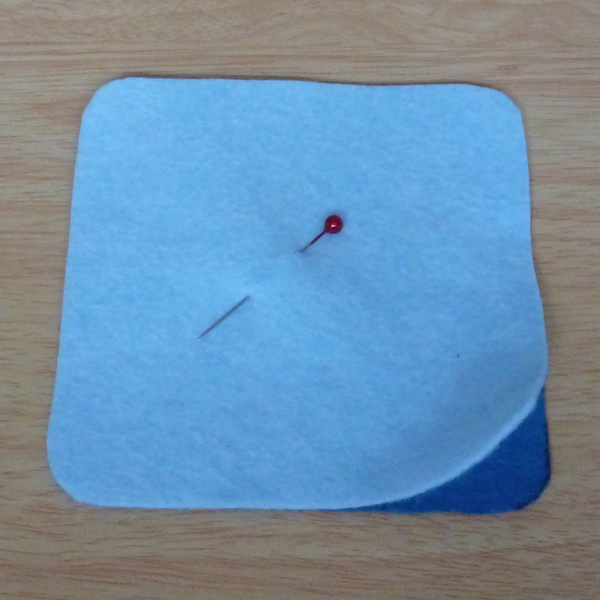
To demonstrate sewing backstitch by hand, I pinned together one light blue and one dark blue square of felt. The light blue is the front of the fabric and the dark is on the reverse. You can easily see the front and back through the backstitch tutorial.

With applique which is sewing a smaller piece of fabric or felt onto another (larger) piece of felt, you would normally sew near the edge of the top piece of fabric. For purely decorative sewing, where you start to sew may depend on the whole look that you're going for.
When sewing small plushies, felt toys and dolls and felt ornaments, the seam allowance (area between the raw or cut edge of the fabric and the stitch line) would normally be quite small.
I have got used to hand stitching around 4-5mm away from the edge. You may need to keep on practicing until you find out just how close to the edge you prefer to sew.
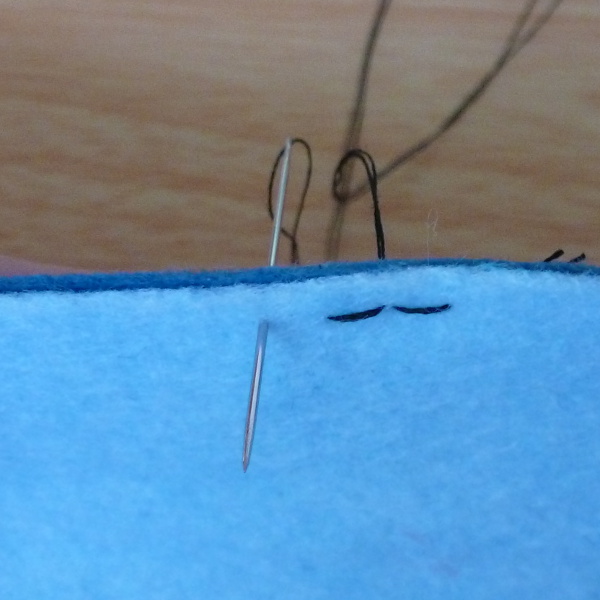
Thread your needle up and knot the end. Push your threaded needle through from the back of the felt to the front. Carefully pull the needle and all the thread through to the front of the felt.

Now move the needle tip to the front of the thread and push down to form your very first stitch. Push the needle all the way through the felt and gently tug the thread to come all the way to the back, leaving a first stitch at the front.

This is the same technique as straight stitch so far except you may have left a larger than normal spacing.

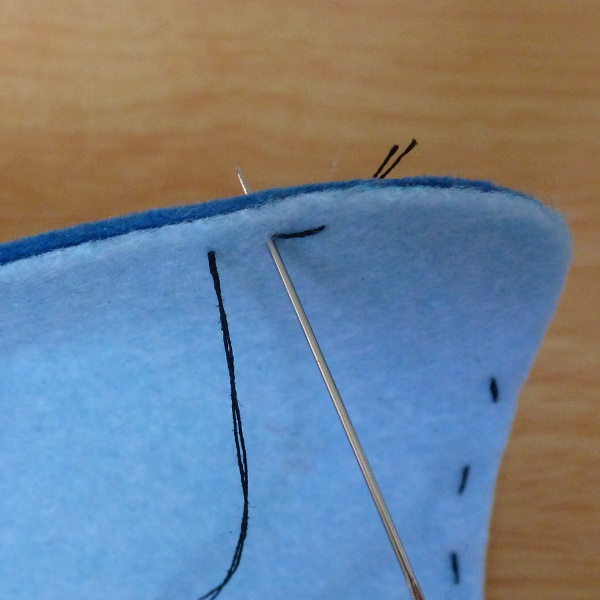
Place the tip of the needle very close to the end of the previous stitch. Push the needle down all the way through to the reverse of the fabric and also pull through the thread.

Repeat steps 4 and 5 as far as you need to in order to sew your line of stitches.
This video show the exact same technique for sewing backstitch by hand. I advise watching this as well as running through my photo guide on this stitch.

As I sew, my finger naturally moves back and passes the felt forward so I can easily work new stitches.

Your corner stitches may look a little angular instead of nicely curved. This is fine. Unless you are taking very small stitches, that is likely to happen. Just try to keep to roughly the same stitch size and the same distance from the edge.

You can also space these back stitches further apart to look more like a standard straight stitch.
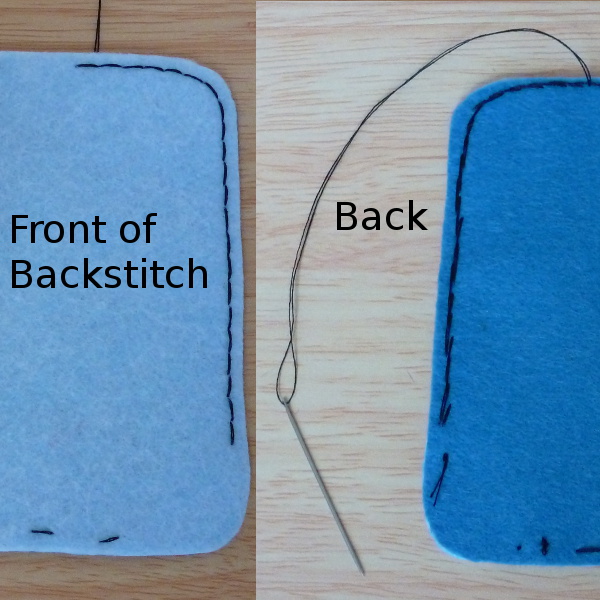
On the right side or front of the fabric, the stitches look like straight running stitches.
It is only when you look over at the back or reverse side of the fabric that you can see a real difference. The back is not as neat and features overlapping loops of thread.
It can be important to know what the reverse side of stitching looks like if you plan on having the reverse stitching visible on your finished project.
The main use of backstitch is to join seams together. In terms of sewing felt, you would normally use it to join two pieces of felt to make a very sturdy seam. For example, joining pieces of felt on a toy or a stuffed plushie which is likely to be handled a lot and needs to be stitched strongly.
It is the perfect choice for any hand repairs and mending of items because it creates such a strong seam and can look very similar to machine stitching. In fact, it is often used for repairs instead of machine stitching when the repair is in an awkward place to sew.
As with any straight stitch, it can be used to sew outline shapes for decoration and to form stitch writing as well.
Using Backstitch Instead of Knots:
One lesser known use of the backstitch, often used by tailors, is to sew a couple of these at the start and end of a row of stitches instead of using knots which can leave unsightly bumps in the fabric. So they can make a great alternative to using knots.
To work backstitches instead of knots, you need to work 2-3 of them on top of each other in order to fix the thread in place. This will add further strength to any seam.
I hope you enjoyed learning all about this rather amazing and useful stitch. Have fun practicing it.
Related Content You Should Also Love:
Page Last Updated:
Although a simple running stitch is fine for the majority of the time when sewing with felt, sometimes you need something even more durable, especially if making handmade toys that could be roughly handled.
Discover all about backstitch and what is the strongest stitch by hand that you can work. Get a step by step stitch tutorial on how it is worked as well as why you need to know how to use it.
Note: This post may contain affiliate links for which I can be compensated.
What is the Strongest Stitch by Hand and Why You Need It: All About Backstitch

Table of Contents
What is the Strongest Stitch?
How to Work Backstitch
Tips on Working the Backstitch by Hand
What is This Strong Back Stitch Used for?
What is the Strongest Stitch?
Backstitch is the strongest stitch that you can sew by hand. This makes it one of the top stitches that you should learn how to work for your own sewing projects.
⭐ Backstitch is a variation of a straight stitch. It is called a "back" stitch because the needle is always placed to the back of and behind where the thread is pulled out as you sew along. With the usual straight, running or forward stitch, the needle always goes in front of the thread.
Knowing how to sew a really durable and tough stitch is going to prove invaluable to your sewing knowledge - especially if you are making items to sell.
A simple running or straight stitch can be pretty tough and hard to break, especially if you use polyester thread which is very strong. Backstitch is even stronger though because the stitches overlap on the wrong side making the line of stitches even tougher to break.
How to Work Backstitch: Step by Step Guide With Photos
If you are not yet familiar with how to work a running stitch, please visit my tutorial for this and practice until it is very familiar. You really should know how to sew that before attempting backstitch.
For good contrast, I am using a black polyester thread. Normally I'd match the color of the thread with the color of the felt. Since I need to show you the finished stitching, I'm using a black for good contrast.

Step 1: Pinning Two Felt Pieces Together
Backstitch can be used in a variety of ways though mostly to offer strength to seams that really need extra durability. So most often, you will need to sew backstitch through two pieces of felt (or felt and fabric) in order to join them together with a strong seam.You may be sewing around the seams of felt plushies, plush toys and dolls or items that need a tougher join to hold them together well.
⭐ Since you especially want a strong stitch when sewing backstitch by hand, I advise you to also use a strong thread too. One of the strongest threads that I recommend are Gutermann polyester threads. These are what I use for all functional hand stitching - and even some decorative too.
To demonstrate sewing backstitch by hand, I pinned together one light blue and one dark blue square of felt. The light blue is the front of the fabric and the dark is on the reverse. You can easily see the front and back through the backstitch tutorial.

Step 2: Decide on Your Starting Point for Sewing
The first thing to decide is where you will start sewing. In the usual case of sewing together and joining two pieces of felt, you would normally begin sewing near the edge.With applique which is sewing a smaller piece of fabric or felt onto another (larger) piece of felt, you would normally sew near the edge of the top piece of fabric. For purely decorative sewing, where you start to sew may depend on the whole look that you're going for.
When sewing small plushies, felt toys and dolls and felt ornaments, the seam allowance (area between the raw or cut edge of the fabric and the stitch line) would normally be quite small.
I have got used to hand stitching around 4-5mm away from the edge. You may need to keep on practicing until you find out just how close to the edge you prefer to sew.
Thread your needle up and knot the end. Push your threaded needle through from the back of the felt to the front. Carefully pull the needle and all the thread through to the front of the felt.

Step 3: Form Your Starting Stitch
The initial starting process for the backstitch is exactly the same as the standard straight running stitch. Your thread should be pulled all the way to the front of the felt with a knot securing it at the back.Now move the needle tip to the front of the thread and push down to form your very first stitch. Push the needle all the way through the felt and gently tug the thread to come all the way to the back, leaving a first stitch at the front.

Step 4: Preparing to Make the Second Stitch
Judge a similar sized gap to the size of your first stitch and push the needle tip up from the back of the felt at this point. Bring the needle all the way to the front and pull through the thread to the front as well.This is the same technique as straight stitch so far except you may have left a larger than normal spacing.

Step 5: Forming Your First Real Backstitch
Here is the point where you really start sewing backstitch. Your needle and thread should be pulled all the way to the front of the felt at this point.
⭐ From now on, you'll be passing the needle behind where the thread is coming through to make each stitch. You work the stitch quite literally backwards instead of in front as you'd do with a normal straight stitch.
Place the tip of the needle very close to the end of the previous stitch. Push the needle down all the way through to the reverse of the fabric and also pull through the thread.

Step 6: Continuing to Work the Backstitch
Carry on working the backstitch by bringing the needle up from the back of the felt about a stitch-width away from the end of the previous stitch. Then sew backwards by pushing the tip of the needle back close to the end of the previous stitch.Repeat steps 4 and 5 as far as you need to in order to sew your line of stitches.
Video Showing How Backstitch is Worked
This video show the exact same technique for sewing backstitch by hand. I advise watching this as well as running through my photo guide on this stitch.
Tips on Working the Backstitch by Hand

Using Your Finger as a Guide Along the Fabric Edge
I like to use my finger as a guide at the back of the felt near the edge of where I am sewing. My finger acts as a guide to help steady the needle as it passes through the fabric.As I sew, my finger naturally moves back and passes the felt forward so I can easily work new stitches.

Working Backstitch Around a Corner
As with any line stitch, you can work around corners as well. To sew your way around a corner, simply try and keep the same distance away from the edge of the fabric. This helps to make the sewing look neat.Your corner stitches may look a little angular instead of nicely curved. This is fine. Unless you are taking very small stitches, that is likely to happen. Just try to keep to roughly the same stitch size and the same distance from the edge.

What the Front and Back/Reverse Sides of Fabric Look Like
Backstitches can be made so that the individual stitches are very close together. You can even have the stitches touching so they look almost like machine stitching.You can also space these back stitches further apart to look more like a standard straight stitch.
On the right side or front of the fabric, the stitches look like straight running stitches.
It is only when you look over at the back or reverse side of the fabric that you can see a real difference. The back is not as neat and features overlapping loops of thread.
It can be important to know what the reverse side of stitching looks like if you plan on having the reverse stitching visible on your finished project.
What is This Strong Back Stitch Used for?
What Backstitch is Often Used For:- Joining two pieces of felt, sewing seams
- Hand repairs and mending
- Sewing outline shapes and designs
- Alternative to using knots at the start and end of sewing
The main use of backstitch is to join seams together. In terms of sewing felt, you would normally use it to join two pieces of felt to make a very sturdy seam. For example, joining pieces of felt on a toy or a stuffed plushie which is likely to be handled a lot and needs to be stitched strongly.
It is the perfect choice for any hand repairs and mending of items because it creates such a strong seam and can look very similar to machine stitching. In fact, it is often used for repairs instead of machine stitching when the repair is in an awkward place to sew.
As with any straight stitch, it can be used to sew outline shapes for decoration and to form stitch writing as well.
Using Backstitch Instead of Knots:
One lesser known use of the backstitch, often used by tailors, is to sew a couple of these at the start and end of a row of stitches instead of using knots which can leave unsightly bumps in the fabric. So they can make a great alternative to using knots.
To work backstitches instead of knots, you need to work 2-3 of them on top of each other in order to fix the thread in place. This will add further strength to any seam.
I hope you enjoyed learning all about this rather amazing and useful stitch. Have fun practicing it.
Related Content You Should Also Love:
Learn to Sew The Easiest Hand Stitch
All the Essential Sewing Supplies for Beginners
Learn How to Hand Sew Blanket Stitch
How to Sew Plushies for Beginners
More Fabric and Felt Crafts
All the Essential Sewing Supplies for Beginners
Learn How to Hand Sew Blanket Stitch
How to Sew Plushies for Beginners
More Fabric and Felt Crafts
Page Last Updated:


Thank you!
ReplyDeleteThank you so much for the details making it super easy to understandfor us that have zero hand sewing knowledge! I now feel much more confident about starting my project.
ReplyDelete