How to Make an Easel Card: Easy Beginner Tutorial
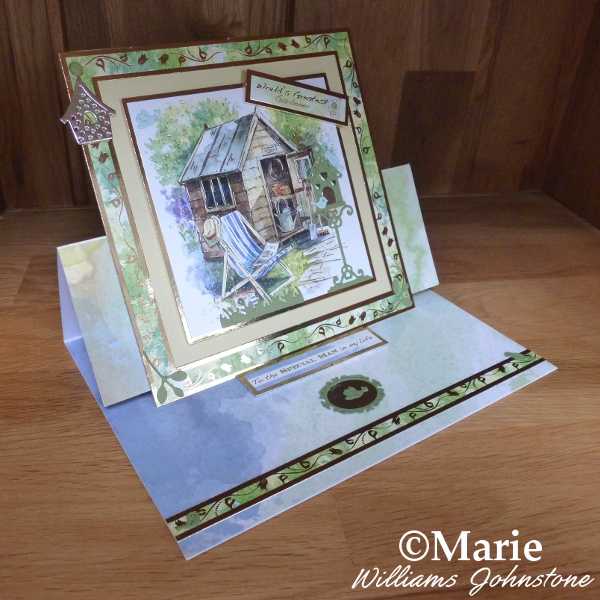
Basic easel cards are really easy to make but, once on display, look like they took a long time to craft. They add some pizzazz and dimension to your finished handmade card and stand up rather like an easel.
Learn how you can make an easel card of your own very easily with this step by step photo tutorial that walks you right through the process. This is a perfect craft for card making beginners.
This simple folded card is easily and quickly made from a standard blank greeting card or, alternatively, from your own scored card. Once you learn how to make easel cards, you won't want to stop!
Note: This post may contain affiliate links for which I can be compensated.

Easel cards, folded cards that stand up somewhat like an art easel, look fabulous on display and offer something very different from the normal greeting card. And they fold almost flat for mailing too.
Luckily they are very simple and quick to make, once you know how. Let me guide you through how to make your very first easel card with my step by step photo guide.
What You Need to Make an Easel Card:
A square or rectangular shaped card blank - you can also make your own
Some paper to decorate your card
Some toppers or embellishments - I used Hunkydory toppers
3D foam squares, tape, pop dots or pads
Optional scoring tool and a score board if you have one
Ruler, pencil, scissors and your chosen adhesive
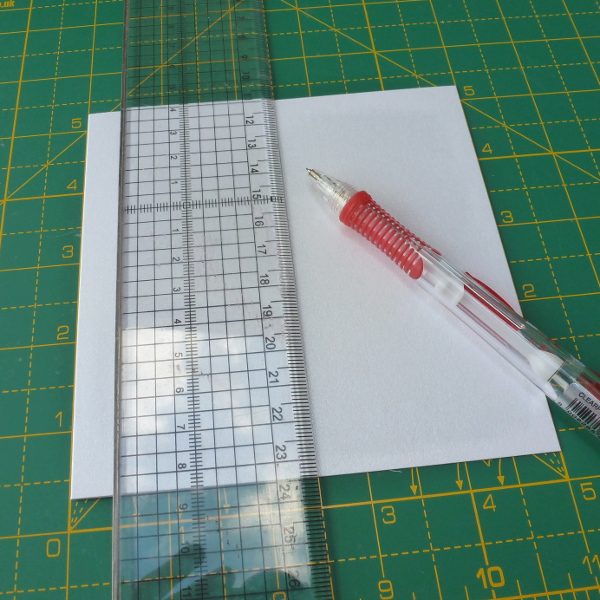
The process works exactly the same with a plain rectangular shaped card as well.
With your card blank, make sure it is folded and placed so that the fold of the card is to your left.
You need to mark the middle or center of your card front across from the left. In my case, the card is 5 inches wide so the middle point is at 2.5 inches. A simple pencil mark top and bottom indicates the middle.
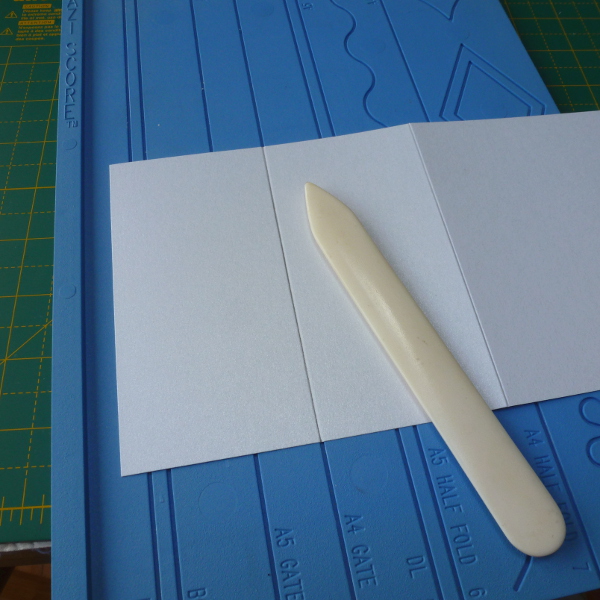
If you don't have a scoring tool or score board, you can just fold the card front in half by hand. You won't get such a good crease but it works.
Use a scoring tool and ruler or scoring tool and score board to carefully score across the middle of the card front.
With a scoring tool, it is best not to press too hard in case you rip the card. Score 2 or 3 times with less pressure to make a good crease line.

You can see the shape of the fold in the photo. I have taken a sideways shot to emphasize the fold more.
Take care to only fold the front of the card and not the back.

One thing to note with easel cards is that, when they are on display, part of the inside of the card is visible.
You don't need to decorate the inside of your card but I think it looks better if you do.
I have lined the inside bottom section of the card with decorative paper. I prefer to stick this down with double sided tape which is less messy than glue. For speed, I like to use double sided adhesive rollers which are very easy.

We can easily do this by using a 3D strip, panel or embellishment such as a button on the inside of the card. Using 3D foam squares or pads on the bottom of a simple greeting strip or small topper works really well.
Open your card so the inside is showing. Stick your chosen 3D embellishment roughly across the middle of the bottom section.
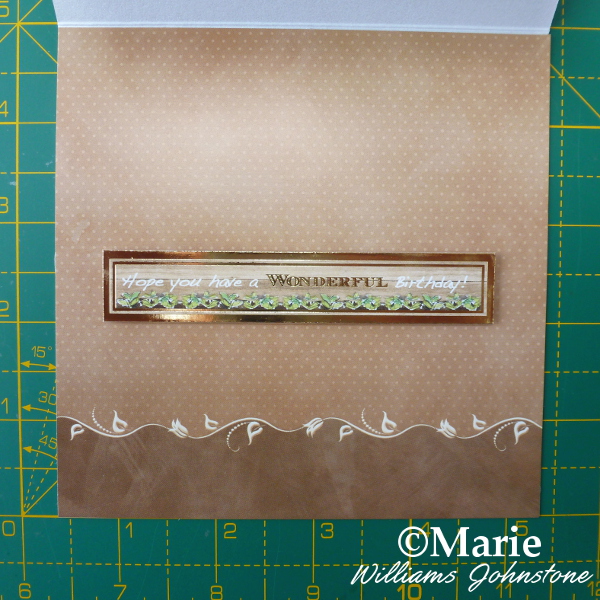
When you fold the card front up, prop the edge of the card in front of this greeting to keep it standing open.
The easel card can be folded up and down as you wish and it folds almost flat for easy mailing and posting too.
For a square card, I like to use square toppers that will fit neatly on the front of the card.
It helps to work on a separate base square of card that is cut to the same size as your card front (mine was 5 by 5 inches) or use a square that is smaller than your card front.
I decorated my square base very easily by using pre-printed Hunkydory toppers. You could use any pre-printed design or make your own design using stamped images or embellishments.
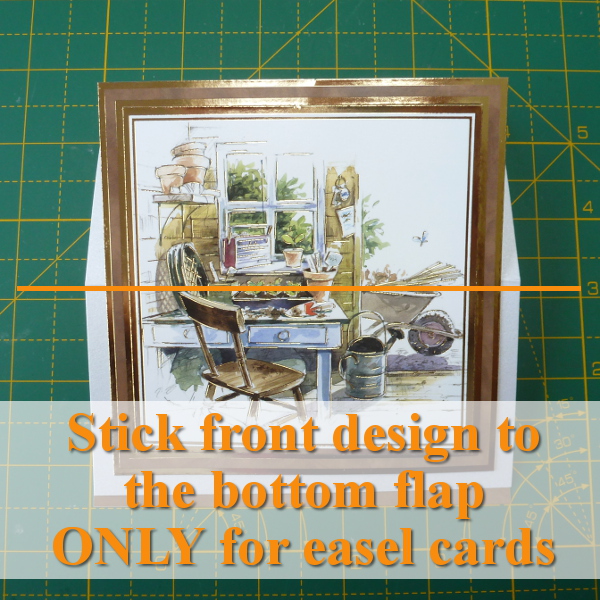
Once your square panel is complete, you need to stick it to the front of your card.
NOTE: you must only stick the bottom section of the design onto the bottom folding flap on your card front. Otherwise you will not have an easel card. Please view the next photo so you can see a side view.


Once you understand how the process works, you will love making these as they look fabulous on display.
More examples of this basic folding easel card are shown below for you.
I added on a few little matching dies cut with my Sizzix Big Shot die cutting machine.

The front design panel is made using simple decoupage techniques and the top has been cut to shape around the nature design.
You should now have the confidence to try making your own easy easel card. Go back and read through again if you feel you need to. Enjoy making some wonderful cards.
Related Content You Should Also Love:
Page Last Updated:
Learn how you can make an easel card of your own very easily with this step by step photo tutorial that walks you right through the process. This is a perfect craft for card making beginners.
This simple folded card is easily and quickly made from a standard blank greeting card or, alternatively, from your own scored card. Once you learn how to make easel cards, you won't want to stop!
Note: This post may contain affiliate links for which I can be compensated.
How to Make an Easel Card: Really Easy Beginner Tutorial

Easel cards, folded cards that stand up somewhat like an art easel, look fabulous on display and offer something very different from the normal greeting card. And they fold almost flat for mailing too.
Luckily they are very simple and quick to make, once you know how. Let me guide you through how to make your very first easel card with my step by step photo guide.
What You Need to Make an Easel Card:
A square or rectangular shaped card blank - you can also make your own
Some paper to decorate your card
Some toppers or embellishments - I used Hunkydory toppers
3D foam squares, tape, pop dots or pads
Optional scoring tool and a score board if you have one
Ruler, pencil, scissors and your chosen adhesive

Step 1: Marking Where to Fold Your Easel Card
I've used a square card blank to demonstrate how to make an easel card because a square card is nice and easy to demonstrate with and square shaped easel cards look especially good on display.The process works exactly the same with a plain rectangular shaped card as well.
With your card blank, make sure it is folded and placed so that the fold of the card is to your left.
You need to mark the middle or center of your card front across from the left. In my case, the card is 5 inches wide so the middle point is at 2.5 inches. A simple pencil mark top and bottom indicates the middle.

Step 2: Score the Front of Your Card Blank Across the Middle
Once you have marked where the middle of the card front is, you need to score it for a smooth fold.If you don't have a scoring tool or score board, you can just fold the card front in half by hand. You won't get such a good crease but it works.
Use a scoring tool and ruler or scoring tool and score board to carefully score across the middle of the card front.
With a scoring tool, it is best not to press too hard in case you rip the card. Score 2 or 3 times with less pressure to make a good crease line.

Step 3: Fold the Front of Your Card
Once you've scored the front of your card blank, fold it downwards. This creates what is known as a Mountain fold because the fold has a peak like the shape of a mountain.You can see the shape of the fold in the photo. I have taken a sideways shot to emphasize the fold more.
Take care to only fold the front of the card and not the back.

Step 4: Decorate the Inside of Your card
IMPORTANT: first rotate the card so the fold is across the top in front of you. Easel cards are top folding cards so the fold of the card blank needs to be across the top of the card and not at the side.One thing to note with easel cards is that, when they are on display, part of the inside of the card is visible.
You don't need to decorate the inside of your card but I think it looks better if you do.
I have lined the inside bottom section of the card with decorative paper. I prefer to stick this down with double sided tape which is less messy than glue. For speed, I like to use double sided adhesive rollers which are very easy.

Step 5: Make a 3D Strip to Prop the Card Open
Your easel card needs something that helps it to stay propped open when on display.We can easily do this by using a 3D strip, panel or embellishment such as a button on the inside of the card. Using 3D foam squares or pads on the bottom of a simple greeting strip or small topper works really well.
Open your card so the inside is showing. Stick your chosen 3D embellishment roughly across the middle of the bottom section.

Step 6: Your 3D Greeting Will Keep the Easel Card Open
Here you can see my greeting topper. It may look flat but it has 3D foam squares underneath so it is raised up a fraction.When you fold the card front up, prop the edge of the card in front of this greeting to keep it standing open.
The easel card can be folded up and down as you wish and it folds almost flat for easy mailing and posting too.

Step 7: Adding the Front Design to Your Easel Card
Now the inside of the card is done and we've added a 3D embellishment that can help to keep the card propped open for display, it's time to work on the front of your card design.For a square card, I like to use square toppers that will fit neatly on the front of the card.
It helps to work on a separate base square of card that is cut to the same size as your card front (mine was 5 by 5 inches) or use a square that is smaller than your card front.
I decorated my square base very easily by using pre-printed Hunkydory toppers. You could use any pre-printed design or make your own design using stamped images or embellishments.
Once your square panel is complete, you need to stick it to the front of your card.
NOTE: you must only stick the bottom section of the design onto the bottom folding flap on your card front. Otherwise you will not have an easel card. Please view the next photo so you can see a side view.

Step 8: Side View Showing Where to Stick the Front Design Panel
The side view more clearly shows how you must only stick the bottom half of your front design onto the bottom flap on the front of your card.
Completed Square Easel Card: Easy to Make for Beginners
I promise that the easel card is very nice and easy to make, especially if you start with a pre-made square greeting card blank.Once you understand how the process works, you will love making these as they look fabulous on display.
More examples of this basic folding easel card are shown below for you.

Another Example of an Easy Square Easel Card With Hunkydory Toppers
This is another design I made also using Hunkydory card toppers. This one uses a rectangular card and a square front panel design for a different look.I added on a few little matching dies cut with my Sizzix Big Shot die cutting machine.

Easel Cards Can be Other Shapes and Designs
This pretty butterfly and bird design is made using a rectangular shaped card. I used a round floral topper with 3D foam pads underneath - even though this is over on one side, it still keeps the card propped open.The front design panel is made using simple decoupage techniques and the top has been cut to shape around the nature design.
You should now have the confidence to try making your own easy easel card. Go back and read through again if you feel you need to. Enjoy making some wonderful cards.
Related Content You Should Also Love:
Tonic Craft Kit Review: Is It REALLY Worth It?
NOW Try My Pop Up Box Card Tutorial
How to Use Die Cut Decoupage Kits
More Card Making Articles
More Paper Crafts to Enjoy
NOW Try My Pop Up Box Card Tutorial
How to Use Die Cut Decoupage Kits
More Card Making Articles
More Paper Crafts to Enjoy
Page Last Updated:


Comments
Post a Comment
CraftyMarie is a craft themed website by Marie Williams Johnstone. I love to craft in the winter and garden in the summer. I make handmade cards, papercrafts, crochet and seasonal crafts. I enjoy many of the more traditional crafts and hobbies including sewing, embroidery and working with felt and fabric. Thanks for leaving me a comment. Comments do not show up until I approve them. Marie