How to Make a Perler Bead Key Pattern
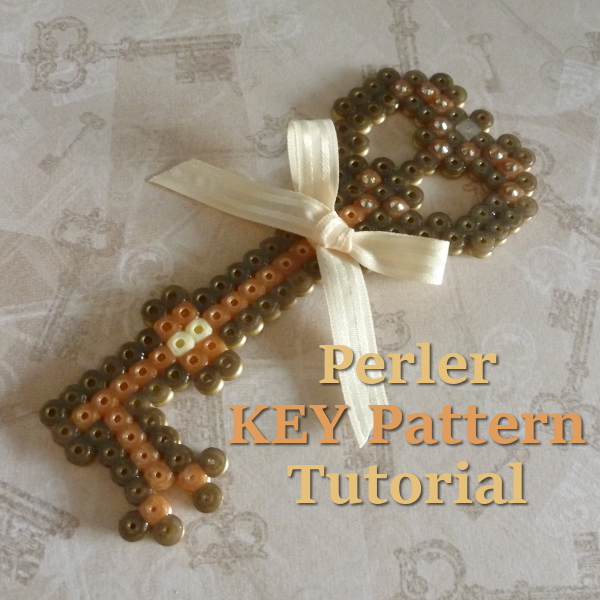
Learn how to make a Perler bead key pattern with fused beads. This is an easy and simple craft ideal to make for a special birthday such as a milestone 21st or 18th celebration.
When I realized I soon had a special, milestone birthday coming up on the calendar, I thought about something cute to make as an extra, thoughtful gift. The key symbol came to mind because it is a traditional symbol for reaching adulthood.
While a key shape could have been cut from gold card, I wanted something more lasting and Perler beads are ideal. Keys are symbols associated with other meanings to such as romance and giving your heart over to someone as well as with moving into a new home.
Note: This post may contain affiliate links for which I can be compensated.

This is a fun craft project that can be made and given for any number of occasions such as birthdays, milestones, celebrations, new homes and more.
The Perler bead key pattern is my own and if you work with the standard sized fused beads, it makes a finished product that is about as long as a small hand. I hope you have fun with this project.
Work in Gold Colors to Make a Special Perler Bead Key
I used two main shades of gold color Perler beads to work this key pattern. The outer and darker shade may looks like dark brown in the photo. However, it is a darker, antiqued gold color which looks far nicer in real view.
You pick up on this beautiful antique gold color especially around the edging of each bead. The main part of the middle coloring is a bright gold color which gives a really good contrast.
You could try using a couple of shades of silver color Perler beads instead of golds and you can buy a metallic mix of shades. Alternatively, come up with your own color choices. Perhaps pick out a favorite color for the person who you're giving it to.

Image Credit: photo belongs to the author.
You need to start right near the bottom of a large, square Perler bead pegboard because the length of the key is almost as high as the board.
I like to start 1 row up. For the outside edges of the key, I chose an antiqued gold color. This color looks quite brown except when you catch it on the sides where it looks beautifully metallic.
Work the first step of the pattern as shown in the photo which forms the bottom part.

Image Credit: photo belongs to the author.
This next photo shows the part of the pattern that you made already. It adds on a little more to the stem of the key shape. In fact the pattern is almost repeated.
Copy this pattern on your own pegboard.

Image Credit: photo belongs to the author.
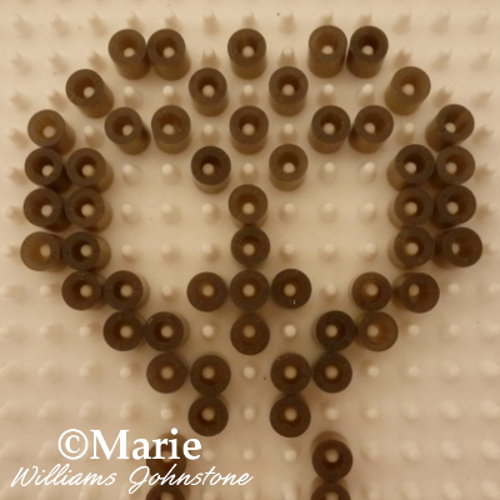
This is the top part of the key shape which is added on to the stem section. It is worked almost like a large heart shape.
This part of the design isn't hard but you need to get this part right before you carry on with the next step.
You should have 2 rows of pegs left free at the top of the board if you started one row up from the bottom back in the first step. Then you know you've completed it right.

Image Credit: photo belongs to the author.
This step focuses on adding in some detail to the very top of the key. You are adding in Perler beads to thicken the exterior of the key shape once completed. And you are also creating two circular areas which are left blank as you would expect with an older style, vintage or antique key.
This part is possibly the most difficult to see. Of course you can experiment with your own ideas if you like to create a key design that looks just a little different.

Image Credit: photo belongs to the author.
Once finished, move to the bottom of the pegboard and the very bottom section of the key pattern.
Here you need to add in some beads which make up the blade section. The blade is the part of a key that actually inserts itself into a lock. This part is much easier to complete.

Image Credit: photo belongs to the author.
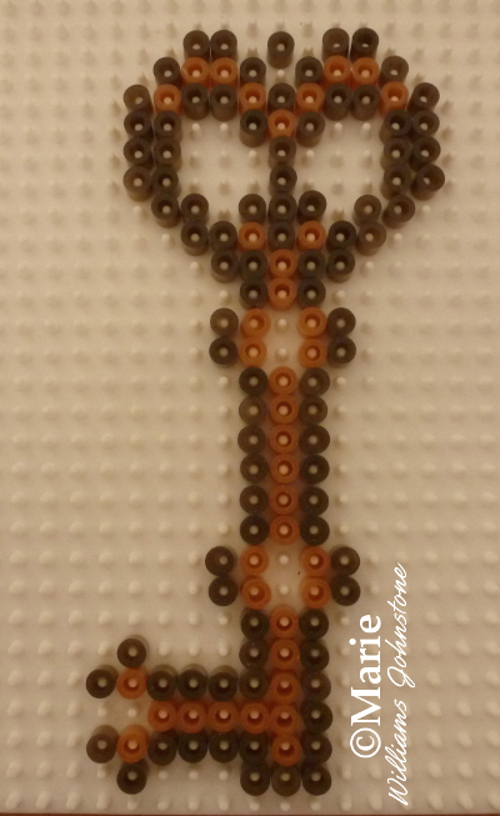
Now comes the best part of this pattern which is filling in the interior shades. Since you've already made the outline, this section is much easier to complete.
For the filling in I used a bright colored gold shade of Perler bead which provides a good contrast with the darker, antiqued shade. A metallic mix of Perler beads is available.
You'll notice that there are some pegs on the board that do not get filled in. If you happen to make a mistake and pop beads in where they shouldn't be, the easiest way to get them out again (without disturbing other beads) is to use tweezers.

Image Credit: photo belongs to the author.
To finish the design, I used 4 cream colored beads in the shaft of the key. And 1 final clear color bead to fill in the single space at the head of the key. You probably just need to choose a lighter shade of whatever colors you're using.
Once complete, an adult needs to iron the beads in order to fuse them all together. Always iron using the Perler ironing paper that you get in most of the big sets and tubs of beads (you can buy it separately too) and read the manufacturers instructions on how to do this process.
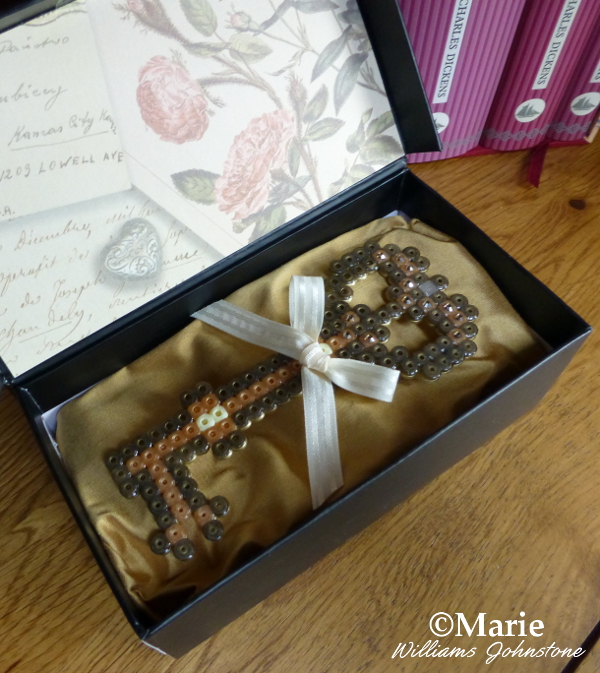
Of course you can dress up your completed key any way you choose. I added some gems and a bow to mine to make it look even more special. Come and look at the presentation box I used for this fun gift below.
➡️ Also See the Key to My Heart Perler Pattern Tutorial

Image Credit: photo belongs to the author.
When presented in a box like this, the key makes a really nice extra handmade gift. It is ideal for 18th, 21st and other milestone birthdays and celebrations. You can also use a key for a new home and new romances. A key is a symbol of luck and hope for the future.
Related Content You Should Also Love:
Page Last Updated:
When I realized I soon had a special, milestone birthday coming up on the calendar, I thought about something cute to make as an extra, thoughtful gift. The key symbol came to mind because it is a traditional symbol for reaching adulthood.
While a key shape could have been cut from gold card, I wanted something more lasting and Perler beads are ideal. Keys are symbols associated with other meanings to such as romance and giving your heart over to someone as well as with moving into a new home.
Note: This post may contain affiliate links for which I can be compensated.
How to Make a Perler Bead Key Pattern: Ideal Design for Special Birthdays, New Homes and More

This is a fun craft project that can be made and given for any number of occasions such as birthdays, milestones, celebrations, new homes and more.
The Perler bead key pattern is my own and if you work with the standard sized fused beads, it makes a finished product that is about as long as a small hand. I hope you have fun with this project.
Work in Gold Colors to Make a Special Perler Bead Key
I used two main shades of gold color Perler beads to work this key pattern. The outer and darker shade may looks like dark brown in the photo. However, it is a darker, antiqued gold color which looks far nicer in real view.
You pick up on this beautiful antique gold color especially around the edging of each bead. The main part of the middle coloring is a bright gold color which gives a really good contrast.
You could try using a couple of shades of silver color Perler beads instead of golds and you can buy a metallic mix of shades. Alternatively, come up with your own color choices. Perhaps pick out a favorite color for the person who you're giving it to.
Part 1: Making the Main Perler Bead Key Outline

Image Credit: photo belongs to the author.
You need to start right near the bottom of a large, square Perler bead pegboard because the length of the key is almost as high as the board.
I like to start 1 row up. For the outside edges of the key, I chose an antiqued gold color. This color looks quite brown except when you catch it on the sides where it looks beautifully metallic.
Work the first step of the pattern as shown in the photo which forms the bottom part.

Image Credit: photo belongs to the author.
This next photo shows the part of the pattern that you made already. It adds on a little more to the stem of the key shape. In fact the pattern is almost repeated.
Copy this pattern on your own pegboard.

Image Credit: photo belongs to the author.
This is the top part of the key shape which is added on to the stem section. It is worked almost like a large heart shape.
This part of the design isn't hard but you need to get this part right before you carry on with the next step.
You should have 2 rows of pegs left free at the top of the board if you started one row up from the bottom back in the first step. Then you know you've completed it right.
Part 2: Adding Detail to The Key Design

Image Credit: photo belongs to the author.
This step focuses on adding in some detail to the very top of the key. You are adding in Perler beads to thicken the exterior of the key shape once completed. And you are also creating two circular areas which are left blank as you would expect with an older style, vintage or antique key.
This part is possibly the most difficult to see. Of course you can experiment with your own ideas if you like to create a key design that looks just a little different.

Image Credit: photo belongs to the author.
Once finished, move to the bottom of the pegboard and the very bottom section of the key pattern.
Here you need to add in some beads which make up the blade section. The blade is the part of a key that actually inserts itself into a lock. This part is much easier to complete.
Part 3: Filling in the Color of the Perler Key Pattern

Image Credit: photo belongs to the author.
Now comes the best part of this pattern which is filling in the interior shades. Since you've already made the outline, this section is much easier to complete.
For the filling in I used a bright colored gold shade of Perler bead which provides a good contrast with the darker, antiqued shade. A metallic mix of Perler beads is available.
You'll notice that there are some pegs on the board that do not get filled in. If you happen to make a mistake and pop beads in where they shouldn't be, the easiest way to get them out again (without disturbing other beads) is to use tweezers.

Image Credit: photo belongs to the author.
To finish the design, I used 4 cream colored beads in the shaft of the key. And 1 final clear color bead to fill in the single space at the head of the key. You probably just need to choose a lighter shade of whatever colors you're using.
Once complete, an adult needs to iron the beads in order to fuse them all together. Always iron using the Perler ironing paper that you get in most of the big sets and tubs of beads (you can buy it separately too) and read the manufacturers instructions on how to do this process.
Of course you can dress up your completed key any way you choose. I added some gems and a bow to mine to make it look even more special. Come and look at the presentation box I used for this fun gift below.
➡️ Also See the Key to My Heart Perler Pattern Tutorial
Completed Perler Bead Key Design in a Presentation Box

Image Credit: photo belongs to the author.
When presented in a box like this, the key makes a really nice extra handmade gift. It is ideal for 18th, 21st and other milestone birthdays and celebrations. You can also use a key for a new home and new romances. A key is a symbol of luck and hope for the future.
Related Content You Should Also Love:
Key to My Heart Perler Bead Craft
Birthday Party Craft Decorations to Make
More on Perler Bead Crafts
Birthday Party Craft Decorations to Make
More on Perler Bead Crafts
Page Last Updated:


Comments
Post a Comment
CraftyMarie is a craft themed website by Marie Williams Johnstone. I love to craft in the winter and garden in the summer. I make handmade cards, papercrafts, crochet and seasonal crafts. I enjoy many of the more traditional crafts and hobbies including sewing, embroidery and working with felt and fabric. Thanks for leaving me a comment. Comments do not show up until I approve them. Marie