How to Tie a Slip Knot for Crochet Step by Step Tutorial
I found that one of the harder parts about getting started with crochet was working out how to create the knot to cast on. You can't make any other stitches or progress with this yarn craft until you learn how to do this.
It took me some time before I really got the hang of how to tie a slip knot for crochet. So I'm sharing the exact process that I like to use for making this starter crochet knot. There are lots of photos included in this tutorial which makes it ideal for beginners to easily follow along.
Some crafters may use different techniques for making a crochet slip knot. However, this is the one that I happen to like best and am happy to recommend. Don't let beginning this yarn craft get you down before you even really start. Learn to master the slip knot so you can get crocheting.
Note: This post may contain affiliate links for which I can be compensated.

I've provided lots of photos and text to help you work through this specific method of making a slip knot which is going to work better for right handed people like myself. Because I go into detail, it makes it seem as though this is a long process when it isn't.
It is extremely fast to tie a slip knot once you master it. I had a real job slowing the process down enough to get clear shots for the photographs because in real-time it literally takes seconds to do.
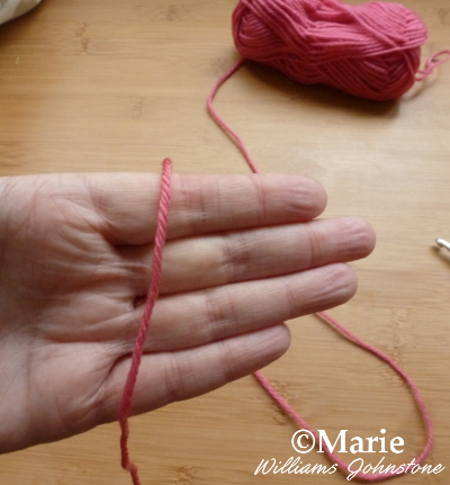
Image Credit: photo belongs to the author.
I am demonstrating this technique with my left hand because I crochet right-handed. You can use the same method if you're left-handed at crochet but you may prefer to work out how to mirror the method for your right hand.
Hold out your left hand as demonstrated in the photo. Loosely drape the end of the yarn over the fingers on your hand so that the yarn falls down at the front. Have the ball of yarn sitting somewhere behind the back of your hand.

Image Credit: photo belongs to the author.
Place your thumb over the end of the yarn to secure it down then twist your hand so that it is laying flat with the palm face down.
Position your ring finger and the little finger next to it over the top of the yarn strand. You are able to do this just by moving these fingers in place over the top and not by using your other hand.
When you have the positioning as shown in the photo above then you are ready for the next step.
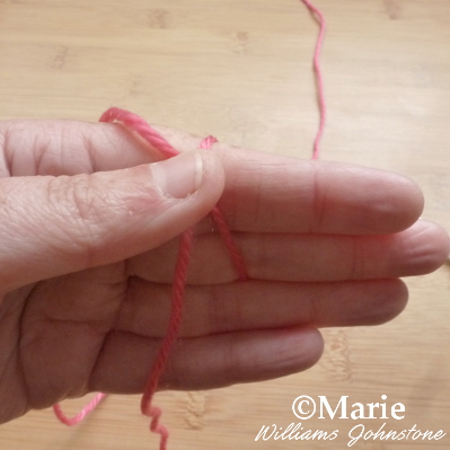
Image Credit: photo belongs to the author.
Lift your hand from having your palm facing down to your palm facing towards you. Working now with the yarn strand that is attached to the main ball, pull it up slightly with your hand and tuck it under your thumb.
The strand of yarn should cross over the other yarn strand in an X shape as shown in the photo.
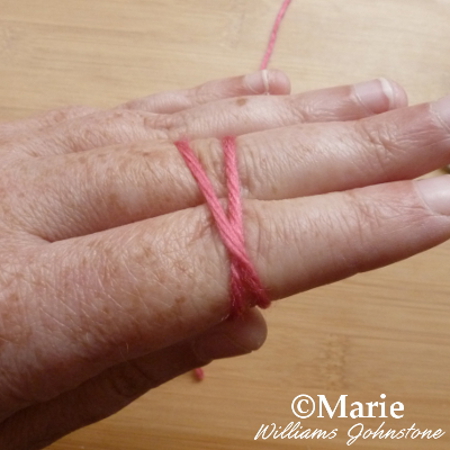
Image Credit: photo belongs to the author.
Move your hand again so that your palm is facing down. Lift up your ring finger and the little finger next to it so they move up and over the yarn again to secure it in place.
You should now see a rough X shape made with the crossed strands of yarn over your fingers. The X is much more visible from the side view and not the top.
Pull the strands to make the X shape more visible if you need to.

Image Credit: photo belongs to the author.
Now pick up your crochet hook with your right hand. You want to use the same hook that you will be using for your yarn project.
If you are just practicing casting on, choose a hook size that is quite wide. A 4.00 mm (G/6) hook or larger is ideal for you to work with.
Push the hook under the top of the X shape as shown and make sure you put it only under the first strand but over the second one as shown.

Image Credit: photo belongs to the author.
Now make sure that the hook point is facing down so the groove can catch hold of the yarn.
Use the hook to latch on to the second strand and gently pull it underneath the first one. This photo shows the loop that starts to form when you do this.

Image Credit: photo belongs to the author.
Once you’ve got this little loop forming, slide it down the main shaft of the hook and lift the hook up into the vertical position as shown.
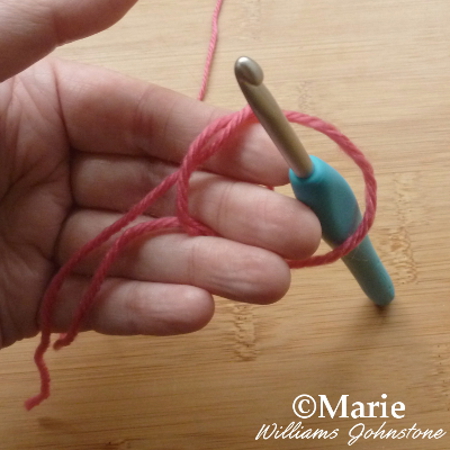
Image Credit: photo belongs to the author.
Once the yarn is over on the shaft of the hook, you can gently slip all the yarn off your fingers and you have a circular loop formed. Keep it placed around the hook.

Image Credit: photo belongs to the author.
Now take hold of both pieces of the yarn with your left hand. You need to hold both the yarn end and the strand that is still attached to the ball.
Gently pull them both down at the same time. You should start to see the loop tighten in to the beginning of a knot.

Image Credit: photo belongs to the author.
Keep pulling on these strands and you will see a knot start to form around a little loop as shown.
At this point you want to just pull on the yarn that’s attached to the main ball. This action will send the knotted part right up around the shaft of the crochet hook.
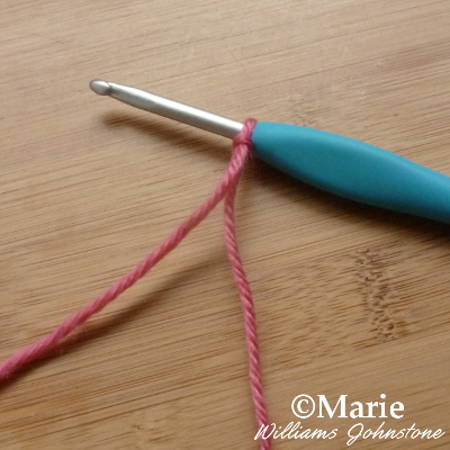
Image Credit: photo belongs to the author.
Make the knot firm and secure around the hook shaft. It should slide if you move it but should not easily just slip off.
If you pull on it too tightly, you can start to pull the yarn strands out of shape so it just needs to fit snugly. Your completed slip knot should look like the photo above.
Once you have your slip knot tied properly, you can start making chain stitches which are the foundation to most crochet projects. That is the next thing that you should look to learn if you are starting this craft.
Crocheting is quick, fun and easy when you know how. I wish I'd realized this much sooner. Keep on practicing this method for tying your starting knot until you can do it without thinking. When your hands know where to move automatically, you will be making it in seconds.
Related Content You Should Also Love:
Page Last Updated:
It took me some time before I really got the hang of how to tie a slip knot for crochet. So I'm sharing the exact process that I like to use for making this starter crochet knot. There are lots of photos included in this tutorial which makes it ideal for beginners to easily follow along.
Some crafters may use different techniques for making a crochet slip knot. However, this is the one that I happen to like best and am happy to recommend. Don't let beginning this yarn craft get you down before you even really start. Learn to master the slip knot so you can get crocheting.
Note: This post may contain affiliate links for which I can be compensated.
How to Tie a Slip Knot for Crochet Step by Step Photo Tutorial Ideal for Beginners

I've provided lots of photos and text to help you work through this specific method of making a slip knot which is going to work better for right handed people like myself. Because I go into detail, it makes it seem as though this is a long process when it isn't.
It is extremely fast to tie a slip knot once you master it. I had a real job slowing the process down enough to get clear shots for the photographs because in real-time it literally takes seconds to do.
Step 1: Starting to Make a Crochet Slip Knot

Image Credit: photo belongs to the author.
I am demonstrating this technique with my left hand because I crochet right-handed. You can use the same method if you're left-handed at crochet but you may prefer to work out how to mirror the method for your right hand.
Hold out your left hand as demonstrated in the photo. Loosely drape the end of the yarn over the fingers on your hand so that the yarn falls down at the front. Have the ball of yarn sitting somewhere behind the back of your hand.
Step 2: Positioning Your Hand

Image Credit: photo belongs to the author.
Place your thumb over the end of the yarn to secure it down then twist your hand so that it is laying flat with the palm face down.
Position your ring finger and the little finger next to it over the top of the yarn strand. You are able to do this just by moving these fingers in place over the top and not by using your other hand.
When you have the positioning as shown in the photo above then you are ready for the next step.
Step 3: Crossing the Yarn Strands

Image Credit: photo belongs to the author.
Lift your hand from having your palm facing down to your palm facing towards you. Working now with the yarn strand that is attached to the main ball, pull it up slightly with your hand and tuck it under your thumb.
The strand of yarn should cross over the other yarn strand in an X shape as shown in the photo.
Step 4: Getting the Yarn Strands in Place

Image Credit: photo belongs to the author.
Move your hand again so that your palm is facing down. Lift up your ring finger and the little finger next to it so they move up and over the yarn again to secure it in place.
You should now see a rough X shape made with the crossed strands of yarn over your fingers. The X is much more visible from the side view and not the top.
Pull the strands to make the X shape more visible if you need to.
Step 5: Placing the Hook Under the Yarn

Image Credit: photo belongs to the author.
Now pick up your crochet hook with your right hand. You want to use the same hook that you will be using for your yarn project.
If you are just practicing casting on, choose a hook size that is quite wide. A 4.00 mm (G/6) hook or larger is ideal for you to work with.
Push the hook under the top of the X shape as shown and make sure you put it only under the first strand but over the second one as shown.
Step 6: Making a Loop

Image Credit: photo belongs to the author.
Now make sure that the hook point is facing down so the groove can catch hold of the yarn.
Use the hook to latch on to the second strand and gently pull it underneath the first one. This photo shows the loop that starts to form when you do this.
Step 7: Sliding the Loop onto the Hook

Image Credit: photo belongs to the author.
Once you’ve got this little loop forming, slide it down the main shaft of the hook and lift the hook up into the vertical position as shown.
Step 8: The Complete Loop

Image Credit: photo belongs to the author.
Once the yarn is over on the shaft of the hook, you can gently slip all the yarn off your fingers and you have a circular loop formed. Keep it placed around the hook.
Step 9: Pulling the Slip Knot

Image Credit: photo belongs to the author.
Now take hold of both pieces of the yarn with your left hand. You need to hold both the yarn end and the strand that is still attached to the ball.
Gently pull them both down at the same time. You should start to see the loop tighten in to the beginning of a knot.
Step 10: Tightening the Slip Knot

Image Credit: photo belongs to the author.
Keep pulling on these strands and you will see a knot start to form around a little loop as shown.
At this point you want to just pull on the yarn that’s attached to the main ball. This action will send the knotted part right up around the shaft of the crochet hook.
Step 11: Completed Knot Ready to Start Crochet

Image Credit: photo belongs to the author.
Make the knot firm and secure around the hook shaft. It should slide if you move it but should not easily just slip off.
If you pull on it too tightly, you can start to pull the yarn strands out of shape so it just needs to fit snugly. Your completed slip knot should look like the photo above.
Making Slip Knot Technique Demonstrated with a Video
Once you have your slip knot tied properly, you can start making chain stitches which are the foundation to most crochet projects. That is the next thing that you should look to learn if you are starting this craft.
Crocheting is quick, fun and easy when you know how. I wish I'd realized this much sooner. Keep on practicing this method for tying your starting knot until you can do it without thinking. When your hands know where to move automatically, you will be making it in seconds.
Related Content You Should Also Love:
Crocheting for the Beginner Book Review
Essential Crochet Supplies That Beginners Need
Granny Triangle Crochet Pattern: Free
Make a Crochet Tassel Garland
More on Crochet Crafts
Essential Crochet Supplies That Beginners Need
Granny Triangle Crochet Pattern: Free
Make a Crochet Tassel Garland
More on Crochet Crafts
Page Last Updated:


Comments
Post a Comment
CraftyMarie is a craft themed website by Marie Williams Johnstone. I love to craft in the winter and garden in the summer. I make handmade cards, papercrafts, crochet and seasonal crafts. I enjoy many of the more traditional crafts and hobbies including sewing, embroidery and working with felt and fabric. Thanks for leaving me a comment. Comments do not show up until I approve them. Marie