Popsicle Stick Summer Beach Hut Hanging Craft

Popsicle sticks are easy to get hold of and they can make lots of fun crafts. This design is a cute popsicle stick summer beach hut hanging that you can make and decorate.
You can hang the completed beach hut up on a wall as a small and colorful hanging decoration for the summer season. This would also make a great door hanger and there is space to apply a name across it using a sharpie pen or stickers.
What evokes this hot season more than a beach hut. Hang this decoration up to remind you of fun times on vacation and as a reminder for where you'd love to be.
Image Credit: photo belongs to the author.
Note: This post may contain affiliate links for which I can be compensated.
Popsicle Stick Summer Beach Hut Hanging Decoration Craft Tutorial
I made use of a hot glue gun to make the summer beach hut because it meant that I could get it finished faster with sticking the popsicle sticks.
This is also a fun activity for children, however, and they could make this using a white PVA based adhesive such as Elmer's school glue. The only difference is that the craft project will take longer to dry and stick together. An alternative suggestion is to have an adult assemble the main parts of the hut and then let a child do all the decorating of it instead.
Materials and Tools Needed to Make This Popsicle Stick Beach Hut
Colored popsicle craft sticks
Small pieces of fabric such as cotton, felt and hessian
Length of twine for hanging
Embellishments for decoration including beads, shells and buttons
A glue gun or a more child-friendly alternative like Elmer's school glue
1: Creating the Main Part of the Popsicle Beach Hut

Image Credit: photo belongs to the author.
I admit that I'm a bit of a lazy crafter and always look out for easier and quicker options. This meant that I wanted to avoid having to cut any sticks down in length to create the main shapes.
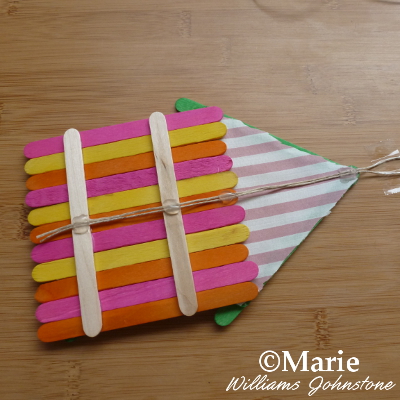
I assembled the main part of the hut so that it had 11 colored sticks lined up next to each other. I then used 2 plain sticks stuck horizontally across the back with glue to hold them all together.
Note that kids should not handle a hot glue gun for safety reasons. The glue is burning hot and I've managed to drip it on my fingers several times which is pretty painful. You can get hold of a white PVA based or liquid glue if children are making this craft. It will take longer to dry but it will be safer along with adult supervision.
I’ve seen some crafters take their time to carefully glue all the sticks down the edges and get them to hold together that way. That is not for me because it's a method that takes too long.
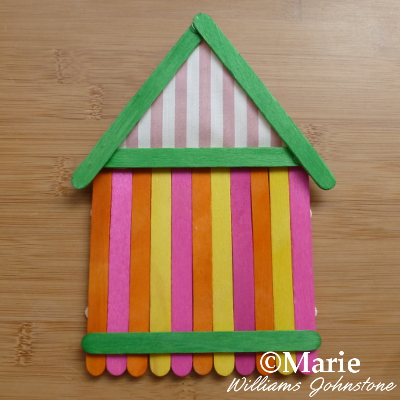
We found some bright and colorful popsicle craft sticks in my daughter's craft stash to use and they look pretty with the hot and vibrant shades of summer. Since stripes are often associated with beach huts, we alternated the yellow, orange and pink colors in a repeating pattern.
You can use unpainted craft sticks but I prefer bright summer colors for this craft which makes it look more fun. Pick out a few shades to alternate or use them all.
2: Making the Roof with Fabric Backing

Image Credit: photo belongs to the author.
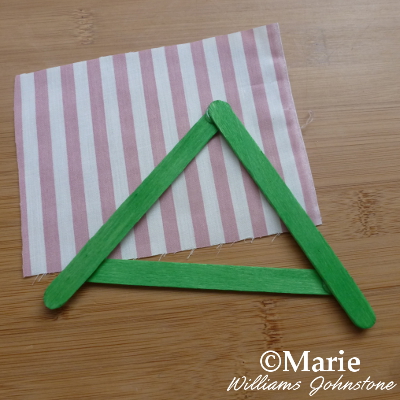
Next it is time to make up the roof. You need 3 popsicle sticks for this arranged in a triangle shape as shown in the photo. It’s easier to start with one stick laid horizontally across your work surface and then glue the remaining two sticks on at an angle to make the triangular shape.
My tip here is to use Blu-Tack to temporarily hold the craft sticks together. Then you can work out the correct shape before gluing it all together.
Once you've got your roof shape made, you need a piece of fabric to stick inside. A fabric with a striped pattern is a great look for this theme. I found some with pink and white stripes. I cut a piece that was a bit larger than the roof. Then I stuck it to the back of the roof and trimmed it to size afterwards. Instead of fabric, you could use paper, card, felt or foam.
3: Sticking the Roof to the Base of the Popsicle Beach Hut

Image Credit: photo belongs to the author.
Once you've made the roof section, you can stick it to the front of the hut somewhere at the top. I added a matching green stick across the front near the bottom of the design to tie the scheme together. This makes the basic shape of the little building.
This is the point where adults can hand the assembled design over and allow kids to decorate it as they please. My daughter is normally much more interested in decorating things and finishing them off than with building and construction. Some children may prefer the making and not the decorating.
4: Adding a Window and Door to the Hut Design

Image Credit: photo belongs to the author.
It's easy to make a door and a window with items that you may already have in your craft stash. I found some hessian which has a really nice and natural look that is ideal for summer and beach style designs. You could use fabric such as felt which is easy to cut, some craft foam, paper or card.
I cut the hessian down to a rectangular door shape and square window. I then cut some fabric down to size and layered this over the door with a wooden button and knotted twine on top. The window had a piece of white felt over hessian with two pieces of twine crossed to give the look of a frame.
5: Creating a Twine Loop for Hanging Up Your Beach Hut Craft

Image Credit: photo belongs to the author.
You can easily turn your design into a door hanger or a decoration for the wall. I have mine hanging up in my office where it adds a nice burst of bright color to the room. You need a long length of cord or twine.
Turn your hut over so that you are looking at the back of it. Fold the twine in half and place it down the middle of the decoration. Have the loop for hanging placed at the top. Make sure enough of the loop is overhanging the top edge and then stick this firmly into place.
Finish the Summer Hanging Craft Decoration with Embellishments

Image Credit: photo belongs to the author.
We finished this beach hut off by adding on some shell themed beads and a fabric bow. You can paint over the top, add some glitter, draw doodle patterns with a Sharpie and add stickers.
I like the idea of personalizing this with a name across the front. You can create your choice of text with some small chipboard letter stickers. That would make a unique door hanger for a child's room or decoration for a party.
Related Content You Should Also Love:
Tropical Scrapbook Supplies and Paper
Popsicle Card Tutorial
Perler Bead Pineapple Summer Craft
Fun and Easy Summer Crafts
Even More Summer Crafts to Enjoy
Popsicle Card Tutorial
Perler Bead Pineapple Summer Craft
Fun and Easy Summer Crafts
Even More Summer Crafts to Enjoy
Page Last Updated:


Comments
Post a Comment
CraftyMarie is a craft themed website by Marie Williams Johnstone. I love to craft in the winter and garden in the summer. I make handmade cards, papercrafts, crochet and seasonal crafts. I enjoy many of the more traditional crafts and hobbies including sewing, embroidery and working with felt and fabric. Thanks for leaving me a comment. Comments do not show up until I approve them. Marie