Free Crochet Amigurumi Fairy Patterns

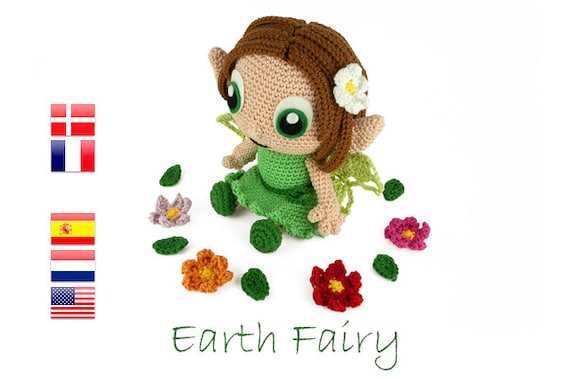
Today I'll be showcasing my finished amigurumi fairy doll made with a free pattern in issue 19 of the Simply Crochet magazine: the issue that also had the fabulous summer bunting in it too. Loved that issue.
I'll also be giving a list of my favorite free fairy patterns that I've found online for you. So bear with me because this could turn into another long post. First up, this is the first fairy doll I've made. So far I've done small stuffed items like strawberries, the unicorn which was also another free pattern in Simply Crochet and even a doll but not a fairy.
Of course, as soon as I saw her, I thought she'd work great on display next to the unicorn. I opted for pastel shades: cream, lilac, mint green, pale blue and pink and of course had to make some tweaks to the original pattern too. I'm not good at just leaving things alone. I always have to change it up a little.
Note: This post may contain affiliate links for which I can be compensated.
FREE Fairy Doll Crochet Patterns at the End

This fairy has a lot of beading and glitter button eyes that would not make her suitable to be given to a young child. As she was being made for a display piece, I used 100% acrylic yarn which is practical, durable and inexpensive to buy.
I do love crocheting with cotton yarn but it is slightly too cost prohibitive for me to use for amigurumi and stuffed toys or plush items. I really tend to just use the more expensive cotton yarns or blends for wearable items and garments.
Of course, if I were making handmade gifts I'd probably opt for a cotton mix. And if I had the budget, I'd choose cotton yarn every time because I love how it feels and how nice it is to crochet with.
The whole process of crocheting is great but I really loathe stitching and sewing amigurumi pieces together. I can sew but I just don't enjoy this part at all. You need to get the pieces pinned in exactly the right positions for items to look good.
I recommend using some very long straight pins for pinning pieces before stitching. Your stitches need to be careful and considered if you don't want them to show on your finished item. The sewing up part is just a process that I don't particularly like at all.
I Sew in Loose Yarn Threads with My Clover Chibi Darning Needles


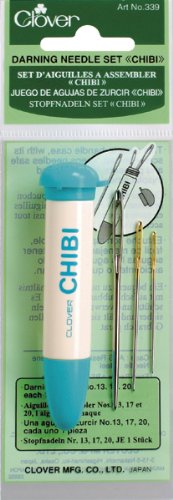

I like to leave long 'tails' of yarn after crocheting a piece like an arm or leg that needs to be sewn on because you can use these for stitching up with. You can see that to sew that arm on, I use a very long darning needle.
I use Chibi darning needles, as you can see in my photos, and then I sew right through to the other side of the plush doll. You need a very long length of yarn for this stitching.
You don't see any stitches on the other side because you pop the needle back through the same hole, back into the arm somewhere else, and pull the yarn through gently - repeat until securely stitched then knot off. Don't pull on the yarn too hard while stitching, or you risk puckering the crochet.

After making the main part of the body and stitching it together, I moved onto making the wings. It should be noted that I made the body, arms and legs all a tiny bit bigger than what was recommended in the actual pattern.
First, making these body parts a little bigger made it easier for me to crochet and sew on these fiddly bits plus I'm not a huge fan of having a massive head and a super tiny body - so I adjusted the pattern to suit my own tastes.

The wings were nice and easy to make. Just 4 pieces worked in the round and no polyester fiberfill or toy stuffing to worry about.
Sewing the wings together was just stitching the two large ones down the middle, the two smaller ones down the middle and then positioning and sewing the smaller set of wings to the larger one.
The original pattern called for some circles of crochet in a separate color to be made and stitched on to the wings. Though this looked quite good, I really did not fancy having to sit there making a load more pieces that then needed more stitching! No thanks.
I used surface stitching with crochet to add on some lilac yarn detail to the wings and then added on some beads using embroidery floss - all fairies should have a bit of sparkle, right!
Decorating the wings was one of the parts I enjoyed the most with this whole project. I just really had fun with it.
If I'd have been making this for a young child, I would not have added beads since there is always a risk they could come off and be popped in a mouth. But since this is purely for my enjoyment, I made her exactly as I wanted her to look.

This photo shows the finished doll along with the magazine photo so you can see where the differences are. I left off the antennae - the idea of making a pair of very fiddly 'stalks' and then pinning and sewing to the top of the head really did not fill me with glee so those were abandoned as a bad idea!
You can't see very well in this photo but the top photo of this post shows better the silver embroidery floss stitched all around the lilac hair. The silver embroidery floss and silver beads shine gorgeously in the light on the wings and make the whole fairy doll look even more magical.
Also, to pretty her up a bit, I added in some yarn tassels for the hair in the same pastel yarns and a little skirt. To make the skirt piece, I crocheted a chain which was large enough to go around her waist. This was then sewn around the doll at the top section of the chain and then I had stitches which I could easily crochet into.
I used double crochet stitches around the skirt (treble UK) for 1 row and then, to make the skirt fan out, worked 3 double crochet stitches into every stitch of the previous row. This made a more feminine looking fairy.
Overall I'm about 98% pleased with this piece. I think she is pretty cute but I'm not entirely happy with how I stitched her mouth. But I really don't have the heart to go back and change it.
Lots of Fairy Amigurumi Crochet Patterns
As promised, here's my pick of favorite patterns I've found online for you. If you have a copy of issue 19 of Simply Crochet, then there's a good one to start with. Otherwise ...
Amazingly Cute Amigurumi Fairy Dolls
Adorable Tiny Little Fairy Pattern
Spring Fairy Doll Pattern with Tinkerbell Style Skirt
Red Heart Tooth Fairy Pattern
Amigurumi Fairy Doll
Free Ravelry Pattern Winged Amigurumi Fairy
Free Ravelry Flower Fairy
Amigurumi Flower Fairy with Mushroom
Spring Fairy House to Make
You Can Also Find Some Fairy Patterns on Amazon and Etsy


Well that should be enough patterns for you to get busy with whether you want to make one for a child, yourself or as a gift to give to someone who loves fantasy and magic. Drop me a line below and I'll get back to you as soon as I'm able to.
Related Content You Should Also Love:
See All My Crochet Pages Here
Making a Crochet Unicorn
How to Make Pretty Yarn Tassels
How to Make Hobbit Fairy Door Cookies
More Fantasy Crafts to Enjoy
Making a Crochet Unicorn
How to Make Pretty Yarn Tassels
How to Make Hobbit Fairy Door Cookies
More Fantasy Crafts to Enjoy
Page Last Updated:


What was the name of the book that you got your pattern from? She is so very cute.
ReplyDeleteThank you for sharing your work and love of crochet.
Thank you. This pattern was printed in issue 19 of the Simply Crochet magazine which is a UK publication. There are a number of books published on making crochet dolls or amigurumi. Once you understand the basics of making and sewing up all the different parts such as head, body, arms and legs, I don't think it's all that hard. A lot of it is working US SC stitch quite tightly in the round. A fairy is essentially just a doll with wings :)
Delete