Free Crochet Pattern African Flower Tutorial
This free crochet pattern for an African Flower tutorial makes up a gorgeous crocheted motif that looks stunning made up with different colors. You'll get step by step instructions on making these which will make for a long post full of photos that you can work from.
The standard African Flower motif is in the shape of a hexagon which is what I'll be demonstrating in this tutorial today although you can also turn these into squares too which is perhaps the subject for a later blog post down the road.
You can use the completed motifs for making up blankets, throws, cushions, pincushions, bags and even garments like scarves. I think they're best suited to bigger projects such as blankets where you can really appreciate the rainbow of colors that can be used with these and how beautiful they look when made up.
Note: This post contains affiliate links for which I may be compensated.

Stitch instructions are in US terms which I find so much easier to go by - you can get many conversion charts online if you don't follow US terms yourself for crochet.
This pattern uses only basic stitches so is ideal for people who are just past the beginner stage. You will need to know how to crochet in the round if you don't already (although I do explain this part in the tutorial) and how to join on new colors. YouTube is your absolute friend when it comes to discovering how to do these things.
The basic pattern instructions are at the start of each step and highlighted with italics. Experienced crocheters can just follow the pattern instructions for each step. Further commentary is provided on each step to help those who are unfamiliar with parts of each process.

Step 1 Round 1: With your first color, make your slip knot on your hook and chain 5. Slip stitch (ss) back into the first chain to make a ring.
In this first step, you're making a small closed ring with your initial color choice. I chose a pale pink yarn. Something like Red Heart acrylic yarn would be fine or cotton would be a lovely choice.
You may not have used this process before but it's a common one for starting off many motif patterns and "Granny Squares" as well. You can also use this same method to start off Amigurumi toys although I'd normally just chain 4 and make the initial circle from that to keep it tighter at the start.


The green object in the photo is a Clover Stitch Marker. I find these little things invaluable in crocheting. I use them to clip onto my last stitch that I've worked when I need to put an unfinished project down, they are useful for marking stitches in continuous rounds of crochet and, here, I've used it to mark where the hole is that I will be stitching through.
A stitch marker is a terrifically useful aid, especially to beginners. Locating the hole that you need to crochet through when working with a small closed round like this is really helpful.

Step 2 Work 2 double crochet (dc) stitches into the center of the ring, then chain (ch) 1.
If you used a stitch marker through the hole as advised in the first step, you will now find it very easy to know exactly where your hook is meant to go as you work 2 double crochet stitches into the middle of the ring.
This hole in the middle of the crochet ring can often be quite small and difficult in particular for newbies to locate, so having a marker of sorts can solve that problem. Next, make a chain of one stitch.

Step 3 Repeat the pattern of 2 dc and 1 ch st ( chain stitch) a further 5 times. SS to close off the 1st round.
All you're doing now around the rest of this circular round is repeating the 2 double crochet and 1 chain stitch pattern another 5 times. This will give you 12 doubles around the ring with a little space formed in between each pair from the chain 1 stitch.
You'll note that once I was comfortable with where the central hole was to work through, I removed the green marker. You'll see the green stitch marker again in the photo because it is showing you where I closed off the round with a slip stitch. Congrats on getting to the end of your first round.

Step 4 Round 2: With your 2nd color choice, fasten on this new yarn into a chain 1 space from the previous round.
Here's where you should switch up colors for the second round. I went for a spring green to work with the pale pink.
This round you'll be crocheting into the chain 1 spaces. What I mean by that is this. In the previous round, you had pairs of double crochet stitches with chain 1s between them. These chain 1s have now made some convenient gaps or spaces which you can see if you gently pull at your work. You'll now be working this second round into those gaps to form petal like shapes.

Step 5 Into each ch 1 space: work 2 dc, 1 ch st, 2 dc.
Working into the spaces as explained in the previous step, you want to work the following pattern in each one and repeat around each space in the circle - there should be 6 spaces altogether from the first (pink) round.
With your second color fastened into a space, make 2 double crochets followed by a chain stitch and another 2 double crochets. It might feel a bit cramped to fit all of those into every space but you can - you'll see from the photo that it makes the gaps a bit larger and more prominent. You'll do this pattern into every space so that's a total of 6 times.

Step 6 Ss to the beginning of the circle to finish off round 2.
Fasten off the round when you get to the end by using a slip stitch.

Step 7 Round 3: You can keep the same color you had in round 2 or start with a new one. Fasten on the yarn into a chain 1 space from the previous round.
Many people stick to the same color for round 3 that has been used in round 2 and that is because this round forms the tops of petal like structures where the previous one forms the bottoms. So you can choose whether to use the same color or a different one.
What may look really good is using a shade which is either slightly darker or lighter to give a bit of a blended look. Again, you need to work into the spaces made by the chain 1s from the previous round.

Step 8 Work 7 dc stitches into each ch 1 space.
In this round, you are forming the tops of the African flower petals and you get a bit of a scalloped edge effect around the motif. Into each of the chain 1 spaces that were formed in the previous round, make 7 double crochet stitches. This will feel cramped and you might like to push the stitches down a little as you work round the design.

Step 9 Ch 1 and ss to the beginning to close the round.
At the end of all those double crochets, chain 1 and slip stitch to the beginning of the round to fasten off. You have a pretty flower design which looks pretty good as it is but there's more to come.

Step 10 Round 4 fasten on with a new color choice into a double crochet stitch from the previous round.
A new color here helps to create a nice, thin border around the petal section of the flower. Here's where it gets a little trickier because you will use both single and double crochet in round 4 as well as working into the stitches and between the petal shapes.
So here's where you may need to pay extra attention to the pattern. Start by fastening on a new color in through the top of a double crochet stitch from round 3.

Step 11 Work single crochet (sc) stitches into every dc stitch from the previous round and a dc stitch between every petal shape. Fasten off the round with a ss.
If you are wanting to finish at this point just to make a large floral shape or motif, you may want to work this round quite tightly which shapes the petals more. If you are carrying on to make the normal hexagonal "granny square" or motif then you will work your tension as you normally do to make a flat shape ideal for joining together and using in blankets and other projects.
You need to work a single crochet stitch into every double crochet stitch that you made on the previous round. In between each petal shape, you need to work a double crochet stitch which helps to define the petal parts of each flower better. Fasten off the round with a slip stitch when you get back to the beginning.

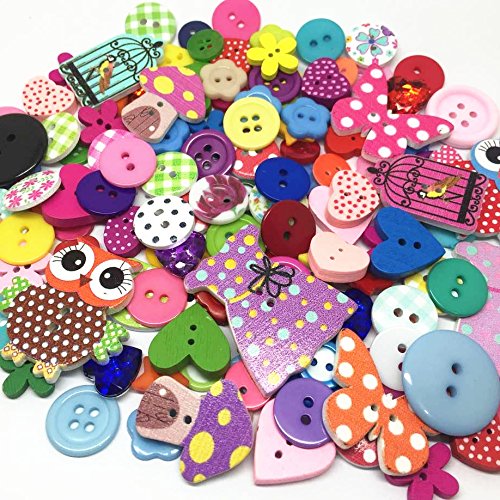
Step 12 These designs can be used as embellishments if you don't want to use them for blankets and other items. Pop buttons into the middles which looks cute.

Step 13 Round 5: fasten on with a new color on top of a dc stitch from the previous round. Work a dc into every stitch around EXCEPT for the very top stitch of every petal which is worked as 1 dc, 1 ch, 1 dc.
Note: locate the top stitch of every petal as follows. Each petal shape was made from 7 dc stitches. The top one is the middle one or number 4 along the petal. Fasten off the round with a ss at the end.
This round forms the hexagonal border around the African flower and gives you a motif which you can then use to join together to make blankets and throws etc.
You are essentially just working a double crochet stitch all the way around except for the top (middle) stitch of each petal where you are working 1 double crochet, 1 chain, 1 double crochet - this forms the corners of your hexagon pattern. Read the note above on how to find the top or middle stitch. Fasten off with a slip stitch once you've worked all the way around.
Phew! That was a long post for me to write but I hope it has made it nice and clear along with the photos so you can make your own motifs to use in your projects. I really like this design and you can get some beautiful arrangements with the colors. Please leave me a comment below.
Related Content You Should Also Love:
Page Last Updated:
The standard African Flower motif is in the shape of a hexagon which is what I'll be demonstrating in this tutorial today although you can also turn these into squares too which is perhaps the subject for a later blog post down the road.
You can use the completed motifs for making up blankets, throws, cushions, pincushions, bags and even garments like scarves. I think they're best suited to bigger projects such as blankets where you can really appreciate the rainbow of colors that can be used with these and how beautiful they look when made up.
Note: This post contains affiliate links for which I may be compensated.
Free Crochet Pattern African Flower Tutorial Notes
Stitch instructions are in US terms which I find so much easier to go by - you can get many conversion charts online if you don't follow US terms yourself for crochet.
This pattern uses only basic stitches so is ideal for people who are just past the beginner stage. You will need to know how to crochet in the round if you don't already (although I do explain this part in the tutorial) and how to join on new colors. YouTube is your absolute friend when it comes to discovering how to do these things.
The basic pattern instructions are at the start of each step and highlighted with italics. Experienced crocheters can just follow the pattern instructions for each step. Further commentary is provided on each step to help those who are unfamiliar with parts of each process.
Crochet Materials and Tools that You Need
- A selection of yarn colors - 4 for each hexagon motif works well
- Crochet hook size 4 - 5.5 mm (F, G , H or I)
- Scissors or a pair of thread snips
How to Make a Hexagonal African Flower Crochet Motif
Step 1 Round 1: With your first color, make your slip knot on your hook and chain 5. Slip stitch (ss) back into the first chain to make a ring.
In this first step, you're making a small closed ring with your initial color choice. I chose a pale pink yarn. Something like Red Heart acrylic yarn would be fine or cotton would be a lovely choice.
You may not have used this process before but it's a common one for starting off many motif patterns and "Granny Squares" as well. You can also use this same method to start off Amigurumi toys although I'd normally just chain 4 and make the initial circle from that to keep it tighter at the start.
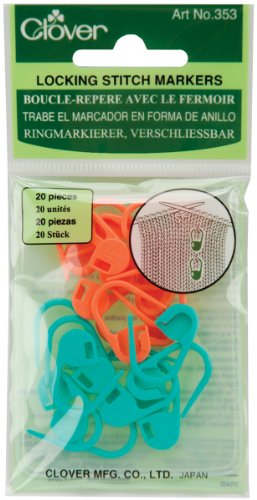

The green object in the photo is a Clover Stitch Marker. I find these little things invaluable in crocheting. I use them to clip onto my last stitch that I've worked when I need to put an unfinished project down, they are useful for marking stitches in continuous rounds of crochet and, here, I've used it to mark where the hole is that I will be stitching through.
A stitch marker is a terrifically useful aid, especially to beginners. Locating the hole that you need to crochet through when working with a small closed round like this is really helpful.
Step 2 Work 2 double crochet (dc) stitches into the center of the ring, then chain (ch) 1.
If you used a stitch marker through the hole as advised in the first step, you will now find it very easy to know exactly where your hook is meant to go as you work 2 double crochet stitches into the middle of the ring.
This hole in the middle of the crochet ring can often be quite small and difficult in particular for newbies to locate, so having a marker of sorts can solve that problem. Next, make a chain of one stitch.
Step 3 Repeat the pattern of 2 dc and 1 ch st ( chain stitch) a further 5 times. SS to close off the 1st round.
All you're doing now around the rest of this circular round is repeating the 2 double crochet and 1 chain stitch pattern another 5 times. This will give you 12 doubles around the ring with a little space formed in between each pair from the chain 1 stitch.
You'll note that once I was comfortable with where the central hole was to work through, I removed the green marker. You'll see the green stitch marker again in the photo because it is showing you where I closed off the round with a slip stitch. Congrats on getting to the end of your first round.
Step 4 Round 2: With your 2nd color choice, fasten on this new yarn into a chain 1 space from the previous round.
Here's where you should switch up colors for the second round. I went for a spring green to work with the pale pink.
This round you'll be crocheting into the chain 1 spaces. What I mean by that is this. In the previous round, you had pairs of double crochet stitches with chain 1s between them. These chain 1s have now made some convenient gaps or spaces which you can see if you gently pull at your work. You'll now be working this second round into those gaps to form petal like shapes.
Step 5 Into each ch 1 space: work 2 dc, 1 ch st, 2 dc.
Working into the spaces as explained in the previous step, you want to work the following pattern in each one and repeat around each space in the circle - there should be 6 spaces altogether from the first (pink) round.
With your second color fastened into a space, make 2 double crochets followed by a chain stitch and another 2 double crochets. It might feel a bit cramped to fit all of those into every space but you can - you'll see from the photo that it makes the gaps a bit larger and more prominent. You'll do this pattern into every space so that's a total of 6 times.
Step 6 Ss to the beginning of the circle to finish off round 2.
Fasten off the round when you get to the end by using a slip stitch.
Step 7 Round 3: You can keep the same color you had in round 2 or start with a new one. Fasten on the yarn into a chain 1 space from the previous round.
Many people stick to the same color for round 3 that has been used in round 2 and that is because this round forms the tops of petal like structures where the previous one forms the bottoms. So you can choose whether to use the same color or a different one.
What may look really good is using a shade which is either slightly darker or lighter to give a bit of a blended look. Again, you need to work into the spaces made by the chain 1s from the previous round.
Step 8 Work 7 dc stitches into each ch 1 space.
In this round, you are forming the tops of the African flower petals and you get a bit of a scalloped edge effect around the motif. Into each of the chain 1 spaces that were formed in the previous round, make 7 double crochet stitches. This will feel cramped and you might like to push the stitches down a little as you work round the design.
Step 9 Ch 1 and ss to the beginning to close the round.
At the end of all those double crochets, chain 1 and slip stitch to the beginning of the round to fasten off. You have a pretty flower design which looks pretty good as it is but there's more to come.
Step 10 Round 4 fasten on with a new color choice into a double crochet stitch from the previous round.
A new color here helps to create a nice, thin border around the petal section of the flower. Here's where it gets a little trickier because you will use both single and double crochet in round 4 as well as working into the stitches and between the petal shapes.
So here's where you may need to pay extra attention to the pattern. Start by fastening on a new color in through the top of a double crochet stitch from round 3.
Step 11 Work single crochet (sc) stitches into every dc stitch from the previous round and a dc stitch between every petal shape. Fasten off the round with a ss.
If you are wanting to finish at this point just to make a large floral shape or motif, you may want to work this round quite tightly which shapes the petals more. If you are carrying on to make the normal hexagonal "granny square" or motif then you will work your tension as you normally do to make a flat shape ideal for joining together and using in blankets and other projects.
You need to work a single crochet stitch into every double crochet stitch that you made on the previous round. In between each petal shape, you need to work a double crochet stitch which helps to define the petal parts of each flower better. Fasten off the round with a slip stitch when you get back to the beginning.
Step 12 These designs can be used as embellishments if you don't want to use them for blankets and other items. Pop buttons into the middles which looks cute.
Step 13 Round 5: fasten on with a new color on top of a dc stitch from the previous round. Work a dc into every stitch around EXCEPT for the very top stitch of every petal which is worked as 1 dc, 1 ch, 1 dc.
Note: locate the top stitch of every petal as follows. Each petal shape was made from 7 dc stitches. The top one is the middle one or number 4 along the petal. Fasten off the round with a ss at the end.
This round forms the hexagonal border around the African flower and gives you a motif which you can then use to join together to make blankets and throws etc.
You are essentially just working a double crochet stitch all the way around except for the top (middle) stitch of each petal where you are working 1 double crochet, 1 chain, 1 double crochet - this forms the corners of your hexagon pattern. Read the note above on how to find the top or middle stitch. Fasten off with a slip stitch once you've worked all the way around.

Phew! That was a long post for me to write but I hope it has made it nice and clear along with the photos so you can make your own motifs to use in your projects. I really like this design and you can get some beautiful arrangements with the colors. Please leave me a comment below.
Related Content You Should Also Love:
African Flower Crochet Pincushion Craft Tutorial
Crochet Tools and Supplies for Beginners
Crochet a Sunburst Granny Square
How to Crochet Mini Strawberries for Summer
More Crochet Crafts to Enjoy
Crochet Tools and Supplies for Beginners
Crochet a Sunburst Granny Square
How to Crochet Mini Strawberries for Summer
More Crochet Crafts to Enjoy
Page Last Updated:


I like the simplicity of your instructions. You made the pattern very easy to follow.
ReplyDelete