Cute Valentine Card Printables Free
Valentine's Day will soon be here and, even if you are in a rush, you can still enjoy making a special handcrafted greeting card up very quickly with this tutorial and my free printable designs. My designs are mini love envelopes and hearts which come in shades of raspberry sorbet and blush pink.
I'm showing you how to use these cute Valentine card printables which are free to create your own little love note. And you'll be able to make one right at the last minute because these are easy and quick to make.
Of course, you can also use these designs to make up your own style of card or use them in your other paper crafting projects too like scrapbooking, journal decorating, sweet little home decorations, gift wrapping and making tags as well or why not make up little ornaments with them.
Note: This post contains affiliate links for which I may be compensated.

Use the freebies to create something really cute for this February 14th and have some fun while you're at it!

To make this Valentine's Day handmade card design, you'll need to print out the free sheet located on this page. That involves saving the design onto your own computer and then printing it out, preferably on to a sheet of white card.
If you don't have a sheet of card, you can print onto white paper and glue the designs onto any scraps of card that you have, even cereal packet boxes.
The designs will work better on card because they are then firm enough that you can layer up individual pieces whereas using paper is really too thin to accomplish this and you'd be better off sticking to a flat design instead.
If you have sticker paper sheets, you can even turn these designs into stickers. Or what about laminating for more of a glossy effect.

Step 1: You can just cut out the designs and use them flat as they are printed but I'm showing you how I love to layer up designs to use.
Layering up makes your own cute embellishments for card making and other paper crafts too. This gives finished projects a lot more 'pop' and makes them more visually exciting to look at.
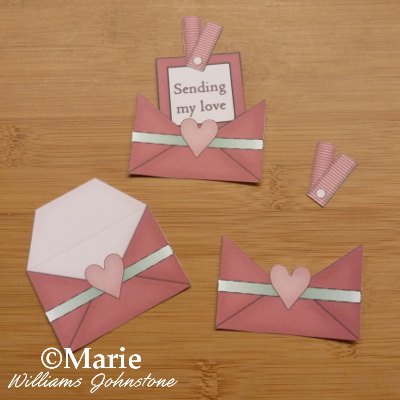
Cut out the pieces as shown in the image. This will mean cutting into some of the designs further.

Step 2: You need some sticky foam squares or pads or you could use 3D glue dots instead.
Stick the foam pads onto the back of the sending my love cut out and position this carefully on top of the envelope design so it all lines up.

Step 3: Add foam squares to the back of the front panel of the envelope design and place over the top of your mini envelope embellishment as a 3rd layer.

Step 4: Cut the square pads down in size if you need to in order to stick on the faux ribbon detail so that part is layered as well. Now you have a cute, layered and dimensional embellishment that becomes the main focal point on your card.
I love my adhesive foam squares and pads because they really stop my finished projects from looking flat and uninspiring.
I love to add in elements to handmade cards and scrapbook layouts that really stand out. Foam squares are a very inexpensive way of achieving that goal or you can buy rolls of sticky foam tape that you can cut to size. The squares are quicker to work with though.

Step 5: You can just stick designs right on top of a greeting card blank if you prefer. I really love to layer up cute papers as a background for embellishments to be placed on.
This design works best with a square card blank and so I have cut out two squares of different colored scrapbook papers to sit on the front, one square about 1 cm all round bigger than the other piece of paper.
I've run scrapbook ink pads in slightly darker shades across the raw edges of the paper because I love how this gives a little more dimension to your completed design.

Step 6: Mat these papers up on top of the front of your card blank. I call this a double matting technique and it's a technique I often use on the front of my handmade cards or scrapbook layouts.
You can use a method for mounting with double-sided tape for matting your papers perfectly.


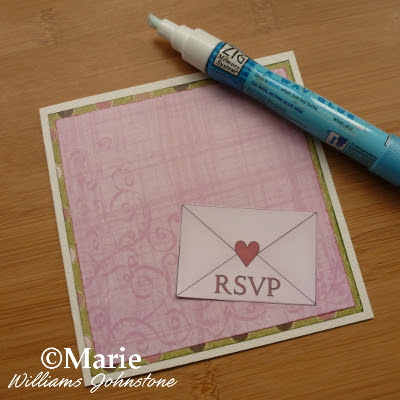
Step 8: Next cut out a Valentine envelope design and stick that on. I actually worked out where all the parts where going to be placed before using any glue or adhesive. Carry on reading to see how this card was finished off.
Most of the paper I use for crafting is scrapbook paper because I love the amazing sets you can get where all the patterns and colors are already handily coordinated for you, no more worrying over which papers are going to look great together!
I actually use scrapbook papers more for card making, general paper crafts, decoupage and origami than for actual scrapbooking. But that just shows how versatile they are.

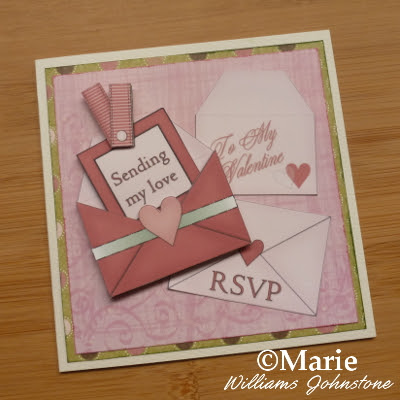
Step 9: Place the layered envelope embellishment that you made at the start on top of the card front. I placed this down more to the left of the card so you can still see the other designs underneath.

Step 10: Cut out a couple of hearts from the printable sheet and pop those on using 3D glue dots or adhesive foam squares to give them a bit of a lift.

Step 11: This last part is optional. I always love adding in little extra bits of detail to my finished cards.
Here I added in a flat backed gem, a flower embellishment and a rub-on transfer. I also made a matching envelope design which you can see next. Don't forget to save the freebies below!

Click on the image to open up the full size which is best for printing and choose "Save As" or "Save Image As" to download it. This is a .jpg image file which is a standard picture file that most computers can view and print.
This free printable is for your personal use only. You are welcome to blog about how you've used this freebie along with your own photos providing that you include a link back to this page.
To download this design sheet to your own computer, you need to click on the image where you will then get a full sized version of the design that you can then save. If you know how to, it is often easier to open these up into a new tab or a new window first.
Perform a right-click command with your mouse, tablet pen or trackpad and then you need to select the option to 'Save Image' or 'Save Image As' so that you can download a copy for yourself at home to print out and enjoy.
Page Last Updated:
I'm showing you how to use these cute Valentine card printables which are free to create your own little love note. And you'll be able to make one right at the last minute because these are easy and quick to make.
Of course, you can also use these designs to make up your own style of card or use them in your other paper crafting projects too like scrapbooking, journal decorating, sweet little home decorations, gift wrapping and making tags as well or why not make up little ornaments with them.
Note: This post contains affiliate links for which I may be compensated.
Cute Free Valentine Card Printables and Valentine Card Tutorial

Use the freebies to create something really cute for this February 14th and have some fun while you're at it!
Print Out the Free Valentine Design Sheet
You'll find the free designs near the end of the page
To make this Valentine's Day handmade card design, you'll need to print out the free sheet located on this page. That involves saving the design onto your own computer and then printing it out, preferably on to a sheet of white card.
If you don't have a sheet of card, you can print onto white paper and glue the designs onto any scraps of card that you have, even cereal packet boxes.
The designs will work better on card because they are then firm enough that you can layer up individual pieces whereas using paper is really too thin to accomplish this and you'd be better off sticking to a flat design instead.
If you have sticker paper sheets, you can even turn these designs into stickers. Or what about laminating for more of a glossy effect.

Step 1: You can just cut out the designs and use them flat as they are printed but I'm showing you how I love to layer up designs to use.
Layering up makes your own cute embellishments for card making and other paper crafts too. This gives finished projects a lot more 'pop' and makes them more visually exciting to look at.
Cut out the pieces as shown in the image. This will mean cutting into some of the designs further.

Step 2: You need some sticky foam squares or pads or you could use 3D glue dots instead.
Stick the foam pads onto the back of the sending my love cut out and position this carefully on top of the envelope design so it all lines up.

Step 3: Add foam squares to the back of the front panel of the envelope design and place over the top of your mini envelope embellishment as a 3rd layer.

Step 4: Cut the square pads down in size if you need to in order to stick on the faux ribbon detail so that part is layered as well. Now you have a cute, layered and dimensional embellishment that becomes the main focal point on your card.
I love my adhesive foam squares and pads because they really stop my finished projects from looking flat and uninspiring.
I love to add in elements to handmade cards and scrapbook layouts that really stand out. Foam squares are a very inexpensive way of achieving that goal or you can buy rolls of sticky foam tape that you can cut to size. The squares are quicker to work with though.

Step 5: You can just stick designs right on top of a greeting card blank if you prefer. I really love to layer up cute papers as a background for embellishments to be placed on.
This design works best with a square card blank and so I have cut out two squares of different colored scrapbook papers to sit on the front, one square about 1 cm all round bigger than the other piece of paper.
I've run scrapbook ink pads in slightly darker shades across the raw edges of the paper because I love how this gives a little more dimension to your completed design.

Step 6: Mat these papers up on top of the front of your card blank. I call this a double matting technique and it's a technique I often use on the front of my handmade cards or scrapbook layouts.
You can use a method for mounting with double-sided tape for matting your papers perfectly.


Step 8: Next cut out a Valentine envelope design and stick that on. I actually worked out where all the parts where going to be placed before using any glue or adhesive. Carry on reading to see how this card was finished off.
Most of the paper I use for crafting is scrapbook paper because I love the amazing sets you can get where all the patterns and colors are already handily coordinated for you, no more worrying over which papers are going to look great together!
I actually use scrapbook papers more for card making, general paper crafts, decoupage and origami than for actual scrapbooking. But that just shows how versatile they are.

Step 9: Place the layered envelope embellishment that you made at the start on top of the card front. I placed this down more to the left of the card so you can still see the other designs underneath.

Step 10: Cut out a couple of hearts from the printable sheet and pop those on using 3D glue dots or adhesive foam squares to give them a bit of a lift.

Step 11: This last part is optional. I always love adding in little extra bits of detail to my finished cards.
Here I added in a flat backed gem, a flower embellishment and a rub-on transfer. I also made a matching envelope design which you can see next. Don't forget to save the freebies below!
The Finished Sending My Love Card Design

Your Free Valentine Printable Sheet
Click on the image to open up the full size which is best for printing and choose "Save As" or "Save Image As" to download it. This is a .jpg image file which is a standard picture file that most computers can view and print.
This free printable is for your personal use only. You are welcome to blog about how you've used this freebie along with your own photos providing that you include a link back to this page.
To download this design sheet to your own computer, you need to click on the image where you will then get a full sized version of the design that you can then save. If you know how to, it is often easier to open these up into a new tab or a new window first.
Perform a right-click command with your mouse, tablet pen or trackpad and then you need to select the option to 'Save Image' or 'Save Image As' so that you can download a copy for yourself at home to print out and enjoy.
Related Content You Should Also Love:
101 Valentine Crafts for Adults Page
25 Valentine Themed Short Quotes for Cards
Key to My Heart Perler Beads Tutorial
More Valentine Crafts to Enjoy
25 Valentine Themed Short Quotes for Cards
Key to My Heart Perler Beads Tutorial
More Valentine Crafts to Enjoy
Page Last Updated:


Comments
Post a Comment
CraftyMarie is a craft themed website by Marie Williams Johnstone. I love to craft in the winter and garden in the summer. I make handmade cards, papercrafts, crochet and seasonal crafts. I enjoy many of the more traditional crafts and hobbies including sewing, embroidery and working with felt and fabric. Thanks for leaving me a comment. Comments do not show up until I approve them. Marie