How to Make a Felt Needle Case Tutorial: Easy and Cute
Learn how to make a felt needle case with this cute and easy tutorial. Making a case or holder to store your needles is a quick project that is ideal for beginner sewers to have a go at.
Needlebooks come in all kinds of shapes and designs but why not sew your own with this quick and easy felt craft project. Choose your favorite colors and design a pretty house to hold your needles safely in your sewing kit.
This step by step photo tutorial comes with detailed instructions so that you can sew this sweet design. If you're looking for a quick gift to make for someone, this makes a great little project that is possible to finish in half a day.
Note: This post may contain affiliate links for which I can be compensated.

Although I wouldn't class a needle case as an essential part of your sewing kit, it is a highly useful one nonetheless. Most sewing needles are now sold as sets in plastic storage cases. However, they are often fiddly to operate and to get the needles out quickly.
I still prefer to use felt needlebooks and cases because it is so fast to pull whatever needle I need from a soft case. It also means that I can easily keep specific ranges of needles that I want stored in different places around the home. I like one with my sewing box, my sewing machine, my craft bag and repair kit.
Tools and Materials to Make a Felt Needle Case:
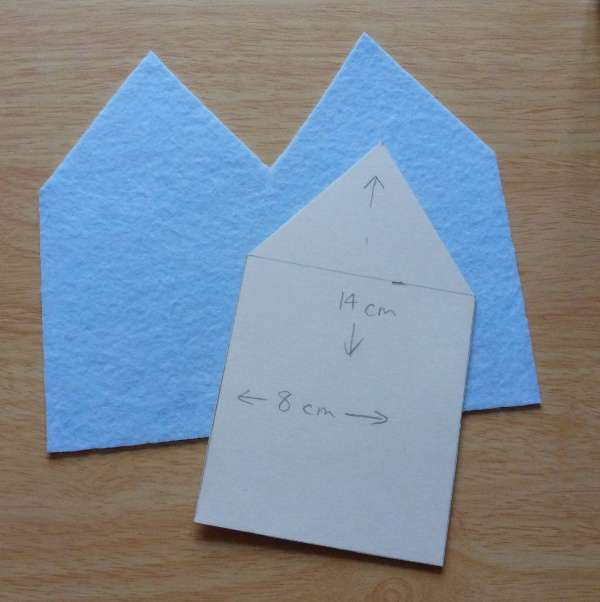
Just as with the beginner house plush ornament, you need a basic house shape. I'm not providing a pattern because these are just so incredibly easy to draw out yourself. It is simply a rectangle shape with a triangle on top. That is all.
If you're really stuck on drawing out a house shape, look up "house template" or outline in any search engine online. You'll probably find loads. For a needlebook, I made one which is roughly as long as my hand at 14 cm high and 8 cm wide.
Once you've got your pattern drawn onto a quick template of paper or card, fold a piece of felt in half. Place the left side of your house pattern up against the fold on the felt and draw around it with your marking tool.
Pin this section to keep it nicely folded and then carefully cut the pattern out. When you unfold it, the shape should look similar to mine in the photo above.
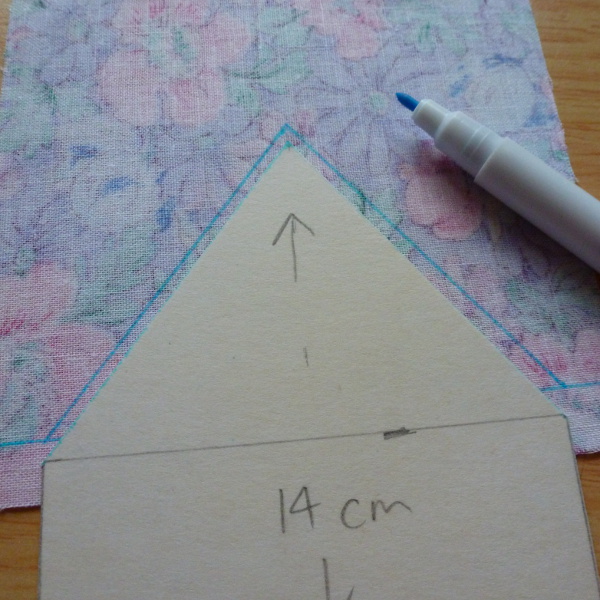
Use the house pattern to draw out a triangle roof on a pretty piece of fabric. To do this, I marked a straight line on the back of the fabric with a ruler. Then I lined up the bottom of the triangle section and draw around the rest with a fabric marking tool.
I chose a fabric by laying a variety of different fabric scraps on top of my needle case felt and seeing which worked best with the color. Then I cut the fabric roof out with pinking shears because this helps to keep the fabric from fraying easily.

Pin the fabric to the roof on the right-hand side of your felt piece. The right side of the felt will become the front of the needle case once it is folded.
Because I have cut this fabric out using pinking shears, I am not overly worried about the fabric fraying. I just use a simple running stitch along the bottom edge to sew it to the felt since I will sew the other sides later.

Draw out and cut a little door shape for your house design. I picked a purple felt which ties in with the colors in the fabric pattern. This was sewn on using a backstitch around the sides and top.
I picked a light blue felt to cut a little window out for the door and sewed this on top of the door. Underneath the window was just enough space to add a tiny heart button for a door knob.
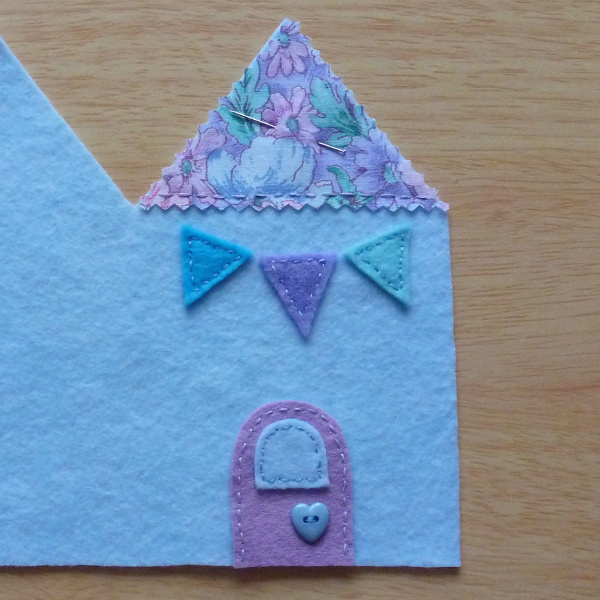
I adore bunting. I have a lot decorating my own home so I wanted to add a bit to this needle case design.
Cut out 3 small triangle shapes from different colors of felt. I choose blues and purple to work with the colors in the fabric. It helps to place the middle triangle first roughly in the middle of the design under the roof section.
Before you sew all these in place, check they will fit across the front of your design comfortably. Sew the middle triangle on first then the other two at an angle to make it look like a curved garland or pennant banner would. These were sewn with a quick backstitch.
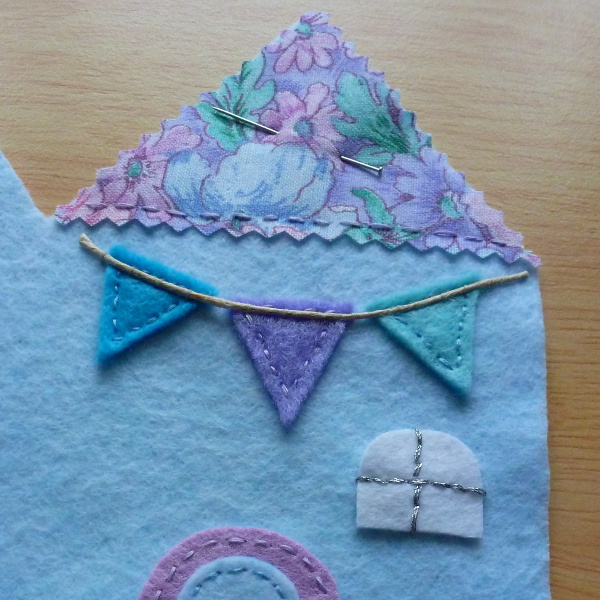
To add some cute detail on the garland, I stitched a very small piece of twine across the top of the triangles with a widely spaced whip stitch in the same color as the twine to hold it in place.
You could stitch on some thin cord or even yarn instead to get a similar effect. It adds a lovely bit of detail very quickly for good effect.
Just below the garland, I stitched on a curved white window of felt with silver thread across the middle vertically and horizontally.

I finished the front of my needle case design with a simple swirl of floss worked in a backstitch and green variegated thread. A little purple flower button finished the whole look off for me.
You may want to add on your own choice of embroidery or felt applique to make make this felt needle case design your own.

Because I now had lots of stitching showing on the inside of my needlebook, I cut another house shape piece of felt to cover over the back of the stitches. Simply draw around the template that you made earlier.

Pin the felt house shape on to the reverse side of your needle case which will be the interior of your needlebook once folded. This will cover over the back of all the stitching.
I sewed this piece of felt on using a blanket stitch around the edges. I sewed it with the front of the case facing me so that the stitching looks neater on the front. This photo shows what the inside of my case looks like once this is sewn into place.

Like you did back in step 1, draw out a double house design on a different piece of felt. This will form some inside sheets to hold your needles.
I chose a purple felt color and used pinking shears around the edges for a prettier effect.
It is possible to add more sheets inside your case but, the more you add, the bulkier your case will become. If you add too many sheets inside, your felt needlecase will become difficult to keep closed.

You can position your sheets right on top of the inside of your case and just sew right down the middle if you want. This is very easy to do but leaves stitch marks on the outside of your needlecase design.
I decided to fold my sheets in half and sew the folded middle to the inside of the front cover down the middle using a simple whip stitch.

You can see what this looks like with the sheets added and some needles placed inside. You can create the interior to suit your own needs.
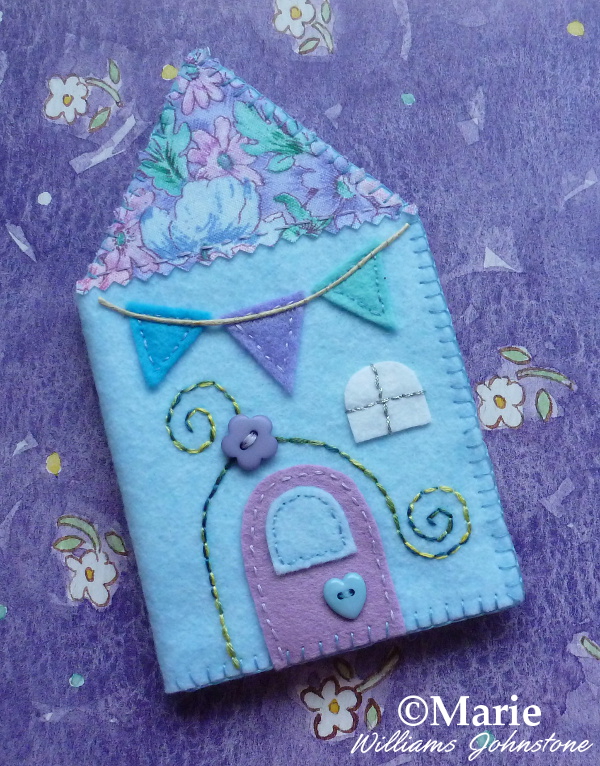
This is the finished felt needle case design. It opens and closes very simply like a book.
You can sew on some ribbon to the side to use as ties if you want to keep it closed tight. I prefer to be able to get into mine very quickly.
Enjoy making your own little needle case designs.
Related Content You Should Also Love:
Page Last Updated:
Needlebooks come in all kinds of shapes and designs but why not sew your own with this quick and easy felt craft project. Choose your favorite colors and design a pretty house to hold your needles safely in your sewing kit.
This step by step photo tutorial comes with detailed instructions so that you can sew this sweet design. If you're looking for a quick gift to make for someone, this makes a great little project that is possible to finish in half a day.
Note: This post may contain affiliate links for which I can be compensated.
How to Make a Felt Needle Case Tutorial: Easy and Cute House Design

Although I wouldn't class a needle case as an essential part of your sewing kit, it is a highly useful one nonetheless. Most sewing needles are now sold as sets in plastic storage cases. However, they are often fiddly to operate and to get the needles out quickly.
I still prefer to use felt needlebooks and cases because it is so fast to pull whatever needle I need from a soft case. It also means that I can easily keep specific ranges of needles that I want stored in different places around the home. I like one with my sewing box, my sewing machine, my craft bag and repair kit.
Tools and Materials to Make a Felt Needle Case:
- Small pieces of felt in your choice of colors
- Embroidery floss
- Needles, pins, scissors, pinking shears if you have them
- Small piece of patterned fabric
- Buttons and some twine for decoration
- Marking tool like a water soluble fabric marker
Step 1: Make a Simple House Shape for the Main Needle Case Shape

Just as with the beginner house plush ornament, you need a basic house shape. I'm not providing a pattern because these are just so incredibly easy to draw out yourself. It is simply a rectangle shape with a triangle on top. That is all.
If you're really stuck on drawing out a house shape, look up "house template" or outline in any search engine online. You'll probably find loads. For a needlebook, I made one which is roughly as long as my hand at 14 cm high and 8 cm wide.
Once you've got your pattern drawn onto a quick template of paper or card, fold a piece of felt in half. Place the left side of your house pattern up against the fold on the felt and draw around it with your marking tool.
Pin this section to keep it nicely folded and then carefully cut the pattern out. When you unfold it, the shape should look similar to mine in the photo above.
Step 2: Make a Pretty Fabric Roof for Your Needle Case Home

Use the house pattern to draw out a triangle roof on a pretty piece of fabric. To do this, I marked a straight line on the back of the fabric with a ruler. Then I lined up the bottom of the triangle section and draw around the rest with a fabric marking tool.
I chose a fabric by laying a variety of different fabric scraps on top of my needle case felt and seeing which worked best with the color. Then I cut the fabric roof out with pinking shears because this helps to keep the fabric from fraying easily.
Step 3: Pin the Fabric to the Roof and Sew in Place

Pin the fabric to the roof on the right-hand side of your felt piece. The right side of the felt will become the front of the needle case once it is folded.
Because I have cut this fabric out using pinking shears, I am not overly worried about the fabric fraying. I just use a simple running stitch along the bottom edge to sew it to the felt since I will sew the other sides later.
Step 4: Add on a Door for Your House Design

Draw out and cut a little door shape for your house design. I picked a purple felt which ties in with the colors in the fabric pattern. This was sewn on using a backstitch around the sides and top.
I picked a light blue felt to cut a little window out for the door and sewed this on top of the door. Underneath the window was just enough space to add a tiny heart button for a door knob.
Step 5: Add a Mini Felt Garland of Bunting

I adore bunting. I have a lot decorating my own home so I wanted to add a bit to this needle case design.
Cut out 3 small triangle shapes from different colors of felt. I choose blues and purple to work with the colors in the fabric. It helps to place the middle triangle first roughly in the middle of the design under the roof section.
Before you sew all these in place, check they will fit across the front of your design comfortably. Sew the middle triangle on first then the other two at an angle to make it look like a curved garland or pennant banner would. These were sewn with a quick backstitch.
Step 6: Add Some Twine or Thin Cord and a Window

To add some cute detail on the garland, I stitched a very small piece of twine across the top of the triangles with a widely spaced whip stitch in the same color as the twine to hold it in place.
You could stitch on some thin cord or even yarn instead to get a similar effect. It adds a lovely bit of detail very quickly for good effect.
Just below the garland, I stitched on a curved white window of felt with silver thread across the middle vertically and horizontally.
Step 7: Complete the Front of Your Needle Case

I finished the front of my needle case design with a simple swirl of floss worked in a backstitch and green variegated thread. A little purple flower button finished the whole look off for me.
You may want to add on your own choice of embroidery or felt applique to make make this felt needle case design your own.
Step 8: Cut Another Piece of Felt

Because I now had lots of stitching showing on the inside of my needlebook, I cut another house shape piece of felt to cover over the back of the stitches. Simply draw around the template that you made earlier.
Step 9: Cover Over the Back of the Stitching

Pin the felt house shape on to the reverse side of your needle case which will be the interior of your needlebook once folded. This will cover over the back of all the stitching.
I sewed this piece of felt on using a blanket stitch around the edges. I sewed it with the front of the case facing me so that the stitching looks neater on the front. This photo shows what the inside of my case looks like once this is sewn into place.
Step 10: Make Some Interior Inside Sheets for the Needles

Like you did back in step 1, draw out a double house design on a different piece of felt. This will form some inside sheets to hold your needles.
I chose a purple felt color and used pinking shears around the edges for a prettier effect.
It is possible to add more sheets inside your case but, the more you add, the bulkier your case will become. If you add too many sheets inside, your felt needlecase will become difficult to keep closed.
Step 11: Sew the Sheets Inside Your Needlebook

You can position your sheets right on top of the inside of your case and just sew right down the middle if you want. This is very easy to do but leaves stitch marks on the outside of your needlecase design.
I decided to fold my sheets in half and sew the folded middle to the inside of the front cover down the middle using a simple whip stitch.
Step 12: Add Your Needles

You can see what this looks like with the sheets added and some needles placed inside. You can create the interior to suit your own needs.
Easy to Make Felt House Needlecase Design

This is the finished felt needle case design. It opens and closes very simply like a book.
You can sew on some ribbon to the side to use as ties if you want to keep it closed tight. I prefer to be able to get into mine very quickly.
Enjoy making your own little needle case designs.
Related Content You Should Also Love:
All You Need to Know About Craft Felt
How to Make an Easy Square Felt Pincushion
Garden Shed Felt Applique
Hand Sewing Tools Complete Guide
More Felt Crafts to Enjoy
How to Make an Easy Square Felt Pincushion
Garden Shed Felt Applique
Hand Sewing Tools Complete Guide
More Felt Crafts to Enjoy
Page Last Updated:


Oh my goodness, this is so stinkin' cute! Thank you for sharing and I hope I can whip one up soon! I love needlework and this is perfect. :)
ReplyDelete