Cute Cherry Perler Bead Pattern Tutorial
Cherries are a favorite summer fruit and a really fun theme for crafting with too. With this Cherry Perler bead pattern tutorial, you'll be able to make a cute pair of cherry embellishments.
These cherry Perler bead embellishment designs will work as sweet additions to handmade cards, scrapbook pages, gift tags, party favor bag decorations and cute detail to add to bags and purses. They'd make great hair and fashion accessories for you to craft too.
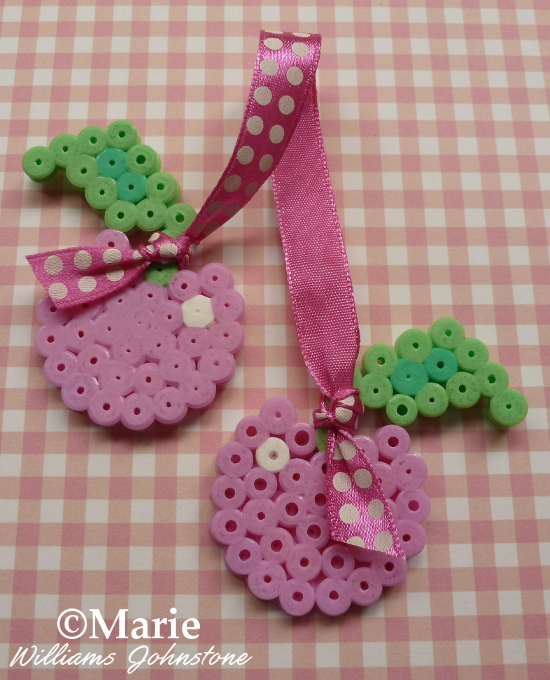
Mine are joined together with some fancy, patterned ribbon which helps them look so cute. I plan to sew mine onto a mini crochet cushion when I get the time to make one.
Note: This post may contain affiliate links for which I can be compensated.

If you live in a European country rather than America, you're more likely to find a brand of beads called Hama which work in exactly the same way.
There are other brands too so check out your local craft store, Amazon or eBay for fused bead supplies.

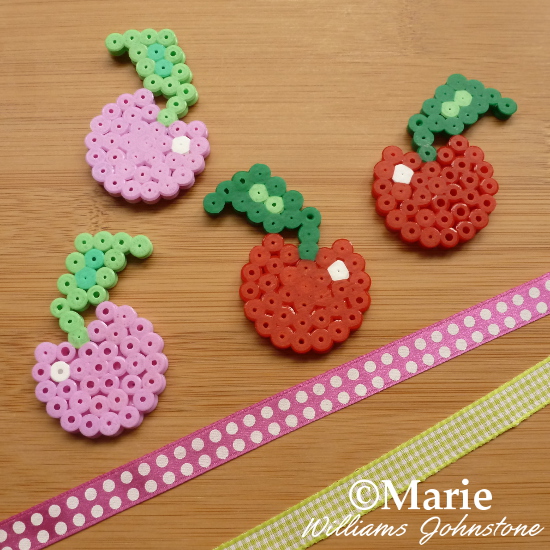
Step 1) With the cherry color you've chosen with your beads (pink, red or something wacky) work the outline shown in the first photo.
It's easy to do so as follows. Counting the middle peg on the circle board as 1, move to the 4th peg straight down - this is the circular row that you want to use as your main outline.
I find it easiest to put beads around the whole row and then remove 3 right at the top and add in the Y shaped pattern worked up from the central peg.

Step 2) Fill in inside all the outline with the same color apart from a single peg shown on the top left of the design because that is where you can pop a white bead for a highlight.

Step 3) Add in a single white bead and that is the fruit section of the cherry done. Next onto the stalk and leaf.

Step 4) I like to use two shades of green to make the stalk and leaf on each cherry pattern but you can just use one shade of green if that is all you have.
Using the first shade of green, add in 3 beads up from the middle area of the fruit and then another 3 going diagonally to the right - this will take you right to the edge if using a small circle pegboard.

Step 5) It's easier to follow the photo here in the middle showing how the rest of the leaf outline is made.
But you add on 3 more beads that follow on down the outside row on the circle board and then use another 4 beads to finish off the leaf shape back up to the stalk.
If you worked the pattern right, there should be two empty spaces in the middle of the leaf design.

Step 6) Fill in the two spaces with another shade of green if you wish or the same shade if you have no different option to use.

Step 7) After completing each cherry pattern, you'll need to iron them with the special paper on top to fuse or melt them together so they stick in one piece. Here's where having more than 1 circle pegboard makes the process a lot faster.
That's because with multiple boards you can make up several cherries and then iron them one by one. Once ironed, choose some ribbon if you'd like to tie a pair together to make cute embellishments.

Step 8) Cut the length of ribbon or twine you need (over-estimate since you need enough to knot at both ends) and then tie one end to a cherry as shown with the ribbon going around the stalk area.

Step 9) Next tie the other end of the ribbon around another cherry which makes a pair.
I folded the ribbons over to make it easy to sew onto a crochet cushion possibly so you get an idea of how the embellishment can hang if attached to something - cushion, bag, purse, clothing, garland, bunting etc.
➡️ Now See How to Turn These Cherry Perler Designs into DIY Party Favors
➡️ See How to Make These into a Pair of Earrings to Wear
Having a pair works better than a single one although just one would look cute on a small gift tag or stuck to a popsicle stick as a cupcake topper maybe.
Above is a photo of the red pair I completed which have got darker green leaves and a spring green check ribbon. I hope you've enjoyed reading my craftymarie article today, thanks for your visit. I can't decide whether I prefer the pink ones or red - you can let me know in the comments which ones you like best.
Related Content You Should Also Love:
Page Last Updated:
These cherry Perler bead embellishment designs will work as sweet additions to handmade cards, scrapbook pages, gift tags, party favor bag decorations and cute detail to add to bags and purses. They'd make great hair and fashion accessories for you to craft too.
Mine are joined together with some fancy, patterned ribbon which helps them look so cute. I plan to sew mine onto a mini crochet cushion when I get the time to make one.
Note: This post may contain affiliate links for which I can be compensated.
Cherry Perler Bead Pattern Page: Tutorial to Make These Cute Embellishments

What You'll Need to Make This Cherry Perler Bead Pattern:
- a selection of Fused Perler Beads (look for Hama beads in the UK) in reds and greens - or pinks and greens depending on your preference
- a small circle pegboard, though a large one will also work
- some of the special Perler ironing paper if you don't already have it for an adult to fuse and melt the beads together
- some ribbon or twine to pair the cherries up as embellishments
If you live in a European country rather than America, you're more likely to find a brand of beads called Hama which work in exactly the same way.
There are other brands too so check out your local craft store, Amazon or eBay for fused bead supplies.
Cute Cherry Perler Bead Pattern Tutorial

Step 1) With the cherry color you've chosen with your beads (pink, red or something wacky) work the outline shown in the first photo.
It's easy to do so as follows. Counting the middle peg on the circle board as 1, move to the 4th peg straight down - this is the circular row that you want to use as your main outline.
I find it easiest to put beads around the whole row and then remove 3 right at the top and add in the Y shaped pattern worked up from the central peg.

Step 2) Fill in inside all the outline with the same color apart from a single peg shown on the top left of the design because that is where you can pop a white bead for a highlight.

Step 3) Add in a single white bead and that is the fruit section of the cherry done. Next onto the stalk and leaf.

Step 4) I like to use two shades of green to make the stalk and leaf on each cherry pattern but you can just use one shade of green if that is all you have.
Using the first shade of green, add in 3 beads up from the middle area of the fruit and then another 3 going diagonally to the right - this will take you right to the edge if using a small circle pegboard.

Step 5) It's easier to follow the photo here in the middle showing how the rest of the leaf outline is made.
But you add on 3 more beads that follow on down the outside row on the circle board and then use another 4 beads to finish off the leaf shape back up to the stalk.
If you worked the pattern right, there should be two empty spaces in the middle of the leaf design.

Step 6) Fill in the two spaces with another shade of green if you wish or the same shade if you have no different option to use.

Step 7) After completing each cherry pattern, you'll need to iron them with the special paper on top to fuse or melt them together so they stick in one piece. Here's where having more than 1 circle pegboard makes the process a lot faster.
That's because with multiple boards you can make up several cherries and then iron them one by one. Once ironed, choose some ribbon if you'd like to tie a pair together to make cute embellishments.

Step 8) Cut the length of ribbon or twine you need (over-estimate since you need enough to knot at both ends) and then tie one end to a cherry as shown with the ribbon going around the stalk area.

Step 9) Next tie the other end of the ribbon around another cherry which makes a pair.
I folded the ribbons over to make it easy to sew onto a crochet cushion possibly so you get an idea of how the embellishment can hang if attached to something - cushion, bag, purse, clothing, garland, bunting etc.
➡️ Now See How to Turn These Cherry Perler Designs into DIY Party Favors
➡️ See How to Make These into a Pair of Earrings to Wear
Having a pair works better than a single one although just one would look cute on a small gift tag or stuck to a popsicle stick as a cupcake topper maybe.
Above is a photo of the red pair I completed which have got darker green leaves and a spring green check ribbon. I hope you've enjoyed reading my craftymarie article today, thanks for your visit. I can't decide whether I prefer the pink ones or red - you can let me know in the comments which ones you like best.
Related Content You Should Also Love:
Lots of Cupcake Perler Bead Designs
Popsicle Perler Bead Tutorial
How to Make Watermelon Perler Beads
How to Make Perler Bead Fruit Slices Tutorial
More Perler Bead Crafts
Popsicle Perler Bead Tutorial
How to Make Watermelon Perler Beads
How to Make Perler Bead Fruit Slices Tutorial
More Perler Bead Crafts
Page Last Updated:


Comments
Post a Comment
CraftyMarie is a craft themed website by Marie Williams Johnstone. I love to craft in the winter and garden in the summer. I make handmade cards, papercrafts, crochet and seasonal crafts. I enjoy many of the more traditional crafts and hobbies including sewing, embroidery and working with felt and fabric. Thanks for leaving me a comment. Comments do not show up until I approve them. Marie