Easy Origami High Heel Shoes Instructions and Tutorial
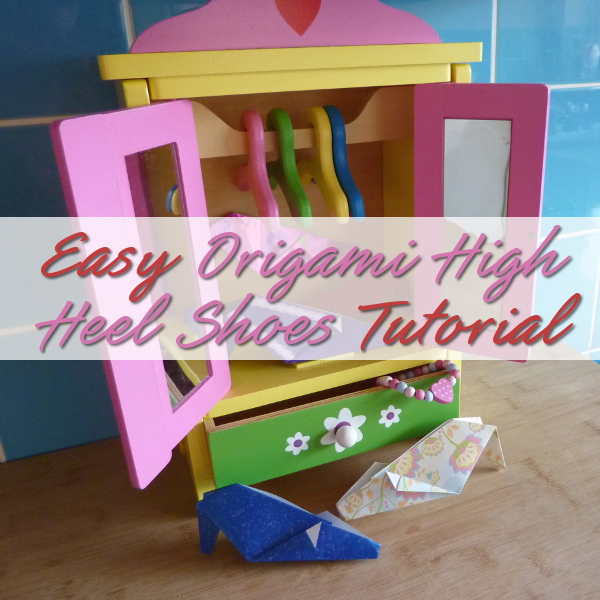
Learn how to make some high heel origami shoes so you can indulge your passion for fashion without hurting your wallet. Fold a pair of gorgeous heeled paper shoes that will stand up unaided or can be glued flat to handmade cards.
Now you really can indulge your passion for shoes without having to spend a dime. This easy origami high heel shoes instructions tutorial is a fun and cute paper crafting project that kids and adults will love to make.
These pretty paper shoes can be folded flat so that they stick onto a paper crafted project such as a handmade card or a scrapbook page. Alternatively, they will stand up so you can proudly display your finished origami pieces. All you need is a piece of square paper to get started.
Note: This post may contain affiliate links for which I can be compensated.

Discover how easy it is to make the cutest origami shoes with my step-by-step paper folding tutorial. These darling paper shoes will stand up by themselves and also fold flat which make them ideal to put onto a handmade card or a paper crafting project.
Decorate your finished origami high heel shoes with stickers, brads, flat-backed gems, glitter glue, bows or pens to make yours truly unique. You can design shoes just the way you want them.

Step 1: Start with a square sheet of paper at least 5 by 5 inches. It doesn't need to be Origami paper but paper with a blank side will make folding easier to start with.

Step 2: Have the blank side facing up and fold in half, diagonally, then unfold.

Step 3: Take the right corner, pull it across to meet the center crease line and make a fold.

Step 4: Repeat step 3 on the other side of the paper so you pull the left corner across to the middle crease line and fold.

Step 5: Take the right corner again and pull it up and across to meet the center crease, then fold. This makes a triangular flap which sits over the top of the one you just made.

Step 6: Repeat step 5 on the other side so you pull the left corner across to the middle crease line and fold.

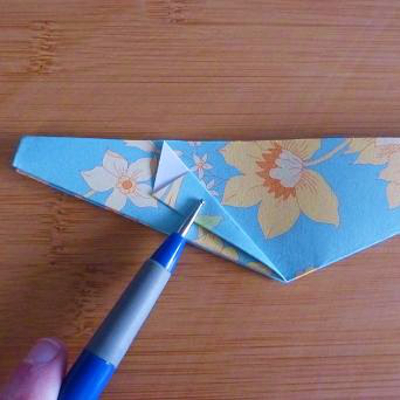
Step 7: You now want to make a couple of small, detail folds which are going to make the front part of your heeled shoe - the bit which you would slip your feet into if they were real.
We're going to fold again the section of paper that we've just folded. Take hold of the top of the folded flap on the right hand side and fold it down into a little triangle as shown in the photo.
You want to fold this over to the south east but not all the way over to the outside edge.

Step 8: Repeat this small fold from step 7 on the left side.

Step 9: Fold your paper shoe back in half, length-ways, along the middle crease. It's easier to do this by lifting the paper up off the table or work surface and bending it backwards before neatly positioning it so edges meet up.
You should see the little detail folds you made on the outside of your paper folded shoe project. Rotate your paper so the detail fold is on the left as shown in the photo.

Step 10: If you want to leave your shoes with a sharp point at the front like you do get with some stilettos then you can. Just move on to step 13 and skip this part.
I like to round off the tip of my folded shoes and here's how you do this. Take hold of the left corner of paper and bend a little back then make a good fold. Unfold back to a point.

Step 11: Here's the tricky part. You want to lift your shoe up from your work surface, open it out at the front a little and push the tip of the paper shoe backwards so it goes underneath the paper.

Step 12: This photo shoes how the tip of the paper has completely disappeared under the bottom of your shoe. The front is now rounded off neatly.

Step 13: Now you start to make the heel of your paper shoe.
Take the right-most corner of the paper and fold it back and down as shown to create a rough heel shape.
What will become the very tip of the heel should extend past the sole or bottom of your shoe. Unfold the fold you've just made.

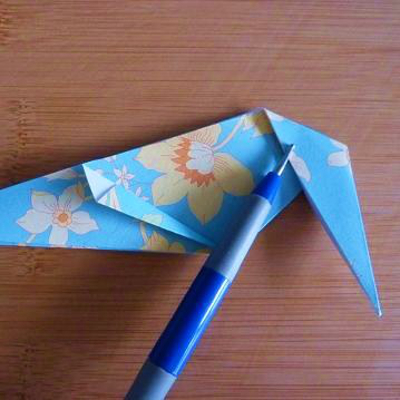
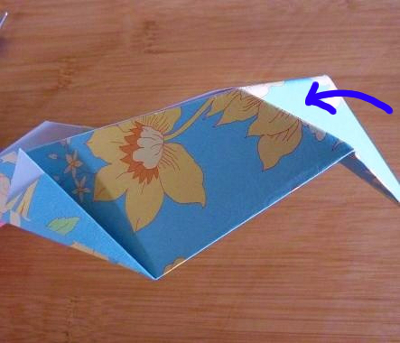
Step 14: Lift the paper shoe up from your work surface and open out the right side of it a little from the bottom which is basically what forms the sole of your origami high heel shoes.
Push the corner of paper on the right hand side (the heel) down and inside the middle of your shoe. You're bending the heel backwards so it sits inside the shoe when folded flat.

Step 15: This image shows how your shoe should now look.

Step 16: Finally, fold in the very tip of the heel using the exact technique from step 13 onwards.
Just fold back a small triangle on the tip of the heel, then unfold.

Step 17: Open out the heel at the back of your shoe and push the tip up and back inside the heel.

Here's some of my completed designs. You can make these paper shoes from patterned papers and shiny foil papers for a different effect.
I don't always use origami paper. I like to use pretty scrapbook papers for a unique look. You can them add on some embellishments like ribbon bows, brads and gems before popping these on display or using them stuck onto a handmade card.
Related Content You Should Also Love:
Page Last Updated:
Now you really can indulge your passion for shoes without having to spend a dime. This easy origami high heel shoes instructions tutorial is a fun and cute paper crafting project that kids and adults will love to make.
These pretty paper shoes can be folded flat so that they stick onto a paper crafted project such as a handmade card or a scrapbook page. Alternatively, they will stand up so you can proudly display your finished origami pieces. All you need is a piece of square paper to get started.
Note: This post may contain affiliate links for which I can be compensated.
Easy Origami High Heel Shoes Instructions and Step by Step Photo Tutorial

Discover how easy it is to make the cutest origami shoes with my step-by-step paper folding tutorial. These darling paper shoes will stand up by themselves and also fold flat which make them ideal to put onto a handmade card or a paper crafting project.
Decorate your finished origami high heel shoes with stickers, brads, flat-backed gems, glitter glue, bows or pens to make yours truly unique. You can design shoes just the way you want them.

Step 1: Start with a square sheet of paper at least 5 by 5 inches. It doesn't need to be Origami paper but paper with a blank side will make folding easier to start with.

Step 2: Have the blank side facing up and fold in half, diagonally, then unfold.

Step 3: Take the right corner, pull it across to meet the center crease line and make a fold.

Step 4: Repeat step 3 on the other side of the paper so you pull the left corner across to the middle crease line and fold.

Step 5: Take the right corner again and pull it up and across to meet the center crease, then fold. This makes a triangular flap which sits over the top of the one you just made.

Step 6: Repeat step 5 on the other side so you pull the left corner across to the middle crease line and fold.

Step 7: You now want to make a couple of small, detail folds which are going to make the front part of your heeled shoe - the bit which you would slip your feet into if they were real.
We're going to fold again the section of paper that we've just folded. Take hold of the top of the folded flap on the right hand side and fold it down into a little triangle as shown in the photo.
You want to fold this over to the south east but not all the way over to the outside edge.

Step 8: Repeat this small fold from step 7 on the left side.

Step 9: Fold your paper shoe back in half, length-ways, along the middle crease. It's easier to do this by lifting the paper up off the table or work surface and bending it backwards before neatly positioning it so edges meet up.
You should see the little detail folds you made on the outside of your paper folded shoe project. Rotate your paper so the detail fold is on the left as shown in the photo.

Step 10: If you want to leave your shoes with a sharp point at the front like you do get with some stilettos then you can. Just move on to step 13 and skip this part.
I like to round off the tip of my folded shoes and here's how you do this. Take hold of the left corner of paper and bend a little back then make a good fold. Unfold back to a point.

Step 11: Here's the tricky part. You want to lift your shoe up from your work surface, open it out at the front a little and push the tip of the paper shoe backwards so it goes underneath the paper.

Step 12: This photo shoes how the tip of the paper has completely disappeared under the bottom of your shoe. The front is now rounded off neatly.

Step 13: Now you start to make the heel of your paper shoe.
Take the right-most corner of the paper and fold it back and down as shown to create a rough heel shape.
What will become the very tip of the heel should extend past the sole or bottom of your shoe. Unfold the fold you've just made.

Step 14: Lift the paper shoe up from your work surface and open out the right side of it a little from the bottom which is basically what forms the sole of your origami high heel shoes.
Push the corner of paper on the right hand side (the heel) down and inside the middle of your shoe. You're bending the heel backwards so it sits inside the shoe when folded flat.

Step 15: This image shows how your shoe should now look.

Step 16: Finally, fold in the very tip of the heel using the exact technique from step 13 onwards.
Just fold back a small triangle on the tip of the heel, then unfold.

Step 17: Open out the heel at the back of your shoe and push the tip up and back inside the heel.

Here's some of my completed designs. You can make these paper shoes from patterned papers and shiny foil papers for a different effect.
I don't always use origami paper. I like to use pretty scrapbook papers for a unique look. You can them add on some embellishments like ribbon bows, brads and gems before popping these on display or using them stuck onto a handmade card.
Related Content You Should Also Love:
How to Do Tea Bag Paper Folding
Origami Heart Ideas to Try
Easy Decorative Origami Envelopes to Fold
More Papercrafts for You to Enjoy
More on Origami
Origami Heart Ideas to Try
Easy Decorative Origami Envelopes to Fold
More Papercrafts for You to Enjoy
More on Origami
Page Last Updated:


Comments
Post a Comment
CraftyMarie is a craft themed website by Marie Williams Johnstone. I love to craft in the winter and garden in the summer. I make handmade cards, papercrafts, crochet and seasonal crafts. I enjoy many of the more traditional crafts and hobbies including sewing, embroidery and working with felt and fabric. Thanks for leaving me a comment. Comments do not show up until I approve them. Marie