How to Make a Felt Ornament: Instructions and Tutorial
Felt is the perfect material to make ornaments with. But, if you've never actually made an ornament before, you will probably be wondering how it is done and what the best way to achieve it is.
This page will show you, step by step, the process of how to make a felt ornament to hang on a Christmas tree, from a hook or a freestanding ornament hanger. Learn how to turn a handsewn felt design into a hanging decoration.
Small felt plushies in particular are very popular as handmade Christmas tree decorations. These small, handsewn ornaments are also great to make up as little gifts and as items to sell online and at craft stalls and fairs.
Note: This post may contain affiliate links for which I can be compensated.

This page is not showing you how to make a particular felt ornament design, it is showing you the actual process. After reading this, you will know exactly how to turn any small felt design or plushie into an ornament.
So often, craft tutorials conveniently skip this crucial step of how a felt item actually becomes a felt ornament and beginners, in particular, are left wondering not just how it is done but how best it can be done.
You may be left with questions like:

Having both front and back pieces means that you can very neatly sandwich the bottom of your chosen loop neatly between the two where the ends cannot be seen.
Sewing or gluing the loop right on the back of your felt design is an amateur and beginner sewer giveaway. I would not be happy to pay for any ornament made this way. If you're planning to sell or give away your felt crafts, it will pay to take the time to learn good sewing habits and techniques.
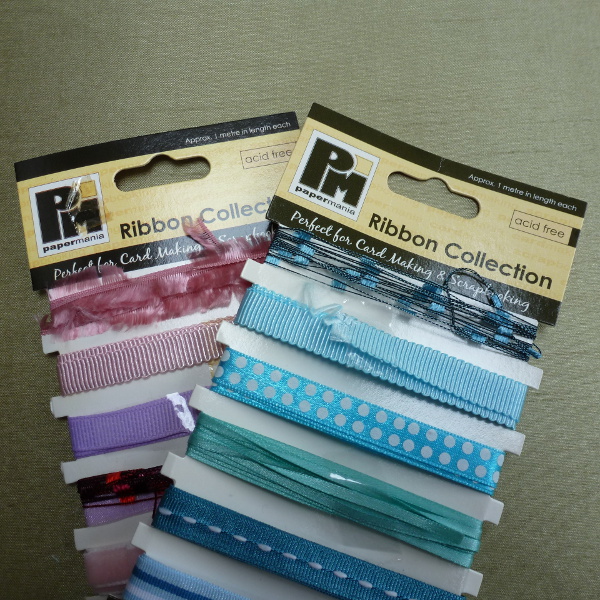
Cords come fashioned in a variety of materials like leather and can provide a sturdy option for hanging loops. You can buy cords in different thicknesses and colors to work well with your finished craft.
My favorite choice is ribbon. Craft ribbon looks fantastic paired up with felt ornaments and you can get ribbon not just in different widths and colors but also in patterns too. So long as the cut ends are tucked inside the ornament, ribbon can be a reasonably durable option as well.
It is worth spending some time selecting a hanging loop that will work well with and complement your felt decoration. Normally I will pick out a color in the ornament and match it up with the loop.

In recent years I have moved towards making shorter loops (about 2-3 inches) simply because I feel they actually look nicer with the ornament design. After all, there are special wire hangers that you can use or even twine if these need to be added to a tree.
So decide on what folded length you want, add on an inch or two for the section that will be hidden inside the ornament and cut. If you are concerned about the cut ends unraveling inside your project, you can use some fray check on them or a bit of slightly watered down white PVA glue.
Place the back/reverse piece of your felt ornament in front of you with what will be the inside of this section facing towards you. Position the folded loop on the inside of this piece so that the cut ends are well away from the top edge.
Normally hanging loops are placed in the top center of an ornament unless you want it to hang at an angle.
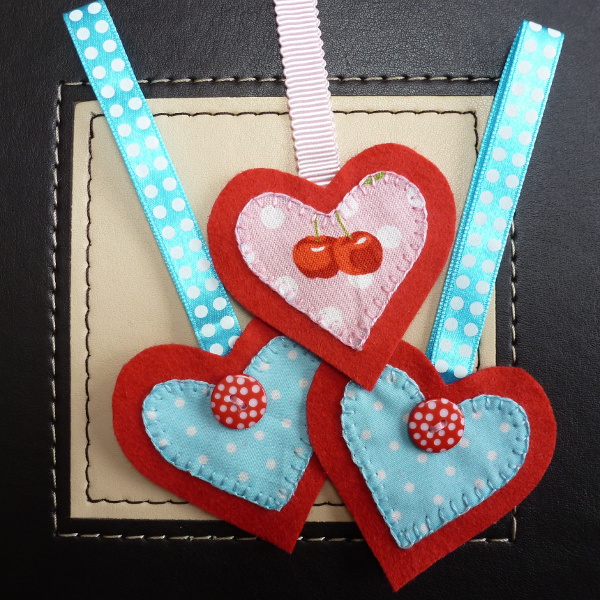
If you glue the loop into place, use a glue that is suitable for felt and fabric such as Aleene's tacky glue. If you pin it, to hold it in place temporarily, you need to pin from the back. This is because you will sew the loop into place while sewing your felt ornament together. Having the pin at the back means that you will find it easy to remove.
Once the loop is secured, place the front piece of your felt ornament over the top and line the edges up as best you can. Pin the pieces together.
Blanket stitch is a harder stitch to sew but does make a very attractive looking edge stitch as well as a durable one. Backstitch is the strongest hand stitch that you can sew around the edges. It is ideal for plush ornaments although be aware that the stitching doesn't look quite so neat on the reverse as it does on the front.
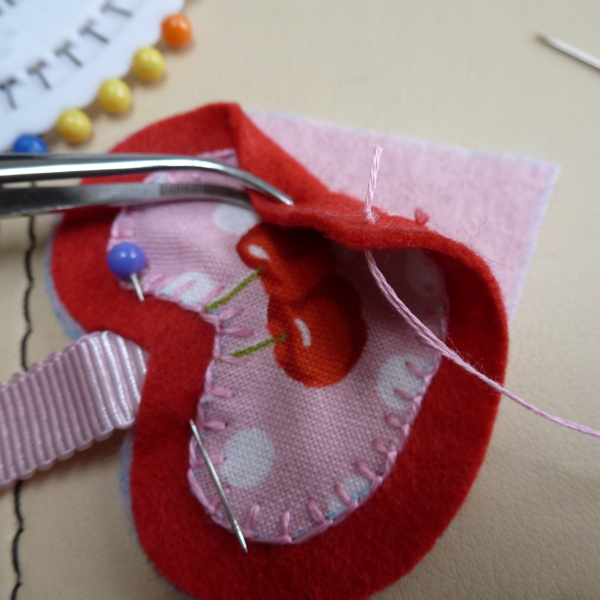
Whatever stitch you choose, the neatest way to start off is to bury the starting thread or knot between the front and back pieces of the felt so it cannot be seen.
So start your first stitch off by sewing through from the back of the top piece of felt only. In the photo above, you can see I have stitched through from the back of the top (red) piece of felt while the bottom (pink) piece of felt is untouched.
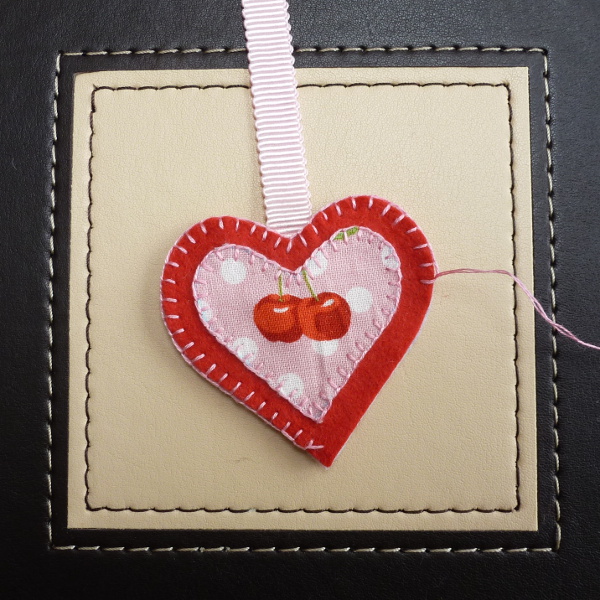
When making stuffed felt plush ornaments, you need to leave enough space for stuffing. I normally stitch around three-quarters of the design and leave enough of a gap to push the stuffing through.
I also try to ensure that the final piece I sew will be a nice easy section. You can see I've left a straight section of this design to sew up rather than trying to stuff and sew any tricky bits.
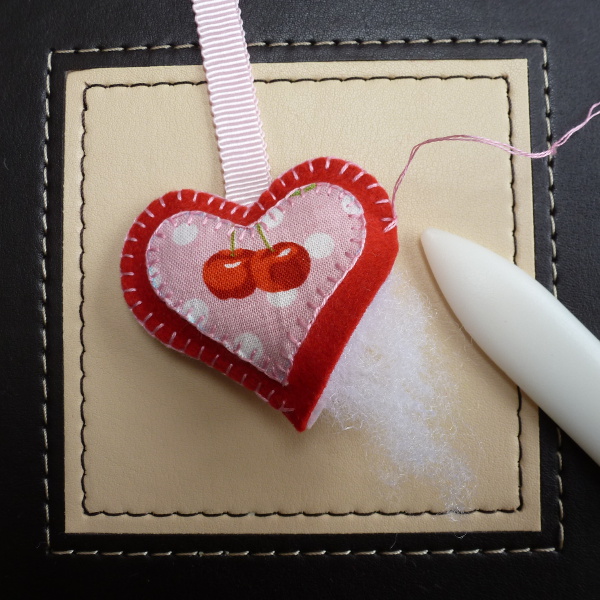
I use my fingers for the most part to gently push in small pieces of fiber fill. For filling out awkward and narrow sections of a plush design, it can be useful to use some blunt ended tweezers or, even better, a round ball head embossing stylus.
If you use any tools to help stuff the ornament, take care to push gently with them so you don't stretch or pull at any stitching.
One of the main beginner issues is with not adding in enough stuffing to really pad the design out. In almost every case, you will need more fiber fill than you think. Add small pieces of the filling at a time rather than trying to add too much in one go.
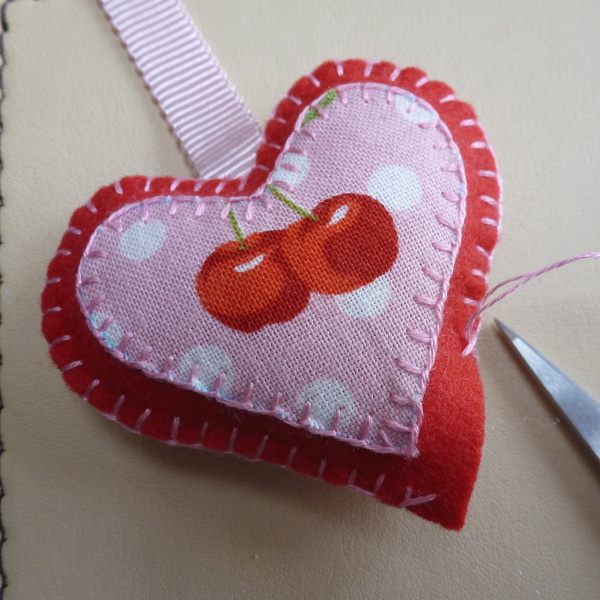
Sew up the rest of the design and knot off the thread at the back of the design and where it will be less noticeable. Sometimes I will knot off and end the thread between the felt pieces where the end of the thread will not be seen at all.
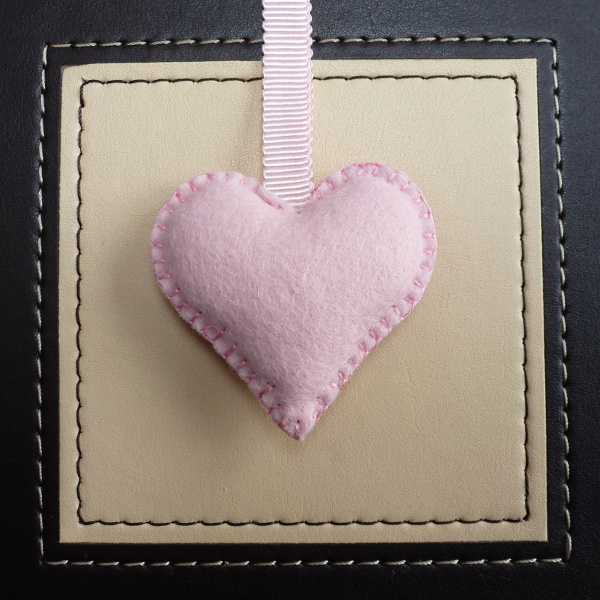
You can see that adding in a hanging loop should not make the back of your felt ornament look messy or untidy at all.
You may wish to take more care choosing an edge stitch that looks almost equally as good on both sides such as blanket stitch. Alternatively use something like running stitch that can also look fairly neat on both sides.
In most cases it is very easy to make a double-sided ornament although it is a lot more work. I would personally not bother making double-sided designs for hanging on a tree or wall where the back will be hidden.
The only time I would consider a double-sided design is for a ornament display stand or hanger where there was a 360 all round view.

Of course, most of the ornaments crafters want to make are decorations for the Christmas tree. This one above is my figgy pudding design. A very simple round ornament jazzed up with some silver thread, beads and just a touch of embroidery.
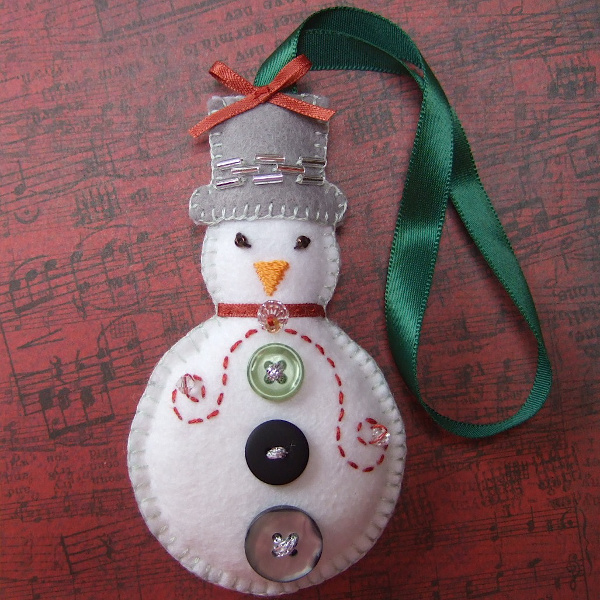
Snowmen and women make a good choice for Christmas and stand out well against a green tree. This one has an embroidered orange carrot nose and an assortment of buttons down the front.
If you're keen to make a plush ornament now, come try my easy felt bird design which has a free pattern template included.
Related Content You Should Also Love:
Page Last Updated:
This page will show you, step by step, the process of how to make a felt ornament to hang on a Christmas tree, from a hook or a freestanding ornament hanger. Learn how to turn a handsewn felt design into a hanging decoration.
Small felt plushies in particular are very popular as handmade Christmas tree decorations. These small, handsewn ornaments are also great to make up as little gifts and as items to sell online and at craft stalls and fairs.
Note: This post may contain affiliate links for which I can be compensated.
How to Make a Felt Ornament: Instructions to Turn Felt Crafts into Hanging Ornaments

This page is not showing you how to make a particular felt ornament design, it is showing you the actual process. After reading this, you will know exactly how to turn any small felt design or plushie into an ornament.
So often, craft tutorials conveniently skip this crucial step of how a felt item actually becomes a felt ornament and beginners, in particular, are left wondering not just how it is done but how best it can be done.
You may be left with questions like:
- What should I use for the hanging loop of the ornament?
- Should I just sew or glue some cord right on the back of my completed felt project?
- How long should the ornament loop be?
- Will adding a loop make the back of my felt ornament look messy?
- Can I make a double-sided hanging ornament which looks equally good on both sides?

Step 1: You Need Front and Back Pieces for Your Felt Ornaments
Even if you are making a flat felt ornament (instead of a plush stuffed one) you really need both a front and a back piece.Having both front and back pieces means that you can very neatly sandwich the bottom of your chosen loop neatly between the two where the ends cannot be seen.
Sewing or gluing the loop right on the back of your felt design is an amateur and beginner sewer giveaway. I would not be happy to pay for any ornament made this way. If you're planning to sell or give away your felt crafts, it will pay to take the time to learn good sewing habits and techniques.

Step 2: Choose Your Hanging Loop: Ribbon, Cord, Twine
There are all kinds of things that you can use for the hanging loop of your handmade ornament. Common ones include ribbon, cord or twine. I have also seen some DIY loops made from yarn and embroidery floss which is not the best idea since these can break and fray rather easily.Cords come fashioned in a variety of materials like leather and can provide a sturdy option for hanging loops. You can buy cords in different thicknesses and colors to work well with your finished craft.
My favorite choice is ribbon. Craft ribbon looks fantastic paired up with felt ornaments and you can get ribbon not just in different widths and colors but also in patterns too. So long as the cut ends are tucked inside the ornament, ribbon can be a reasonably durable option as well.
It is worth spending some time selecting a hanging loop that will work well with and complement your felt decoration. Normally I will pick out a color in the ornament and match it up with the loop.

Step 3: Placing the Loop Inside The Felt Ornament Pieces
Once you've decided on the hanging loop, you need to cut a length and fold it in half.
⭐ This is where a lot of crafters get stumped. How long does the loop need to be - that is a frequent question. Truthfully, the loop can be whatever size you want it to be. You can have a very long loop which means that you can hang the ornament directly on a fat branch of the Christmas tree or a short loop that will work for a small hook or ornament display stand.
In recent years I have moved towards making shorter loops (about 2-3 inches) simply because I feel they actually look nicer with the ornament design. After all, there are special wire hangers that you can use or even twine if these need to be added to a tree.
Fray Check is So Handy for Securing Ends of Cut Ribbon to Stop it From Fraying
So decide on what folded length you want, add on an inch or two for the section that will be hidden inside the ornament and cut. If you are concerned about the cut ends unraveling inside your project, you can use some fray check on them or a bit of slightly watered down white PVA glue.
Place the back/reverse piece of your felt ornament in front of you with what will be the inside of this section facing towards you. Position the folded loop on the inside of this piece so that the cut ends are well away from the top edge.
Normally hanging loops are placed in the top center of an ornament unless you want it to hang at an angle.

Step 4: Place the Front Felt Pieces on Top of the Back Pieces
Once the hanging loop is exactly where you want it, you can pin it into place temporarily or you can glue it. Occasionally, you can even sew it in place - but only if it is possible to sew it without any stitches showing through to the reverse side of your design.If you glue the loop into place, use a glue that is suitable for felt and fabric such as Aleene's tacky glue. If you pin it, to hold it in place temporarily, you need to pin from the back. This is because you will sew the loop into place while sewing your felt ornament together. Having the pin at the back means that you will find it easy to remove.
Once the loop is secured, place the front piece of your felt ornament over the top and line the edges up as best you can. Pin the pieces together.

Step 5: Start to Sew Around Your Felt Ornament Pieces
Now both the hanging loop and the front and back pieces are all secured, it's time to start sewing around the edges of your ornament. There are all kinds of stitches that you can use to sew around felt ornaments with. Running stitch is fine for beginners and this makes a pretty neat stitch on both the front and back.Blanket stitch is a harder stitch to sew but does make a very attractive looking edge stitch as well as a durable one. Backstitch is the strongest hand stitch that you can sew around the edges. It is ideal for plush ornaments although be aware that the stitching doesn't look quite so neat on the reverse as it does on the front.
Whatever stitch you choose, the neatest way to start off is to bury the starting thread or knot between the front and back pieces of the felt so it cannot be seen.
So start your first stitch off by sewing through from the back of the top piece of felt only. In the photo above, you can see I have stitched through from the back of the top (red) piece of felt while the bottom (pink) piece of felt is untouched.

Step 6: Sew Only Three-Quarters of the Way Around if Making a Plush Ornament
If you are making a flat ornament and not a plush stuffed one, you simply need to sew all the way around and then move on to step 9.When making stuffed felt plush ornaments, you need to leave enough space for stuffing. I normally stitch around three-quarters of the design and leave enough of a gap to push the stuffing through.
I also try to ensure that the final piece I sew will be a nice easy section. You can see I've left a straight section of this design to sew up rather than trying to stuff and sew any tricky bits.

Step 7: Starting to Fill the Felt Ornament
Start to gradually fill up your ornament design with your stuffing. For plushies I use a polyester fiber fill which is what you normally use for stuffing toys with.I use my fingers for the most part to gently push in small pieces of fiber fill. For filling out awkward and narrow sections of a plush design, it can be useful to use some blunt ended tweezers or, even better, a round ball head embossing stylus.
If you use any tools to help stuff the ornament, take care to push gently with them so you don't stretch or pull at any stitching.
One of the main beginner issues is with not adding in enough stuffing to really pad the design out. In almost every case, you will need more fiber fill than you think. Add small pieces of the filling at a time rather than trying to add too much in one go.

Step 8: Sewing The Final Part of the Plush Ornament
When you have padded out the entire ornament to your liking, you can start to sew up the rest of the design. Very often I will sew a little more, then fill up a bit more in order to fill out the last part properly.Sew up the rest of the design and knot off the thread at the back of the design and where it will be less noticeable. Sometimes I will knot off and end the thread between the felt pieces where the end of the thread will not be seen at all.

Step 9: Finished Ornament Design
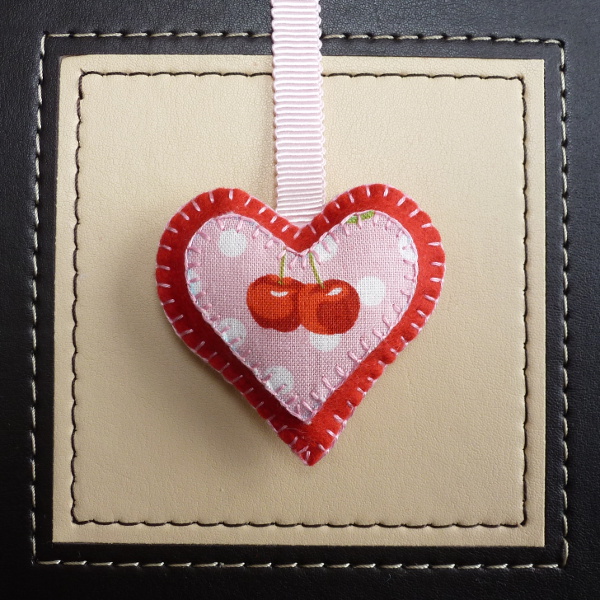
This is an example of a felt plush ornament. You can see that the ribbon loop at the top has been sewn into the design using blanket stitch around the edges. You can sew the loop in place with many other stitches as well. I just happen to like blanket stitch.
Step 10: The Back or Reverse Side of Your Ornament
This photo gives you an idea of what your ornament may look like at the back. The only visible stitching is around the edges of the design which is how it should be unless you want a double sided ornament.You can see that adding in a hanging loop should not make the back of your felt ornament look messy or untidy at all.
Making a Double-Sided Felt Ornament
For a double-sided ornament - just repeat your design for the back piece making sure it is an exact mirror image of the front. Then sew the pieces together around the edge following all my instructions above.You may wish to take more care choosing an edge stitch that looks almost equally as good on both sides such as blanket stitch. Alternatively use something like running stitch that can also look fairly neat on both sides.
In most cases it is very easy to make a double-sided ornament although it is a lot more work. I would personally not bother making double-sided designs for hanging on a tree or wall where the back will be hidden.
The only time I would consider a double-sided design is for a ornament display stand or hanger where there was a 360 all round view.
You Can Make Your Own Felt Christmas Tree Decorations

Of course, most of the ornaments crafters want to make are decorations for the Christmas tree. This one above is my figgy pudding design. A very simple round ornament jazzed up with some silver thread, beads and just a touch of embroidery.

Snowmen and women make a good choice for Christmas and stand out well against a green tree. This one has an embroidered orange carrot nose and an assortment of buttons down the front.
If you're keen to make a plush ornament now, come try my easy felt bird design which has a free pattern template included.
Related Content You Should Also Love:
Learn to Sew an Easy Felt House
How to Make a Cute Mushroom House Ornament
Complete Beginner Guide: Making Felt Plushies
How to Make a Felt Brooch Pin
More Felt Crafts to Enjoy
How to Make a Cute Mushroom House Ornament
Complete Beginner Guide: Making Felt Plushies
How to Make a Felt Brooch Pin
More Felt Crafts to Enjoy
Page Last Updated:


Comments
Post a Comment
CraftyMarie is a craft themed website by Marie Williams Johnstone. I love to craft in the winter and garden in the summer. I make handmade cards, papercrafts, crochet and seasonal crafts. I enjoy many of the more traditional crafts and hobbies including sewing, embroidery and working with felt and fabric. Thanks for leaving me a comment. Comments do not show up until I approve them. Marie