How to Make a Felt Bird Ornament With Free Pattern
This ideal beginner project shows you how to make a felt bird ornament and it includes a free pattern template for you to print off and use.
Enjoy this easy beginner plushie tutorial which shows you how to make a simple and cute bird design. I used two stitches but, if you're new to sewing, it is possible to make this with only one.
Felt birds make great ornaments and hanging decorations that you can enjoy year round. My example in this tutorial shows a yellow chick bird ideal for Spring and Easter. Simply change the colors up for any other season or occasion.
Note: This post may contain affiliate links for which I can be compensated.

Enjoy this beginner sewing project which makes up a small and simple bird design. I've turned this into an ornament which can be hung on a tree, a display stand or on the wall.
Alternatively, turn it into a brooch pin, bag clip, keychain or just a freestanding plush. Find the free pattern template at the end of this craft tutorial.
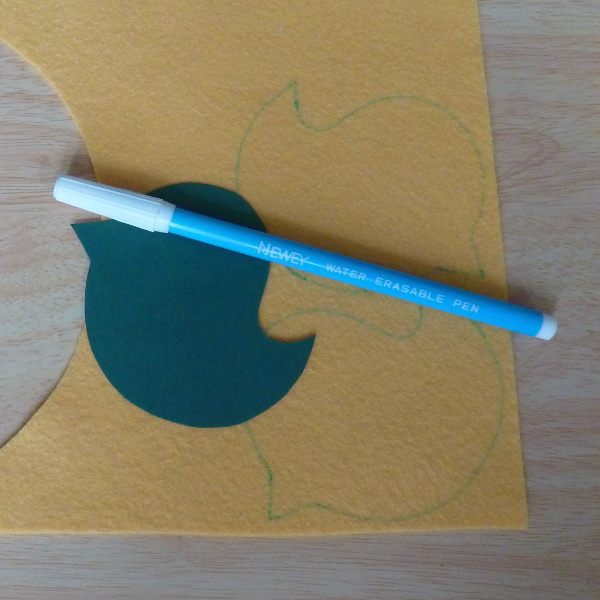
I have a card template of the bird which I trace around onto the felt with a water soluble fabric marking pen.
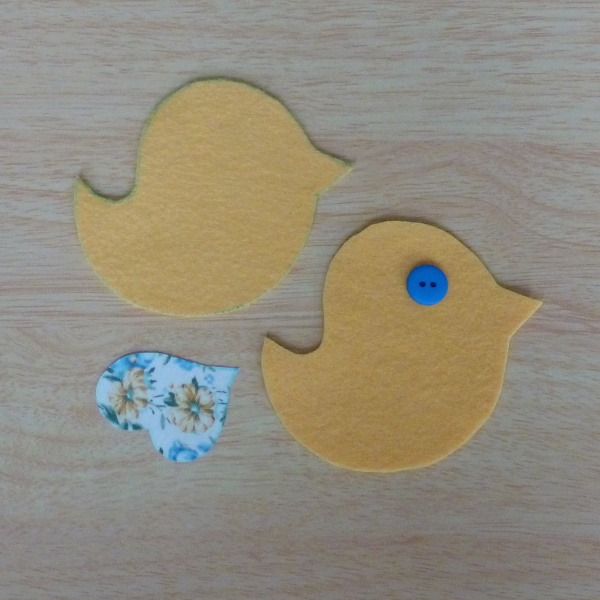
If you're a beginner at sewing plushies, you'll find it easier to cut the wing from felt which does not fray. Choose a different color for the wing or at least a lighter or darker shade so that it stands out well.
Patterned fabric looks great mixed with felt and I opted for this blue and yellow floral design. The yellow flowers match with the yellow of the felt and the blue gives me another color that I can match up easily with other elements such as the button eye.
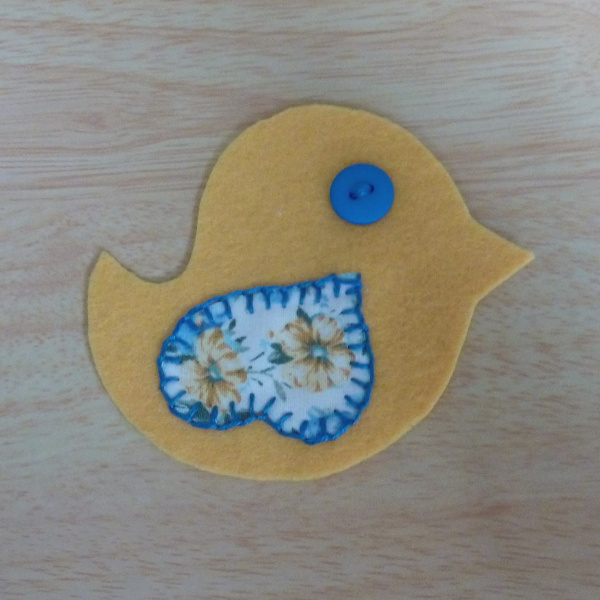
Because I used fabric for the wing, I chose a blanket stitch which helps to prevent fraying. I used a blue floss with two strands doubled over to make the stitch nice and thick. The blue was matched up to the button I chose for the eye detail.
Blanket stitch is not what I would call a beginner friendly stitch. In fact, this is a stitch that a lot of sewers have trouble with. You can use any stitch you like. For beginners I recommend a simple running stitch here. You can always use a fray check around the edges if you chose fabric for the wing.
Once the wing is in place, you can position the button eye and sew that on as well. Other alternative options for the eye can include a bead, some stitching or a circle of felt.

For turning this into a hanging ornament, I pick out some pretty ribbon which I fold in half and pin it into place temporarily on the inside of the front pattern piece for the bird.
Note that the pin needs to be on the outside of the felt though so you can remove it easily after sewing. If you don't want to make this into an ornament, skip this step.
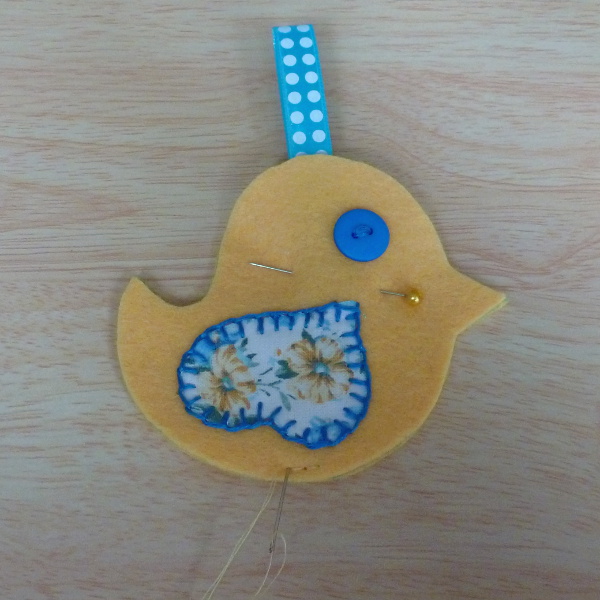
For sewing around the outside edges, you can use a simple straight stitch but I have chosen to sew backstitch because it is much more durable. For sewing around the edges, I prefer to use a strong thread such as Gutermann polyester thread in a matching or close shade to the felt.
Leave a small margin (3-5mm is great) and start to sew around the edge of the bird. I like to start from the bottom middle because this will leave me an easy section to sew at the end once I start stuffing the plush.
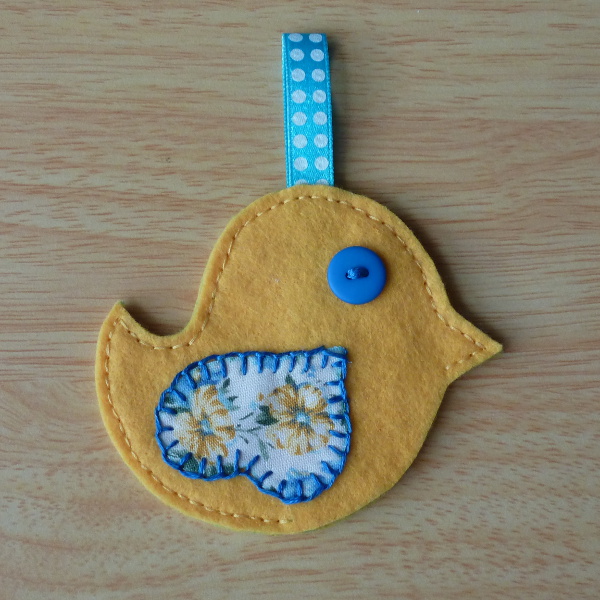
You can see I've stitched to the end of the beak which just leaves one slightly curved area to sew up once stuffing is complete.
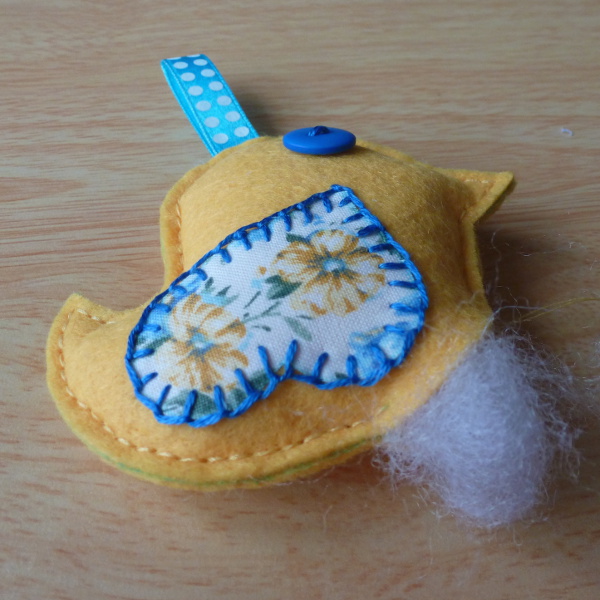
Most of the time, I can gently push pieces of stuffing in with my fingers. To help fill out narrow sections such as the tail and beak, you may find it helpful to use some blunt ended tweezers or an embossing stylus with a round ball head. If you use tools to help, just push gently so you don't ruin any stitching.
The main beginner issue is not adding in enough stuffing. You nearly always need more than you think. Just add in small sections at a time. Don't get impatient and try to stuff in a huge amount in one go because it won't look good.
When the whole bird is padded out nicely, you can start to sew up the rest of the design. Sometimes it pays to sew a bit, then stuff a bit in order to pack it out properly to make a really good plush.
➡️ TURN THIS BIRD INTO A BROOCH PIN - HERE'S HOW!
Use other color combinations to suggest other seasons and occasions with your ornament design or just pick out colors that you love.
Here's some color combos I like for birds: blue and lilac, pink and brown, cream and brown, pink and blue. You can also use more natural looking colors too. Enjoy making your tweet bird.
Related Content You Should Also Love:
Page Last Updated:
Enjoy this easy beginner plushie tutorial which shows you how to make a simple and cute bird design. I used two stitches but, if you're new to sewing, it is possible to make this with only one.
Felt birds make great ornaments and hanging decorations that you can enjoy year round. My example in this tutorial shows a yellow chick bird ideal for Spring and Easter. Simply change the colors up for any other season or occasion.
Note: This post may contain affiliate links for which I can be compensated.
How to Make a Felt Bird Ornament Tutorial With Free Printable Pattern

Enjoy this beginner sewing project which makes up a small and simple bird design. I've turned this into an ornament which can be hung on a tree, a display stand or on the wall.
Alternatively, turn it into a brooch pin, bag clip, keychain or just a freestanding plush. Find the free pattern template at the end of this craft tutorial.
What You Need to Make These Easy Felt Birds
- Craft felt with one main color for the bird and another for the wing or, alternatively, use fabric for the wing
- Some matching sewing thread and a needle
- A button or bead for the bird's eye
- Ribbon, cord or twine for hanging loops
- Fiber fill for stuffing
- Scissors, small and medium sizes if you have them
- A temporary fabric marker is useful
- Free felt bird pattern template

Step 1: Cut Out Two Bird Shapes From Felt
Print off the free pattern template and use it to mark and then cut two bird shapes (template A - you choose either small or large) from your chosen color of felt.I have a card template of the bird which I trace around onto the felt with a water soluble fabric marking pen.

Step 2: Cut Out a Wing from Felt or Patterned Fabric
Cut out a wing piece which is marked as template B - choose the small or large to fit in with what you picked in step 1. Template C and D (the chest area) is not needed for this design; I use that one to make festive Robin birds.If you're a beginner at sewing plushies, you'll find it easier to cut the wing from felt which does not fray. Choose a different color for the wing or at least a lighter or darker shade so that it stands out well.
Patterned fabric looks great mixed with felt and I opted for this blue and yellow floral design. The yellow flowers match with the yellow of the felt and the blue gives me another color that I can match up easily with other elements such as the button eye.

Step 3: Sew the Wing to the Front Piece of the Bird
Choose one piece of felt for the front of your bird. Sew the wing into place as shown in the photo above.Because I used fabric for the wing, I chose a blanket stitch which helps to prevent fraying. I used a blue floss with two strands doubled over to make the stitch nice and thick. The blue was matched up to the button I chose for the eye detail.
Blanket stitch is not what I would call a beginner friendly stitch. In fact, this is a stitch that a lot of sewers have trouble with. You can use any stitch you like. For beginners I recommend a simple running stitch here. You can always use a fray check around the edges if you chose fabric for the wing.
Once the wing is in place, you can position the button eye and sew that on as well. Other alternative options for the eye can include a bead, some stitching or a circle of felt.

Step 4: Pin and Sew the Ribbon to the Back Piece for Hanging
At this point, I've finished all the detail I want on the front of my bird. Because it is a small felt ornament design, I don't like to add too much to it else it risks looking too fancy for the size. You can add in beads, sequins, embroidery or anything else to make your design totally unique.For turning this into a hanging ornament, I pick out some pretty ribbon which I fold in half and pin it into place temporarily on the inside of the front pattern piece for the bird.
⭐ How long does the ribbon need to be? You choose. I prefer to have just a small loop of ribbon on the top of my ornaments. If I need to hang my felt ornament on a tree with its bulky branches, then I can thread twine through the loop and tie it on or use wire hangers which do the job discretely. You may prefer to have a long loop and you may prefer to use cord or twine instead of ribbon.
Note that the pin needs to be on the outside of the felt though so you can remove it easily after sewing. If you don't want to make this into an ornament, skip this step.

Step 5: Pin the Bird Pieces Together for Sewing
Carefully pin both pieces of the bird, front and back, together. Try to match up the felt edges as best you can. Sometimes there is a slight difference due to the pattern piece cutting or due to a lot of sewing on one side which can make it slightly smaller than the other piece.For sewing around the outside edges, you can use a simple straight stitch but I have chosen to sew backstitch because it is much more durable. For sewing around the edges, I prefer to use a strong thread such as Gutermann polyester thread in a matching or close shade to the felt.
⭐ DO NOT sew all the way around your design, if you want a plush felt bird ornament. You need to leave a large enough section for stuffing so I recommend sewing from the bottom middle to the beak.
Leave a small margin (3-5mm is great) and start to sew around the edge of the bird. I like to start from the bottom middle because this will leave me an easy section to sew at the end once I start stuffing the plush.

Step 6: A Flat Yellow Bird Ready for Filling
This shows my bird as it looks right before I start stuffing it with polyester fiber fill. If you want, you can continue sewing right the way around and just have a flat hanging ornament instead. I really think the slight extra work involved in stuffing is worth it though.You can see I've stitched to the end of the beak which just leaves one slightly curved area to sew up once stuffing is complete.

Step 7: Filling the Felt Bird With Fiber Fill
Start to fill up the design gradually with your chosen stuffing. With this design, I like to start with the tail area and push a small amount of fiber fill in this area.Most of the time, I can gently push pieces of stuffing in with my fingers. To help fill out narrow sections such as the tail and beak, you may find it helpful to use some blunt ended tweezers or an embossing stylus with a round ball head. If you use tools to help, just push gently so you don't ruin any stitching.
The main beginner issue is not adding in enough stuffing. You nearly always need more than you think. Just add in small sections at a time. Don't get impatient and try to stuff in a huge amount in one go because it won't look good.
When the whole bird is padded out nicely, you can start to sew up the rest of the design. Sometimes it pays to sew a bit, then stuff a bit in order to pack it out properly to make a really good plush.

Completed Spring Easter Bird Design - Make Birds in Different Colors for Other Seasons and Occasions
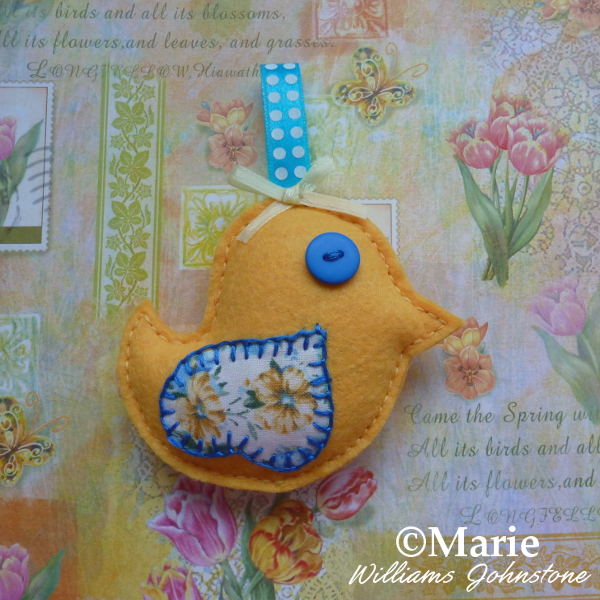
Once finished, I sewed on a small ribbon bow for detail at the bottom of the ribbon loop. This design really looks like a Spring chick. Orange would work well combined with the yellow to really enhance that feel.➡️ TURN THIS BIRD INTO A BROOCH PIN - HERE'S HOW!
Use other color combinations to suggest other seasons and occasions with your ornament design or just pick out colors that you love.
Here's some color combos I like for birds: blue and lilac, pink and brown, cream and brown, pink and blue. You can also use more natural looking colors too. Enjoy making your tweet bird.
Related Content You Should Also Love:
Tutorial to Make a Small Felt Cupcake with Free Pattern
Essential Sewing Supplies for Beginners
Free Template Pattern to Make an Easter Bag
How to Make Plushies for Complete Beginners
More Felt Crafts to Enjoy
Essential Sewing Supplies for Beginners
Free Template Pattern to Make an Easter Bag
How to Make Plushies for Complete Beginners
More Felt Crafts to Enjoy
Page Last Updated:


Comments
Post a Comment
CraftyMarie is a craft themed website by Marie Williams Johnstone. I love to craft in the winter and garden in the summer. I make handmade cards, papercrafts, crochet and seasonal crafts. I enjoy many of the more traditional crafts and hobbies including sewing, embroidery and working with felt and fabric. Thanks for leaving me a comment. Comments do not show up until I approve them. Marie