Ultimate Guide to Craft Felt Material
I love working with craft felt so I thought I'd share a lot of advice, tips and information on this brilliant and versatile material.
The ultimate guide to craft felt is split into handy sections for you so it is easier to find the information you need and also to dip in and out of and come back to as you need to. There are loads of commonly asked questions about it and I answer many of them here for you, so many that I've called it the Ultimate Guide because it really is.
This amazing fabric is often used to create plush toys, unique jewelry, home decor, kids crafts and more. Whether you are new to crafting with this fabric or you already use it and want to know even more on the topic, you can discover a lot more by reading on.
Note: This post may contain affiliate links for which I can be compensated.

Part 1: Sewing with Felt Fabric
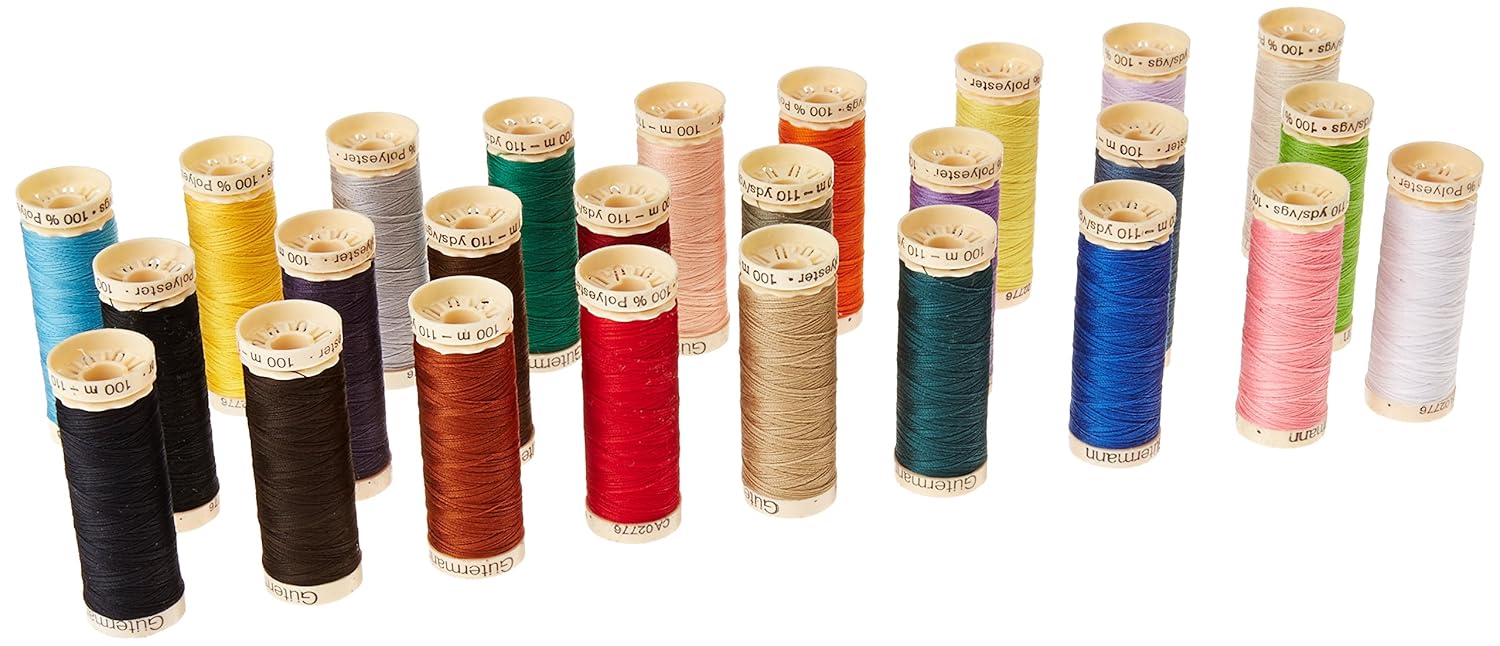
You can use standard cotton or polyester sewing threads. Gutermann polyester threads are my absolute favorites because they are strong and reliable and these are often used for hand and especially sewing machine stitching. There are two main types of threads I use.
Gutermann Polyester Threads are Strong and Reliable

Gutermann polyester threads are my absolute favorite for stitching with. Unlike cotton threads or floss, these are super strong and far less likely to break. They're ideal for reinforcement stitches around seams and plain stitches.
You really don't want threads to break in the middle of sewing which is part of the reason why I love these. The colors are gorgeous and they have a wonderful silky sheen too.
This set is perfect to get a good assortment of colors and ideal for the beginner and those who enjoy hand stitching with felt. For machine sewing, I buy larger sizes in colors that I use frequently like black and white.
I really enjoy using these to sew felt with since it's widely available and it comes in lots of color choices. A spool can last a very long time, especially if you opt for the 547 yards or even the 1094 yard serger varieties. I also love these threads for machine stitching and doing general sewing repairs by hand.
For sewing any felt plush toys and stuffies which might get a lot of handling, you might want to use polyester sewing thread instead of embroidery floss just because the polyester threads like Gutermann are much tougher and also because you can easily buy a large length in exactly the same color.
I rarely tend to hand sew items much larger than my hand since I enjoy miniature work such as making small pincushions, pin brooches, keychains and little toys. Sometimes I will use floss and sometimes Gutermann for more functional stitches like running stitch but nothing else.
Embroidery Floss is Not as Strong but Perfect for Decorative Stitching


Doubled over (doubled thread) is my term for placing the threads in the eye of the needle, taking hold of both ends of the length of threads, letting the needle fall down into the middle of these threads and then knotting the ends off. This is how I prefer to sew, rather than with a single strand or strands.
Embroidery floss is much softer than machine sewing polyester threads and it is more prone to breakage which is the main disadvantage. However, you can easily prevent this by learning to not pull too hard or vigorously on your needle when you use it.
Embroidery floss threads do not normally break if you sew carefully with a nice even tension. I feel that floss absolutely gives a better look to the finished piece and especially with decorative stitches.
They have a wonderful silky sheen to them, and you can also get many specialized embroidery threads to use with your hand sewing too.
The edges of felt do not fray when cut which is part of the appeal of this amazing material, so you're free to use absolutely any stitch that you're comfortable with to join edges together, to applique one piece on top of another or to even use quick, no-sew methods too.
A plain straight or running stitch is fine and I've seen lots of people use this as a standard stitch for sewing this fabric with and even for joining seams or raw edges. You can certainly experiment with lots of stitches since it's so lovely and easy to sew through.

My absolute favorite happens to be blanket stitch which you can see an example of in the image provided above. I use this stitch often for applique where I'm sewing one cut piece on top of another as shown in the photo and also for joining up the edges around a decorative plush item.
I just happen to love the way it looks on a finished item but it isn't the easiest stitch to grasp as a beginner. So, if you're not used to blanket stitch, a much easier alternative for sewing two edges of felt together is whip stitch or overcast stitch.
For me, part of the fun is to sew by hand and especially as I'm normally working in miniature and making decorative items which don't often lend themselves to being machine stitched. Hand stitching is a slow and relaxing process and one where I enjoy the look of the less regimented finished stitches.

But you can absolutely use a machine to sew your felt fabric. I have used it for items like pennant banner bunting where I want to make lots of triangular flag pieces up fairly quickly. It's absolutely ideal for sewing up larger items like this and especially when you need something in a hurry.
It might not be practical to use a machine for smaller projects but it depends on what you're making. Sometimes I'll choose to use my machine where I need a particularly strong and straight seam as with pincushions where I need a tubular shape as with the stem section of a toadstool or a tree design. So a machine for that particular part is much better than anything I can do by hand.
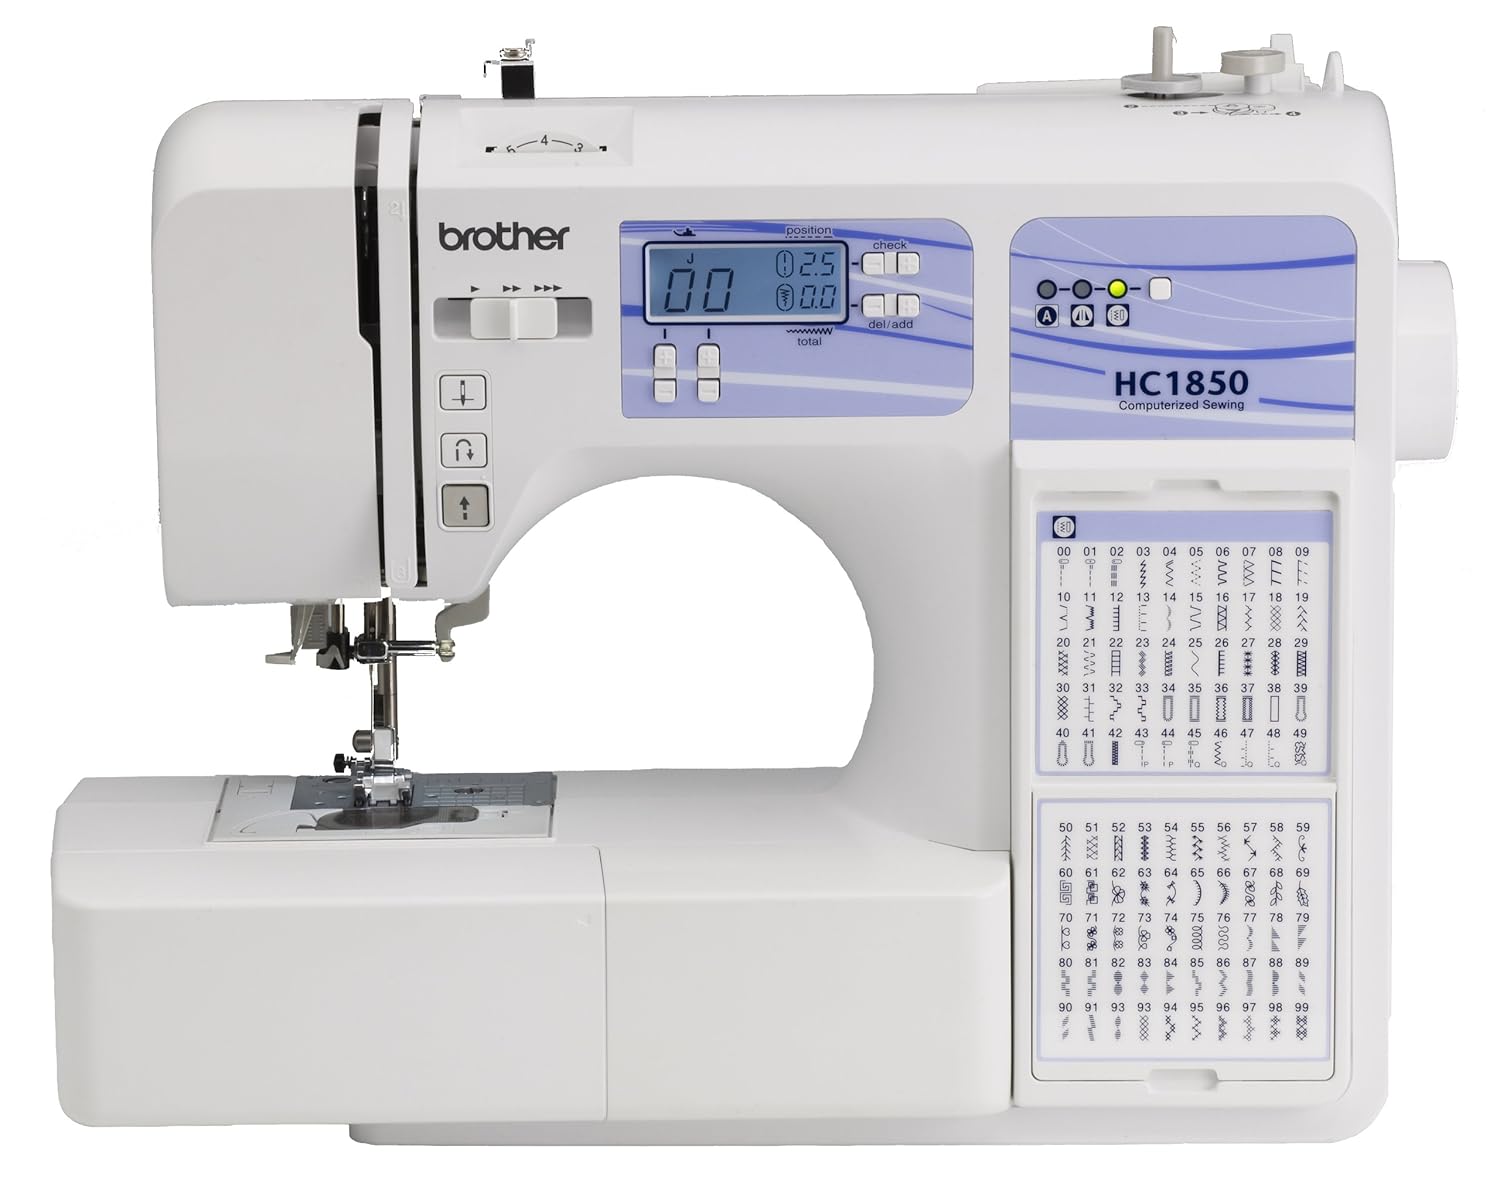
My computerized Brother sewing machine sorts the tension out automatically for me which helps enormously. I would always recommend that you do a test piece first on your machine to get the right tension and size of stitch.
You may want to use a slightly smaller or finer needle than you think because although craft felt can feel thick. It is generally very soft and easy to sew through unless you're using a particularly bad example of acrylic.
I Love My Brother Computerized Sewing Machine and Will Never Go Back to a Manual
If you're having sewing issues, try swapping out your needle for a different size. You can also try stitching this fabric through layers of tissue paper and tearing it away when you've finished sewing.
I keep a set of universal needles that I just use for felt and nothing else. You don't strictly need to do this but I prefer to keep machine needles for specific uses such as denim needles and another set for stitching on paper.
Having sets of needles for specific purposes helps to keep them good for that specific purpose. Certainly if you sew on paper, you ought to keep needles just for that since that can blunt them quickly and blunt needles can ruin fabric.
Water soluble or embroidery transfer pens (don't mix these up with permanent fabric marker pens which won't come off!) normally look like blue ink marker pens and are an invaluable tool for my crafting.
Since I make my own plush designs, I often need a quick way to trace around paper or card templates straight onto the fabric.
Learn all about fabric markers you can use for felt sewing HERE
Learn all about transferring patterns onto felt HERE
The great thing about water soluble pens is that you can easily trace your design onto the fabric and then it will come off, when you are ready to remove it, with a small amount of water.

Felt doesn't take too kindly to being doused liberally in water so you must only wet the end of a cloth and dab this over any blue marks made by your special transfer pen.
Even better, if you can make the marks on the reverse or back side of the fabric. On the reverse side you don't necessarily need to remove the marks at all.
I tend to make sure that my water soluble pen marks (even though they are easily removable) go on the reverse or the inside of the finished sewn design, rather than at the front.
Another way to visually mark the fabric is with tailors chalk. These often come in triangles in different colors and I have a pink one. You can also buy Clover Chaco Liner Chalk Pens which may provide a little more accuracy than the tailors chalk but I have yet to try these out.
What I do find with the chalk rather than a water soluble pen is that the marking is not quite as accurate - not such a big deal on larger designs but no good when I'm doing small and miniature projects.
Before I was aware that these special transfer pens existed, I used plain ballpoint pens to trace out my design. The problem with that is you either have to mark where the fabric will be hidden (reverse or inside) or do some very careful cutting to remove the pen marks as you cut the design out.
So I wouldn't go back to this method myself but it is useful to someone starting out with making felt items or for kids crafts where lines are not a big issue.
Another method, which is especially good if you don't want to leave any marks at all, is to pin a thin paper piece of the pattern straight onto the felt and cut around it.
You need to pin it well to ensure that you get an accurate cut but this method works great for not having to deal with any markings at all on the fabric. Depending on the size and shape, you may also be able to use a small rotary cutter along with a craft cutter mat.
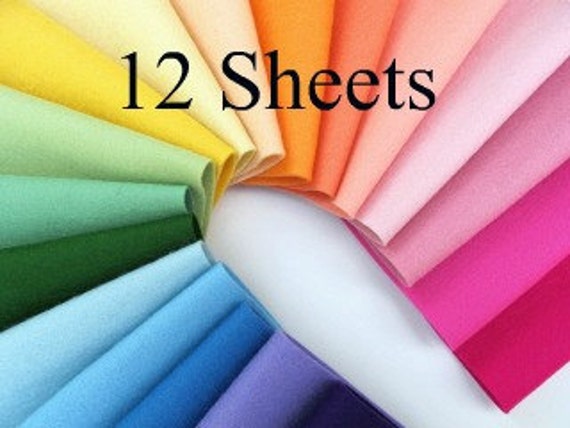
There are many different types of felt sheet fabric that you can use for your crafting but the main types are as follows:
1) Acrylic Craft Felt Sheets: These are inexpensive sheets (often sold in an 9 x 12 inch sizing in the US and A4 which is 8.3 x 11.7 inches in the UK) which are absolutely ideal for kids crafts and quick projects that you're making for yourself. These are easily obtainable from vendors online like Amazon and also eBay where you often get hold of assorted packs.
They are the cheapest type of felt sheets to buy since they are 100% synthetic or man-made. They are normally referred to as Craft Felt and are ideal for beginner stitchers to use as well as being perfect to use for projects that are to be glued (no-sew) rather than sewn.
2) Blended Wool Felt Sheets: Slightly more expensive are these sheets which are made from a mix of real wool and synthetic or man-made fibers. These sheets are often referred to as Premium Felt and are ideal for most projects for the home and also those which are being made to sell.
I use lots of blended wool felt sheets in my own crafting because it is affordable to buy but also has a nicer texture than the craft sheets.
3) 100% Wool Felt Sheets: Super soft to touch and much more expensive to buy than the blended wool or craft felt options but even if it wasn't I still would not use 100% wool felt for all my crafting.
The softness means that it doesn't always hold up very well for making certain items and especially those that really rely on having some kind of structure or rigidity to them like padded plush items. I use this type of felt in moderation more for decorative purposes than anything else.

If you're just starting out, I'd advise you just use the cheapest craft felt first. Get a small assorted pack of sheets and use it to practice with on making plush items, felt jewelry, applique, free-sewn embroidery, home decor or whatever else it is you wish to do with it.
Get used to making all your mistakes with cheap fabric first before using more expensive material. For the majority of kids crafts, I'd certainly say to use craft sheets. There is no need to use anything else on projects that you might want to glue, no-sew or just do quick stitching with.
More experienced crafters should find blended wool sheets to be more than adequate for most projects. But do try 100% wool felt too if you can: you can often purchase smaller samples from places like Etsy so you can test it out before committing to invest a sum of money in a fabric you may not need or ever use!
As well as sheets, you can invest in larger cuts by the yard or meter which is perfect if you do a lot of crafting with it.
Part 2: Cutting Felt Sheets
A really good cut on this material needs a pair of very sharp scissors or a sharp rotary cutter. I cannot stress enough that to get a nice clean cut on the edges, you need a very sharp blade. It is best if you don't use the same scissors or rotary blade that you use on paper since these blades will have dulled and become less sharp over time.
You need a great pair of fabric scissors (or rotary cutter) and try to keep them just for cutting out fabric otherwise they won't give very nice looking cuts. Since you often tend to see the cut edges with felt in a finished project, this tends to matter a lot more.

To make sure I do not get my scissors and rotary cutters mixed up, I keep all the fabric blades for cutting fabric, felt, threads and yarns stored together in my sewing box. I also keep the blades sharpened too because they dull over time. You can sharpen your blades which can save buying new ones.
Another tip is to pick the right sized scissors or cutter for your project. If you're cutting out a tiny piece then you will get the best result with a small and sharp pair of scissors like some sharp little embroidery scissors.
For a larger piece of fabric it makes sense to use some larger scissors with appropriately sized blades. You can also get rotary cutters in a variety of sizes. I use a 45mm rotary cutter for most projects but for cutting smaller pieces and steeper curves and angles, a smaller one like a 28mm might be a good bet. I do prefer scissors normally though.
It is inevitable that you will end up with some small scraps from cutting pieces out of your sheets. Like many crafters, I can't stand wastage and I don't like to throw even small off-cuts away if I think I can use them so here's what I use these small scraps for:
1) Small Applique Items: since I work in miniature most of the time, the small scraps work to make things like tiny flowers, little fairy doors, windows for plush houses and other small decorations.
2) Fabric Mosaics: when a lot of scraps and off-cuts build up, I let my young daughter make colorful mosaics with them. I give her a piece of card, some standard white glue mixed with a little water, a glue applicator or brush and lots of scraps. She has a lot of fun gluing the pieces down to make her own colorful designs.
3) Stuffing Small Brooch Pins: if you cut the scraps into small and more evenly sized pieces, they are fine for stuffing little projects like felt brooch pins. Cutting the scraps down ensures that they stuff the item more evenly and accurately.
4) Felt Picture Art: ever seen the fuzzy variety? Those boards where you arrange smaller pre-cut pieces of the fabric to make up pictures and scenes. You can use the same idea to glue or stitch your own picture together and make a beautiful scene or piece of art for your home. The scraps will be ideal for these little pieces.
5) Make Garlands or Necklaces: Cut the scraps into shapes and thread them or sew into necklaces, bracelets or long garlands for decoration.
Part 3: How to Glue Felt
If I'm letting my daughter mess about with gluing this to make up her own patterns, she just uses a standard white PVA glue mixed in with a little water in a pot. The trouble with this method is that it bleeds through the fabric, takes a long time to dry and when it does dry it stiffens up.
I would only recommend this for kids crafts and crafts where you are not too bothered on the final appearance and just want it to stick.
I've used my glue gun with it for decorative projects where I want a very quick dry and permanent bond. You can feel the hard adhesive underneath when dry so I tend to use it as a fast option on projects like banners and things where the feel doesn't matter.
Glues and adhesives that may be better options for felt are Aleene's Tacky Glue which sticks the felt but is slow drying, Elmer's Craft Bond Fabric and Paper Glue also slow drying or Fabri-Tac which is faster drying. These work for sticking fabric to fabric or fabric to paper/cardstock. Fabri-Tac is the more expensive option so you might want to put up with the slower drying and pay less.
Part 4: Stuffing Felt to Make Toys
You can use up some small scraps or off-cuts of felt to stuff small plush items with and especially items such as decorative stuffed brooch pins. If you're using this method then a tip is to cut the scraps up quite small and in evenly sized pieces so that they stuff the item out much more evenly.

My favorite way of stuffing is to use polyester fiber or polyester toy stuffing. It's affordable, it's washable, it's soft and easy to separate by hand for stuffing with.
And it's what most crafters use for making plush toys and handmade goodies. It can be used for filling or plumping out very small projects or much larger ones as you wish.
When I use this to fill my items, I work with just a little at a time. Just pull off a small piece out of your fiber bag and push it inside your toy or item - hopefully you've sewn around it three quarters of the way first which is a general rule of thumb.
You need to push it in firmly, making sure to fill corners and edges well and keep gradually packing it in.
You can use a tool like the blunt end of a long pair of tweezers, a pencil end or an embossing stylus to help to get stuffing into corners to fill them out properly.
I have a process of doing a little packing, then a little sewing, then back to packing as I continue to sew around until the item is completely stitched shut.
Part 5: Cleaning and Maintenance of this Fabric
NOTE: I would never recommend wet washing felt. Of course it does depend on the type of felt that you've used but the results on this fabric can be highly unpredictable including extensive shrinkage of the material plus you may also end up with colors bleeding too. I'd always recommend using dry methods of cleaning if you can - refer to the section below.
If you are determined to wash a felt item that you've made, bought or been given - hand wash it only because it's delicate. But do be warned that it may well ruin your item depending on the threads you've used, the decorations, the composition of the felt and also type of stuffing inside (if it is a plush felt item) which may not actually be washable.
You would hand wash using cool water only since hot water could cause major defects in the fabric. Do NOT use any soap since the addition of soap with felt can cause fuzzing and piling on the surface.
Just gently soak the item in cool (not ice cold) water. You can gently squeeze the felt in an area to try and remove a stain but don't rub at the stain since that can quickly ruin the surface of the material.
Soak it for as long as you need. Then remove the item from the water and gently squeeze it out to remove as much excess water as you can. You will then need to air dry it so an overnight dry might be best.
The best ways to clean this fabric are using dry methods since any addition of water to felt in large quantities can have really horrible and also unpredictable results on the material.

If you store your handmade or hand-sewn items well, they can stay looking good for many years to come. We have festive felt ornaments that have lasted for well over 10 years and are still going strong. That's because they are carefully packed away in soft white tissue paper and stored carefully in a box once they are removed off the Christmas tree.
If you can keep your items where they will not get very dusty (in a glass cabinet, on a shelf with a shelf above it or in a drawer) then that will help to prevent any problems with dirt and stains.
You can gently use a soft toothbrush to remove any surface dirt from felt. Softly sweep down the fabric in one direction. Do not use any circular, up and down or rubbing motions because that can cause the material to pile up and look fuzzy on the surface.
You can also use the nozzle of a small vacuum cleaner to suck up any dust or dry surface dirt from the fabric. To help protect the material from the suction of the nozzle, you can stretch some old hosiery over the nozzle. Be careful with any decorative beading and make sure this is all secure before applying any kind of suction.
Water can be used in a small quantity. But no soap because this can quickly damage the material. Just gently press or dab on a dirty area with a damp cloth dipped into plain lukewarm water.
You can iron this fabric and also the sheets if they become creased. I would never iron onto the fabric directly since it would likely damage it or your iron.
I lay the felt flat on my ironing board and then place a clean and dry cotton tea towel over the top. I use the iron on a medium setting and iron over the top of the tea towel. This helps to remove any creases just fine.
It would make sense for you to use a medium setting on your iron and test out a corner first before peeling back the tea towel and seeing if you need a slightly hotter or cooler setting.
Sheets and folded yards and meters of this fabric will store very well in drawers. I have used large lever arch box files and also plastic drawers on wheels for storage. Both of these were great methods for keeping the fabric clean and organized.
My current storage is a large oak Welsh dresser where I use zippered bags to hold the fabric and keep it clean and dust free and these are kept inside the dresser furniture. It does help to keep them flat if you can although you can iron out creasing with the method I have explained just above.
If you have further questions on this topic, you can leave a comment and if the answer is something I think lots of people can benefit from, I can add it into the article.
Related Content You Should Also Love:
Page Last Updated:
The ultimate guide to craft felt is split into handy sections for you so it is easier to find the information you need and also to dip in and out of and come back to as you need to. There are loads of commonly asked questions about it and I answer many of them here for you, so many that I've called it the Ultimate Guide because it really is.
This amazing fabric is often used to create plush toys, unique jewelry, home decor, kids crafts and more. Whether you are new to crafting with this fabric or you already use it and want to know even more on the topic, you can discover a lot more by reading on.
Note: This post may contain affiliate links for which I can be compensated.
The Essential Guide to Using Craft Felt Fabric
Part 1: Sewing with Felt Fabric
What Threads Can You Use for Stitching Felt?
You can use standard cotton or polyester sewing threads. Gutermann polyester threads are my absolute favorites because they are strong and reliable and these are often used for hand and especially sewing machine stitching. There are two main types of threads I use.
Gutermann Polyester Threads are Strong and Reliable
Gutermann polyester threads are my absolute favorite for stitching with. Unlike cotton threads or floss, these are super strong and far less likely to break. They're ideal for reinforcement stitches around seams and plain stitches.
You really don't want threads to break in the middle of sewing which is part of the reason why I love these. The colors are gorgeous and they have a wonderful silky sheen too.
This set is perfect to get a good assortment of colors and ideal for the beginner and those who enjoy hand stitching with felt. For machine sewing, I buy larger sizes in colors that I use frequently like black and white.
I really enjoy using these to sew felt with since it's widely available and it comes in lots of color choices. A spool can last a very long time, especially if you opt for the 547 yards or even the 1094 yard serger varieties. I also love these threads for machine stitching and doing general sewing repairs by hand.
For sewing any felt plush toys and stuffies which might get a lot of handling, you might want to use polyester sewing thread instead of embroidery floss just because the polyester threads like Gutermann are much tougher and also because you can easily buy a large length in exactly the same color.
I rarely tend to hand sew items much larger than my hand since I enjoy miniature work such as making small pincushions, pin brooches, keychains and little toys. Sometimes I will use floss and sometimes Gutermann for more functional stitches like running stitch but nothing else.
Embroidery Floss is Not as Strong but Perfect for Decorative Stitching
For more decorative stitches and especially embroidery on felt fabric, I use the wonderful 6 stranded embroidery threads or floss. DMC and Anchor are my particular favorites since that's what I grew up with and you can see part of my collection above.
I tend to use either one or 2 strands out of the 6 that you get in each length. I then use these doubled over in the needle which is like using 4 strands at once.
I tend to use either one or 2 strands out of the 6 that you get in each length. I then use these doubled over in the needle which is like using 4 strands at once.
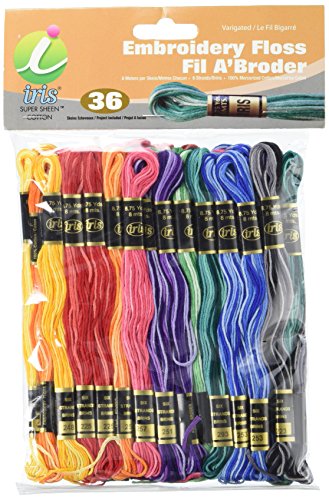

Doubled over (doubled thread) is my term for placing the threads in the eye of the needle, taking hold of both ends of the length of threads, letting the needle fall down into the middle of these threads and then knotting the ends off. This is how I prefer to sew, rather than with a single strand or strands.
Embroidery floss is much softer than machine sewing polyester threads and it is more prone to breakage which is the main disadvantage. However, you can easily prevent this by learning to not pull too hard or vigorously on your needle when you use it.
Embroidery floss threads do not normally break if you sew carefully with a nice even tension. I feel that floss absolutely gives a better look to the finished piece and especially with decorative stitches.
They have a wonderful silky sheen to them, and you can also get many specialized embroidery threads to use with your hand sewing too.
Hand Stitches You Can Use for Sewing with Felt Fabric
The edges of felt do not fray when cut which is part of the appeal of this amazing material, so you're free to use absolutely any stitch that you're comfortable with to join edges together, to applique one piece on top of another or to even use quick, no-sew methods too.
A plain straight or running stitch is fine and I've seen lots of people use this as a standard stitch for sewing this fabric with and even for joining seams or raw edges. You can certainly experiment with lots of stitches since it's so lovely and easy to sew through.
My absolute favorite happens to be blanket stitch which you can see an example of in the image provided above. I use this stitch often for applique where I'm sewing one cut piece on top of another as shown in the photo and also for joining up the edges around a decorative plush item.
I just happen to love the way it looks on a finished item but it isn't the easiest stitch to grasp as a beginner. So, if you're not used to blanket stitch, a much easier alternative for sewing two edges of felt together is whip stitch or overcast stitch.
Can You Use a Sewing Machine with Felt?
For me, part of the fun is to sew by hand and especially as I'm normally working in miniature and making decorative items which don't often lend themselves to being machine stitched. Hand stitching is a slow and relaxing process and one where I enjoy the look of the less regimented finished stitches.
But you can absolutely use a machine to sew your felt fabric. I have used it for items like pennant banner bunting where I want to make lots of triangular flag pieces up fairly quickly. It's absolutely ideal for sewing up larger items like this and especially when you need something in a hurry.
It might not be practical to use a machine for smaller projects but it depends on what you're making. Sometimes I'll choose to use my machine where I need a particularly strong and straight seam as with pincushions where I need a tubular shape as with the stem section of a toadstool or a tree design. So a machine for that particular part is much better than anything I can do by hand.
My computerized Brother sewing machine sorts the tension out automatically for me which helps enormously. I would always recommend that you do a test piece first on your machine to get the right tension and size of stitch.
You may want to use a slightly smaller or finer needle than you think because although craft felt can feel thick. It is generally very soft and easy to sew through unless you're using a particularly bad example of acrylic.
I Love My Brother Computerized Sewing Machine and Will Never Go Back to a Manual

If you're having sewing issues, try swapping out your needle for a different size. You can also try stitching this fabric through layers of tissue paper and tearing it away when you've finished sewing.
I keep a set of universal needles that I just use for felt and nothing else. You don't strictly need to do this but I prefer to keep machine needles for specific uses such as denim needles and another set for stitching on paper.
Having sets of needles for specific purposes helps to keep them good for that specific purpose. Certainly if you sew on paper, you ought to keep needles just for that since that can blunt them quickly and blunt needles can ruin fabric.
How to Transfer a Design onto Felt
Water soluble or embroidery transfer pens (don't mix these up with permanent fabric marker pens which won't come off!) normally look like blue ink marker pens and are an invaluable tool for my crafting.
Since I make my own plush designs, I often need a quick way to trace around paper or card templates straight onto the fabric.
Learn all about fabric markers you can use for felt sewing HERE
Learn all about transferring patterns onto felt HERE
The great thing about water soluble pens is that you can easily trace your design onto the fabric and then it will come off, when you are ready to remove it, with a small amount of water.
Felt doesn't take too kindly to being doused liberally in water so you must only wet the end of a cloth and dab this over any blue marks made by your special transfer pen.
Even better, if you can make the marks on the reverse or back side of the fabric. On the reverse side you don't necessarily need to remove the marks at all.
I tend to make sure that my water soluble pen marks (even though they are easily removable) go on the reverse or the inside of the finished sewn design, rather than at the front.
![LEONIS 5 Water Erasable Marking Pens Blue [ 78008 ]](https://images-na.ssl-images-amazon.com/images/I/41sHjgnHLWL.jpg)

Another way to visually mark the fabric is with tailors chalk. These often come in triangles in different colors and I have a pink one. You can also buy Clover Chaco Liner Chalk Pens which may provide a little more accuracy than the tailors chalk but I have yet to try these out.
What I do find with the chalk rather than a water soluble pen is that the marking is not quite as accurate - not such a big deal on larger designs but no good when I'm doing small and miniature projects.
Before I was aware that these special transfer pens existed, I used plain ballpoint pens to trace out my design. The problem with that is you either have to mark where the fabric will be hidden (reverse or inside) or do some very careful cutting to remove the pen marks as you cut the design out.
So I wouldn't go back to this method myself but it is useful to someone starting out with making felt items or for kids crafts where lines are not a big issue.
Another method, which is especially good if you don't want to leave any marks at all, is to pin a thin paper piece of the pattern straight onto the felt and cut around it.
You need to pin it well to ensure that you get an accurate cut but this method works great for not having to deal with any markings at all on the fabric. Depending on the size and shape, you may also be able to use a small rotary cutter along with a craft cutter mat.
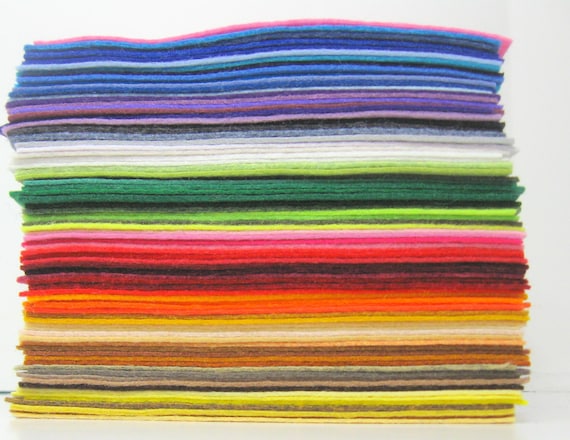
Different Types of Felt Sheets
There are many different types of felt sheet fabric that you can use for your crafting but the main types are as follows:
1) Acrylic Craft Felt Sheets: These are inexpensive sheets (often sold in an 9 x 12 inch sizing in the US and A4 which is 8.3 x 11.7 inches in the UK) which are absolutely ideal for kids crafts and quick projects that you're making for yourself. These are easily obtainable from vendors online like Amazon and also eBay where you often get hold of assorted packs.
They are the cheapest type of felt sheets to buy since they are 100% synthetic or man-made. They are normally referred to as Craft Felt and are ideal for beginner stitchers to use as well as being perfect to use for projects that are to be glued (no-sew) rather than sewn.
Merino Wool Blend Summer Colors FeltMerino Wool Blend Winter Colors FeltMerino Wool Blend Fall Colors Felt
 Merino Wool Blend Winter Colors Felt
 Merino Wool Blend Fall Colors Felt
2) Blended Wool Felt Sheets: Slightly more expensive are these sheets which are made from a mix of real wool and synthetic or man-made fibers. These sheets are often referred to as Premium Felt and are ideal for most projects for the home and also those which are being made to sell.
I use lots of blended wool felt sheets in my own crafting because it is affordable to buy but also has a nicer texture than the craft sheets.
3) 100% Wool Felt Sheets: Super soft to touch and much more expensive to buy than the blended wool or craft felt options but even if it wasn't I still would not use 100% wool felt for all my crafting.
The softness means that it doesn't always hold up very well for making certain items and especially those that really rely on having some kind of structure or rigidity to them like padded plush items. I use this type of felt in moderation more for decorative purposes than anything else.
If you're just starting out, I'd advise you just use the cheapest craft felt first. Get a small assorted pack of sheets and use it to practice with on making plush items, felt jewelry, applique, free-sewn embroidery, home decor or whatever else it is you wish to do with it.
Get used to making all your mistakes with cheap fabric first before using more expensive material. For the majority of kids crafts, I'd certainly say to use craft sheets. There is no need to use anything else on projects that you might want to glue, no-sew or just do quick stitching with.
More experienced crafters should find blended wool sheets to be more than adequate for most projects. But do try 100% wool felt too if you can: you can often purchase smaller samples from places like Etsy so you can test it out before committing to invest a sum of money in a fabric you may not need or ever use!
As well as sheets, you can invest in larger cuts by the yard or meter which is perfect if you do a lot of crafting with it.
Part 2: Cutting Felt Sheets
What Scissors Can You Use?
A really good cut on this material needs a pair of very sharp scissors or a sharp rotary cutter. I cannot stress enough that to get a nice clean cut on the edges, you need a very sharp blade. It is best if you don't use the same scissors or rotary blade that you use on paper since these blades will have dulled and become less sharp over time.
You need a great pair of fabric scissors (or rotary cutter) and try to keep them just for cutting out fabric otherwise they won't give very nice looking cuts. Since you often tend to see the cut edges with felt in a finished project, this tends to matter a lot more.
To make sure I do not get my scissors and rotary cutters mixed up, I keep all the fabric blades for cutting fabric, felt, threads and yarns stored together in my sewing box. I also keep the blades sharpened too because they dull over time. You can sharpen your blades which can save buying new ones.
Another tip is to pick the right sized scissors or cutter for your project. If you're cutting out a tiny piece then you will get the best result with a small and sharp pair of scissors like some sharp little embroidery scissors.
For a larger piece of fabric it makes sense to use some larger scissors with appropriately sized blades. You can also get rotary cutters in a variety of sizes. I use a 45mm rotary cutter for most projects but for cutting smaller pieces and steeper curves and angles, a smaller one like a 28mm might be a good bet. I do prefer scissors normally though.
What Can You do with Felt Scraps?
It is inevitable that you will end up with some small scraps from cutting pieces out of your sheets. Like many crafters, I can't stand wastage and I don't like to throw even small off-cuts away if I think I can use them so here's what I use these small scraps for:
1) Small Applique Items: since I work in miniature most of the time, the small scraps work to make things like tiny flowers, little fairy doors, windows for plush houses and other small decorations.
2) Fabric Mosaics: when a lot of scraps and off-cuts build up, I let my young daughter make colorful mosaics with them. I give her a piece of card, some standard white glue mixed with a little water, a glue applicator or brush and lots of scraps. She has a lot of fun gluing the pieces down to make her own colorful designs.
3) Stuffing Small Brooch Pins: if you cut the scraps into small and more evenly sized pieces, they are fine for stuffing little projects like felt brooch pins. Cutting the scraps down ensures that they stuff the item more evenly and accurately.
4) Felt Picture Art: ever seen the fuzzy variety? Those boards where you arrange smaller pre-cut pieces of the fabric to make up pictures and scenes. You can use the same idea to glue or stitch your own picture together and make a beautiful scene or piece of art for your home. The scraps will be ideal for these little pieces.
5) Make Garlands or Necklaces: Cut the scraps into shapes and thread them or sew into necklaces, bracelets or long garlands for decoration.
Part 3: How to Glue Felt
What's the Best Way to Glue Felt Together
If I'm letting my daughter mess about with gluing this to make up her own patterns, she just uses a standard white PVA glue mixed in with a little water in a pot. The trouble with this method is that it bleeds through the fabric, takes a long time to dry and when it does dry it stiffens up.
I would only recommend this for kids crafts and crafts where you are not too bothered on the final appearance and just want it to stick.
I've used my glue gun with it for decorative projects where I want a very quick dry and permanent bond. You can feel the hard adhesive underneath when dry so I tend to use it as a fast option on projects like banners and things where the feel doesn't matter.
Glues and adhesives that may be better options for felt are Aleene's Tacky Glue which sticks the felt but is slow drying, Elmer's Craft Bond Fabric and Paper Glue also slow drying or Fabri-Tac which is faster drying. These work for sticking fabric to fabric or fabric to paper/cardstock. Fabri-Tac is the more expensive option so you might want to put up with the slower drying and pay less.
Part 4: Stuffing Felt to Make Toys
What do You Use to Stuff Felt With?
You can use up some small scraps or off-cuts of felt to stuff small plush items with and especially items such as decorative stuffed brooch pins. If you're using this method then a tip is to cut the scraps up quite small and in evenly sized pieces so that they stuff the item out much more evenly.
My favorite way of stuffing is to use polyester fiber or polyester toy stuffing. It's affordable, it's washable, it's soft and easy to separate by hand for stuffing with.
And it's what most crafters use for making plush toys and handmade goodies. It can be used for filling or plumping out very small projects or much larger ones as you wish.
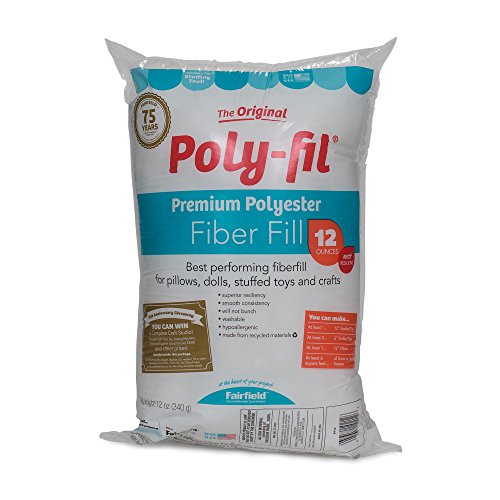
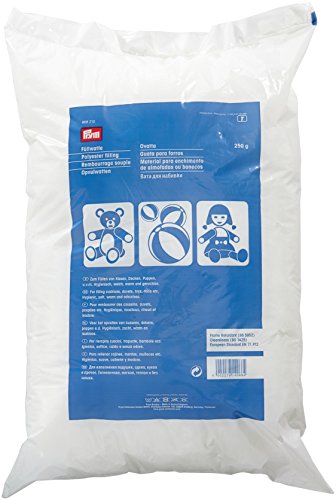
When I use this to fill my items, I work with just a little at a time. Just pull off a small piece out of your fiber bag and push it inside your toy or item - hopefully you've sewn around it three quarters of the way first which is a general rule of thumb.
You need to push it in firmly, making sure to fill corners and edges well and keep gradually packing it in.
You can use a tool like the blunt end of a long pair of tweezers, a pencil end or an embossing stylus to help to get stuffing into corners to fill them out properly.
I have a process of doing a little packing, then a little sewing, then back to packing as I continue to sew around until the item is completely stitched shut.
Part 5: Cleaning and Maintenance of this Fabric
Can You Wash Items Made with Felt?
NOTE: I would never recommend wet washing felt. Of course it does depend on the type of felt that you've used but the results on this fabric can be highly unpredictable including extensive shrinkage of the material plus you may also end up with colors bleeding too. I'd always recommend using dry methods of cleaning if you can - refer to the section below.
If you are determined to wash a felt item that you've made, bought or been given - hand wash it only because it's delicate. But do be warned that it may well ruin your item depending on the threads you've used, the decorations, the composition of the felt and also type of stuffing inside (if it is a plush felt item) which may not actually be washable.
You would hand wash using cool water only since hot water could cause major defects in the fabric. Do NOT use any soap since the addition of soap with felt can cause fuzzing and piling on the surface.
Just gently soak the item in cool (not ice cold) water. You can gently squeeze the felt in an area to try and remove a stain but don't rub at the stain since that can quickly ruin the surface of the material.
Soak it for as long as you need. Then remove the item from the water and gently squeeze it out to remove as much excess water as you can. You will then need to air dry it so an overnight dry might be best.
What is the Best Way to Clean it?
The best ways to clean this fabric are using dry methods since any addition of water to felt in large quantities can have really horrible and also unpredictable results on the material.
If you store your handmade or hand-sewn items well, they can stay looking good for many years to come. We have festive felt ornaments that have lasted for well over 10 years and are still going strong. That's because they are carefully packed away in soft white tissue paper and stored carefully in a box once they are removed off the Christmas tree.
If you can keep your items where they will not get very dusty (in a glass cabinet, on a shelf with a shelf above it or in a drawer) then that will help to prevent any problems with dirt and stains.
You can gently use a soft toothbrush to remove any surface dirt from felt. Softly sweep down the fabric in one direction. Do not use any circular, up and down or rubbing motions because that can cause the material to pile up and look fuzzy on the surface.
You can also use the nozzle of a small vacuum cleaner to suck up any dust or dry surface dirt from the fabric. To help protect the material from the suction of the nozzle, you can stretch some old hosiery over the nozzle. Be careful with any decorative beading and make sure this is all secure before applying any kind of suction.
Water can be used in a small quantity. But no soap because this can quickly damage the material. Just gently press or dab on a dirty area with a damp cloth dipped into plain lukewarm water.
Can You Iron Felt?
You can iron this fabric and also the sheets if they become creased. I would never iron onto the fabric directly since it would likely damage it or your iron.
I lay the felt flat on my ironing board and then place a clean and dry cotton tea towel over the top. I use the iron on a medium setting and iron over the top of the tea towel. This helps to remove any creases just fine.
It would make sense for you to use a medium setting on your iron and test out a corner first before peeling back the tea towel and seeing if you need a slightly hotter or cooler setting.
Store the Sheets Flat in Drawers
Sheets and folded yards and meters of this fabric will store very well in drawers. I have used large lever arch box files and also plastic drawers on wheels for storage. Both of these were great methods for keeping the fabric clean and organized.
My current storage is a large oak Welsh dresser where I use zippered bags to hold the fabric and keep it clean and dust free and these are kept inside the dresser furniture. It does help to keep them flat if you can although you can iron out creasing with the method I have explained just above.
If you have further questions on this topic, you can leave a comment and if the answer is something I think lots of people can benefit from, I can add it into the article.
Related Content You Should Also Love:
Tutorial to Make a Small Felt Cupcake with Free Pattern
Essential Sewing Supplies for Beginners
How to Make Felt Plushies for Beginners
Make an Easy Mushroom Spool Pincushion
More Felt Crafts to Enjoy
Essential Sewing Supplies for Beginners
How to Make Felt Plushies for Beginners
Make an Easy Mushroom Spool Pincushion
More Felt Crafts to Enjoy
Page Last Updated:


Greetings from Finland!
ReplyDeleteI was googling ideas for felt and here I am =) Just amazing stuff you have! Love your blog!
Br,
Nina
Hi Nina, that's great, I'm really pleased to have a comment all the way from Finland :) I am in the UK so not as far as I could be I guess!
DeleteThank you so much I really appreciate you stopping by and leaving such a pleasant note for me. I enjoy working with felt, just wish I had more time to do that :) If you're on pinterest there's lots of lovely felt inspiration there too.
Hi, what do you recommend for bonding cotton fabric to felt. I would like to attach it first and then cut out shapes that will not fray on the edges. I don't plan on sewing at all. Forgive me if you mentioned this in your article but I didn't see it.
ReplyDeleteThanks for your help!
Hi Amanda, since you want a no sew option, I'd have to go with a fusible webbing also called fusible interfacing. This is a thin sheet that you place between the felt and cotton and you iron over the top to bond the two fabrics together.
DeleteI would place the felt at the back, then the webbing, then the cotton. Before ironing, I would place some plain cotton fabric over to protect the felt. I'd also do a test patch first.
There are other no sew methods but I believe this would give the neatest result. You could also try something like Aleene's tacky glue which works with fabrics.
Whatever method you use, the felt will not fray but the cut edges of the cotton might if you are not either sewing around them or use a fray check. Note that a fray check can stiffen the edges of the fabric slightly.
Hope that helps.
Hi Marie, this is a very helpful post . I am currently making a quite book for my daughter and so had ordered white felt. The felt that I got is very stiff, can u give any suggestion as to how I can soften it a bit? Many thanks for your post.
ReplyDeleteI am sorry to say that I have never read or heard of any way in which you can soften felt that is stiff. You can actually stiffen up felt fabric that is too soft but, as far as I'm aware, you cannot soften it.
DeleteFelt fabric is designed to be a specific texture. Acrylic felt and even acrylic mixes/blends of felt can be quite stiff. There is sadly no substitute for being able to feel the felt fabric before you buy it.
If buying online, you can only really go on previous reviews. 100% wool felt is softer and more pliable but I find this can be too soft for the type of sewing projects I like to do. In the past, I have been able to order felt samples from sellers on Etsy. I don't know if they do this anymore because I now get felt from my local craft store.
I think there was a spelling error or autocorrect in your post as I don't understand what a "quite book" is. If you mean a quiet book, I would look for a wool blend felt although it is really worth getting samples if you can. You'd need to check what you bought originally because if that was a wool blend and it is too stiff then you will want one with a higher percent of wool in.
Hope that helps.
Hi Marie! I'm a preschool teacher and I'm toying with the idea of letting my students draw/write on some felt pumpkins I have. What type of pen would work the best? I've seen people say Sharpie and Fabric markers on the top ones...but I've also seen people say no to both. This would just be for some fun arts and crafts, but I wouldn't mind some sturdy pens that can be used after as well. :-)
ReplyDeleteHi Krista, I haven't tried special fabric markers except for water soluble ones which are temporary and meant to be dabbed off with water. I have tried felt tip colored marker pens which can smudge on the felt and ballpoint pens which also smudge.
DeleteThe best permanent pens I've found for drawing and writing on felt are colored Sharpies. These do tend to have quite thick lines and the style is not as neat as writing on paper but they don't smudge nearly as much. Just be careful the preschoolers don't draw all over themselves with them :)
This was very informative and straight-forward. I haven't seen writing like that in a long time. It was a needed breath of fresh air.
DeleteI will definitely try my hand at making a felt throw pillow b/c commercial decorative pillows can be sooo expensive, and they are usually not what I envision anyway. I'm pretty terrible at crafts, and am rewarded for my efforts with a big mess to clean up, but I think I can do this!
Hi, Thank you for giving so many great details about felt. I do have one question. I am wondering if you can use some sort of uv protection spray on felt projects? I would love to make a rear-view mirror hanging accessory using felt but I would want to protect it from fading. Have you ever done anything like this? Thank you in advance for you advice.
ReplyDeleteHi Donice, sorry I've only just seen this as I've been on vacation. You are right to be concerned about fading as the colors on felt projects can fade over time if left exposed to sunlight.
DeleteMy projects are mostly used indoors and only temporarily outdoors like banners so I don't have this issue. I also haven't heard of anyone using UV spray on felt fabric before but it probably has been thought of by someone out there.
What I would recommend is that you test the spray on some scraps of felt first (perhaps also with some threads and stitching on) to see what the effect is on the felt and also on any threads and bits of embellishments you intend to use. Better to test it out on all materials before using on a finished project. Good luck.
hi.I wanted to decorate baby bibs with little felt shapes but, am I understanding you correctly? The frequent washing would be a problem?
ReplyDeleteFrequent washing would be a problem with felt added to the bibs. It isn't a good fabric to choose for items that need to be washed and especially not items like baby bibs which need a lot of washing at high temperatures. Felt is much better used for decorative items.
DeleteHi. I make felt floral jewelry and wanted to know if there was a way I could seal the felt so it didn't become bobbled or so that it was somewhat waterproof?
ReplyDeleteYou could try testing out waterproof fabric sealers on small scraps of felt. You can purchase sealers - most of them need to be sprayed outside because of the chemical fumes. It is likely that any sealer will alter the feel and texture of the felt and perhaps also the look and color. So this is something you would have to test out.
DeleteI have read about some artists using hairspray on their work to help stop the bobbles. That may be worth a try on test pieces. Pilling or bobbling though is just a common issue with anything made from wool so that's the nature of the fabric you're working with.
Is there a way to shrink felt back when it has been overstretched in just one area. I have a felt Christmas stocking, where there is a small area at the top of the stocking in the cuff, where the felt is very thin and frayed,almost making a hole. I don't want to replace the whole cuff because of the embroidery on it.
ReplyDeleteIs there any way to place a small piece of the same color felt right behind this thin area. I would not wish to replace the cuff with embroidery either.
DeleteWhere I've had similar issues with some older but treasured felt decorations, I have placed a small patch of felt right behind (at the back of) the thinning area and stitched it carefully just on the back of the felt only. You can also use a small amount of fabric glue if you are unable to stitch this piece in place.
As long as the color is the same, it will give the appearance of the cuff looking good. And also the patch should help you to enjoy the stocking for longer.
Thank You
DeleteI am making a set of "paper" dolls for my granddaughter out of felt and I wanted to double the layers for the bodies with a layer of interfacing sandwiched in between for stiffening but I'm not sure what glue to use to really bond the edges tightly so they don't peel apart. What would you suggest?
ReplyDeleteGlues and adhesives are always difficult when it comes to felt and I'm never completely satisfied with the end result. I would advise doing a few test pieces on some scraps of felt with any white craft glues that you already have to see how well they work.
DeleteAleene's have a specific felt and foam tacky glue which I've never tried but some people swear by when it comes to felt. I do use the regular Aleene's tacky glue and that works OK but doesn't always stick felt onto felt so well together. Hot glue will stick the felt extremely well together but can easily ruin the look if you're not careful.
If it was me and the dolls are not too tiny, I'd stitch the edges down with a sewing machine because (even though more effort) that stitching will hold fast and it will last. That may not be an option due to the sizing though.
Hi. Thanks for all this helpful information. I’m making lap size fidget blanket/quilts for my Mum with dementia. I have used cheap stiff store bought felt flowers ( I assume acrylic) to decorate parts of the materials (cotton/fleece etc) on one already. The flowers are layered with 3 different felt colours glued together. I’ve sewn them on using a couple of stitches in the middle. I plan to use more to decorate the fidget quilt I’m currently making as well. My question is....would you think they would be likely to run & bleed colour onto the material if ever I have to wash the whole thing in cold water????......or much less importantly..lose shape? I have made small felt birds which I was able to make detachable but I can’t do that with the flowers. I would really appreciate some advice..I’m a newbie.
ReplyDeleteThanks
To check whether the felt is ever likely to run in case you need to wash your quilt in cold water, you can do a colorfast test on some scraps of the felt that you're using for the flowers.
DeleteWith some small pieces of the felt, wash in cold water and then place the wet pieces onto paper towel. If any color bleeds onto the paper towel, then the color may run when washed. If not, you should be fairly safe if washed gently in cool/tepid water.
If you no longer have any spare scraps of the same felt, take a clean white cloth, wet it and rub the underside of the flowers with it. If any color comes off onto the cloth that means that the color on the felt may run when washed.
Felt flowers may lose a little shape when washed but I'd advise not rubbing the flowers when wet. This should help them keep the original shape better.
Your fidget blanket sounds like a really lovely idea for your Mum. Good luck finishing it off.
Greeting from Bali..!
ReplyDeleteIt's a brief explanation and i learn a lot to start my felt project. Thank you so much.