How to Make Felt Mushroom Ornaments and Brooches
Toadstools and mushrooms are a favorite design theme of mine. Probably because they are heavily associated with the fairy and fantasy world.
Enjoy this fun how to make felt mushroom ornaments and brooch pins step by step photo tutorial. I've made my pattern template into mini mushroom houses but you can easily make yours into the more realistic kind instead.
You'll find lots of inspiration on this page with finished photos and different samples to enjoy. These look fantastic hung up on the tree as ornaments. Alternatively, wear them as a unique and totally cute brooch or bag accessory.
Note: This post may contain affiliate links for which I can be compensated.

These miniature mushroom and toadstool designs make ideal sizes for wearable brooch pins and hanging ornaments.
What You Need to Make These:

⭐ Get this design now in my Sellfy store.
My 17 page tutorial has 3 different pattern sizes ready for you to print and is available as an instant PDF download.
Alternatively, there are simple mushroom and toadstool drawings online that you can use to make your own pattern with or draw your own. Look for mushroom outline in any search engine.
With the purchase of my digital PDF tutorial and pattern, you get my own design pieces all ready to print and cut in a choice of 3 different sizes.

Image Credit: photo belongs to the author.
These are the pattern pieces you will need: a front and back, a cap, some spots and a little door. These ones are from my own mushroom house pattern but you can also choose to create a design using your own sketch, mushroom clipart or outline drawing.
You need a main front and back piece (2 x A) a mushroom cap (B) some spots (C, D, E, F, G) as the basics. If you want to make a miniature mushroom house, you'll also need a door (H) and a window (I) for the door.
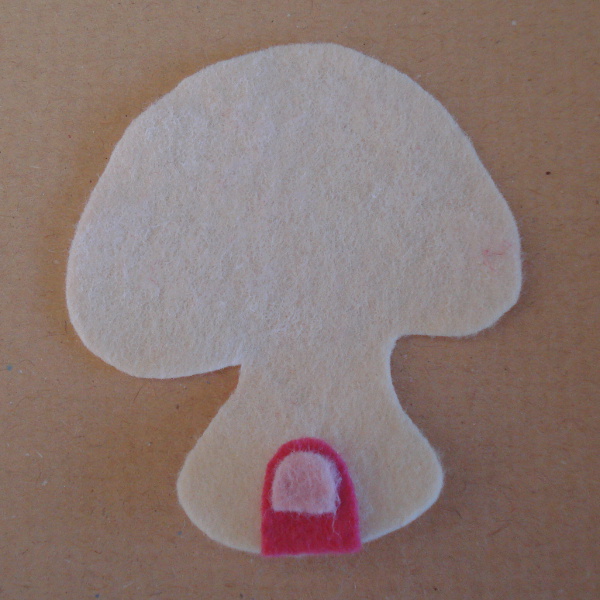
Image Credit: photo belongs to the author.
I like to turn my felt mushrooms into miniature felt houses so I add on a little door. You may prefer to keep your mushroom design more like a realistic fungi so ignore any additions that don't personally appeal to you.
Take one of your main mushroom felt pieces (A) and lay it out in front of you. Cut out a small door shape (H) from colored felt (I used dark pink) and pop this near the bottom of the design.
Use a lighter shade of felt to cut out a little window for the door (I) and put that into place on the design.

Image Credit: photo belongs to the author.
Thread up your needle with one strand of embroidery floss or sewing thread doubled over to make a working thickness of 2 strands.
I prefer to work on a smaller scale so don't use many strands of thread, you may be working on a larger scale so would perhaps need more to make the stitching stand out nicely.
Sew the window in place on the door with one stitch securing it horizontally and the other vertically making a + (cross) shape.
Keep the thread on the needle and use it to sew around the door. Use little straight stitches as I've done or running stitch around the sides and top. There's no need to sew the bottom edge down. Knot off the thread when done.

Image Credit: photo belongs to the author.
I'm not trying to make my mushroom look realistic so I've gone for shades of pink felt. You could use red for the mushroom cap and white spots for a more traditional style. Note how some of my felt circles overhang the design, these will be trimmed to shape later.
Layer the colored cap (B) in place on top of the mushroom shape (A) then add on the spots. You can pin the spots (C, D, E, F, G) in place which is a bit fiddly.
An easier method is to use a tiny amount of stick glue (like Pritt stick or an actual fabric glue pen such as SewLine) on the back of each spot which can help to secure it enough for sewing.
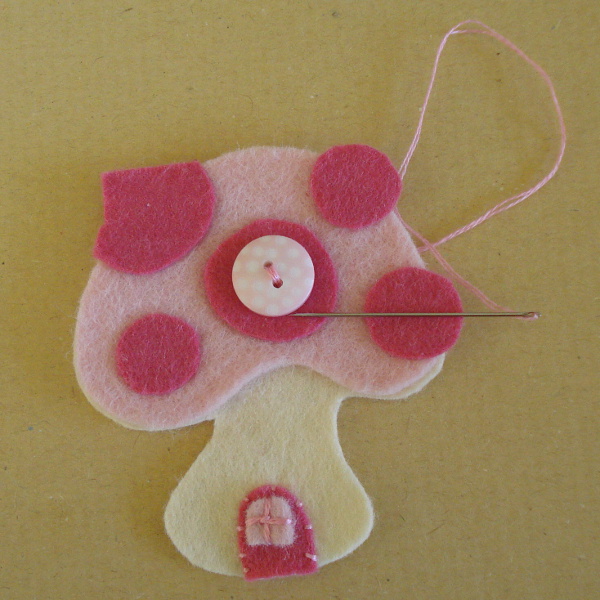
Image Credit: photo belongs to the author.
With the middle spot, I like to add on a cute button. Thread a needle with one strand in your choice of floss or sewing thread and double it over. Sew the button firmly in place. Leave the thread attached for the next part.
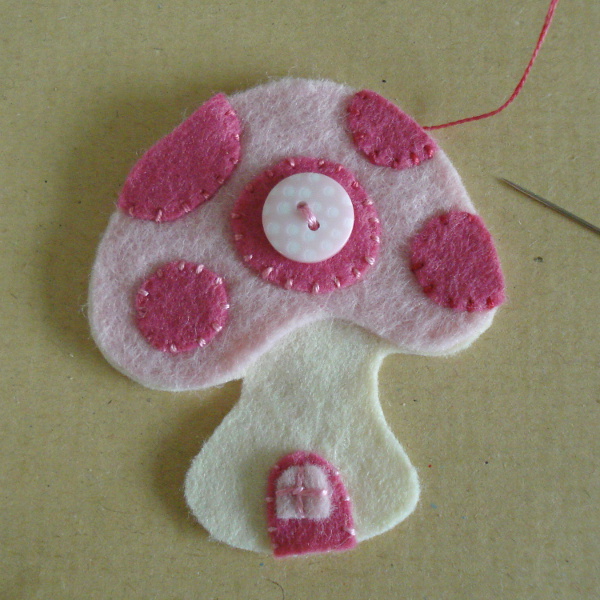
Image Credit: photo belongs to the author.
You need to stitch the spots into place. Any straight stitch or blanket stitch can work well for this felt applique. You don't need to sew around the spot sections which are right on the edge of the design.
Before sewing these down, I trim the spots around the edges with a small pair of scissors to neaten those off.

Image Credit: photo belongs to the author.
At this point, it is a good idea to sew the small section of the mushroom cap which is above the stalk. I am using blanket stitch because I intend to sew blanket stitch all around the design. But you could use a running stitch instead.
I choose a thread color to match the mushroom cap felt. If you have another sewing needle to use, you can leave this thread dangling to use later when you sew around the outside of your design.

Image Credit: photo belongs to the author.
Now is the time to finish adding any other details on to the front of your mini mushroom plush. Perhaps you want to add on some beading or some embroidery.
You can get a few ideas from looking at my finished samples near the end of the page. So finish the front design first.
Next decide if you want to turn your mushroom into a hanging ornament, a wearable brooch pin or something else. Maybe you just want it as a filled mushroom shape.
You need to decide now if you want your felt plush to be something other than just a plushie design so that you can add on the necessary parts. You need the back section of the mushroom ready for sewing to the front of your design.
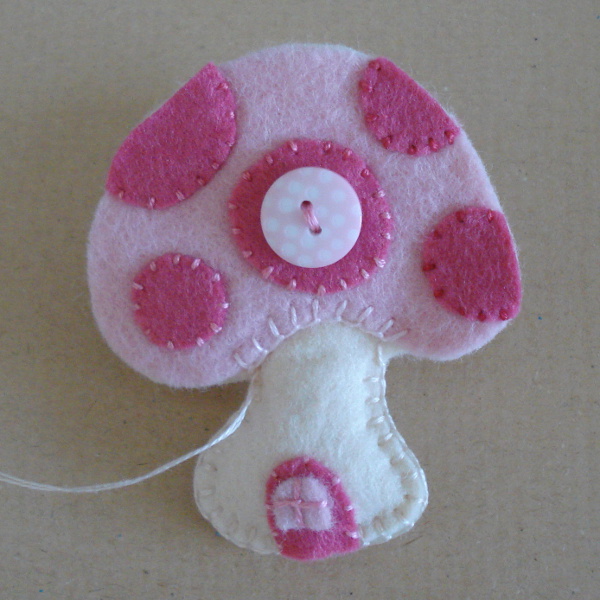
Image Credit: photo belongs to the author.
Layer the front of the mushroom design over the plain back piece (A) and try to line up the edges as closely as possible. Pin if you prefer to keep these in place.
Thread a needle with one length of floss doubled over in a color which matches closely with the stalk section of the mushroom.
I've sewn around the edge of mine using blanket stitch but you use what stitch you prefer. Note that I sewed under the felt of the door along the bottom for neatness but you could just sew right over it.
When you get to the end of the stalk area, knot off your thread on the inside of the mushroom or on the reverse.
Stuff the stalk section with your fiber fill. Pull off small amounts of the stuffing and carefully push them inside the stalk to pad it out nicely.
You may find it helpful to use a blunt ended tool to help push the stuffing in. A round ended embossing stylus is what I normally use to help me with this.

Image Credit: photo belongs to the author.
If you left your thread dangling on from step 6, you can use this to sew around the rest of the mushroom cap section. Otherwise, thread up your needle with thread to match up with the color of the cap felt.
Whatever stitch you chose to sew part of the mushroom cap in step 6 is the stitch you should now use to sew around the rest of the design.
When sewing around the edge, I prefer to sew under the felt of the spots that meet the edge but that does make the sewing more fiddly so you can sew right over these if you want.
Sew around to the top section of the cap and then stop so you can continue filling up and stuffing the plush design with some toy stuffing or fiber fill.

Image Credit: photo belongs to the author.
Take a stuff and sew approach which means sewing a little, then stuffing a little to keep on padding out your felt plush mushroom ornament or brooch right until the end.
When finished, knot off your thread on the reverse of your design.

⭐ Get this design now in my Sellfy store.
My 17 page tutorial has 3 different pattern sizes ready for you to print and is available as an instant PDF download.
The instant download PDF has a detailed 17 page tutorial with text, photos and 3 different printable pattern sizes.
Pattern sizes are approx 3, 4 and 5 inches tall. I recommend that you start with the medium sized pattern (4 inch tall) if you are unsure which one to choose.

Image Credit: photo belongs to the author.
Your finished little felt mushroom or toadstool makes a wonderful choice of felt hanging ornament to pop on the tree, on a stand or use as a sweet motif for a garland for a room scheme.
You can also turn it into a wearable brooch pin very easily that you can wear or add on to a bag as a cute accessory.
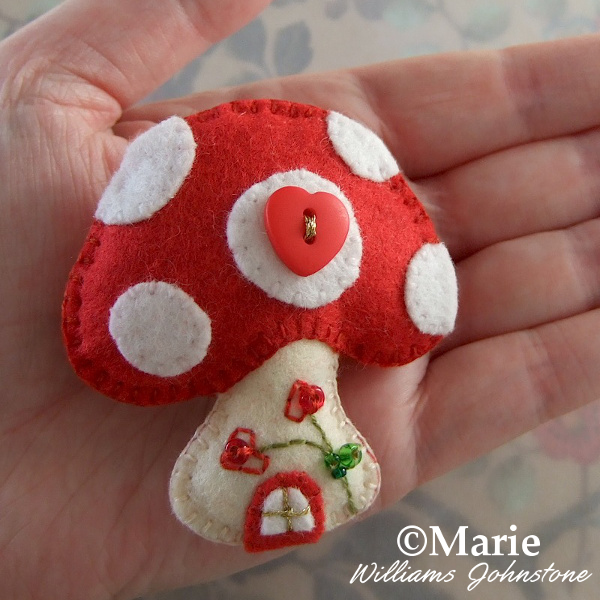
Image Credit: photo belongs to the author.
There are numerous ways to make your own design really unique. Here, I've used traditional mushroom colors of red and white. I popped a heart shaped button on as detail and added some simple embroidery and a few beads.
There is an addition of some gold colored sewing thread which works well with this color scheme.

Image Credit: photo belongs to the author.
On this design I added some Swarovski clear beads to the white spots as added sparkle. The door uses a tiny seed bead as a door knob and there is an addition of some simple embroidery with French knots as flowers.
Before sewing the back and front pieces together, I added some folded ribbon on the side with a white flower shaped button sewn on. This just adds another level of interest.
I hope you've got lots of ideas on how you are going to make your own felt mushroom design and the color scheme that you will use. You should also love my easy square pincushion tutorial that uses this mushroom motif.
Related Content You Should Also Love:
Page Last Updated:
Enjoy this fun how to make felt mushroom ornaments and brooch pins step by step photo tutorial. I've made my pattern template into mini mushroom houses but you can easily make yours into the more realistic kind instead.
You'll find lots of inspiration on this page with finished photos and different samples to enjoy. These look fantastic hung up on the tree as ornaments. Alternatively, wear them as a unique and totally cute brooch or bag accessory.
Note: This post may contain affiliate links for which I can be compensated.
How to Make Felt Mushroom Ornaments and Brooches: Cute Little Toadstool House Design

These miniature mushroom and toadstool designs make ideal sizes for wearable brooch pins and hanging ornaments.
What You Need to Make These:
- Small felt pieces in your chosen colors
- Embroidery floss or threads
- Sewing needle
- Scissors
- Sewing pins
- A temporary fabric marking tool
- Fiber fill toy stuffing
- Optional accessories: beads, buttons, ribbon
- A mushroom pattern template

⭐ Get this design now in my Sellfy store.
My 17 page tutorial has 3 different pattern sizes ready for you to print and is available as an instant PDF download.
Alternatively, there are simple mushroom and toadstool drawings online that you can use to make your own pattern with or draw your own. Look for mushroom outline in any search engine.
With the purchase of my digital PDF tutorial and pattern, you get my own design pieces all ready to print and cut in a choice of 3 different sizes.

Image Credit: photo belongs to the author.
These are the pattern pieces you will need: a front and back, a cap, some spots and a little door. These ones are from my own mushroom house pattern but you can also choose to create a design using your own sketch, mushroom clipart or outline drawing.
You need a main front and back piece (2 x A) a mushroom cap (B) some spots (C, D, E, F, G) as the basics. If you want to make a miniature mushroom house, you'll also need a door (H) and a window (I) for the door.
Step 1: Start Designing the Front of Your Felt Mushroom

Image Credit: photo belongs to the author.
I like to turn my felt mushrooms into miniature felt houses so I add on a little door. You may prefer to keep your mushroom design more like a realistic fungi so ignore any additions that don't personally appeal to you.
Take one of your main mushroom felt pieces (A) and lay it out in front of you. Cut out a small door shape (H) from colored felt (I used dark pink) and pop this near the bottom of the design.
Use a lighter shade of felt to cut out a little window for the door (I) and put that into place on the design.
Step 2: Sew the Door and Window in Place

Image Credit: photo belongs to the author.
Thread up your needle with one strand of embroidery floss or sewing thread doubled over to make a working thickness of 2 strands.
I prefer to work on a smaller scale so don't use many strands of thread, you may be working on a larger scale so would perhaps need more to make the stitching stand out nicely.
Sew the window in place on the door with one stitch securing it horizontally and the other vertically making a + (cross) shape.
Keep the thread on the needle and use it to sew around the door. Use little straight stitches as I've done or running stitch around the sides and top. There's no need to sew the bottom edge down. Knot off the thread when done.
Step 3: Layer Up the Mushroom Cap and Spots

Image Credit: photo belongs to the author.
I'm not trying to make my mushroom look realistic so I've gone for shades of pink felt. You could use red for the mushroom cap and white spots for a more traditional style. Note how some of my felt circles overhang the design, these will be trimmed to shape later.
Layer the colored cap (B) in place on top of the mushroom shape (A) then add on the spots. You can pin the spots (C, D, E, F, G) in place which is a bit fiddly.
An easier method is to use a tiny amount of stick glue (like Pritt stick or an actual fabric glue pen such as SewLine) on the back of each spot which can help to secure it enough for sewing.
Step 4: Sew on Cute Button Detail

Image Credit: photo belongs to the author.
With the middle spot, I like to add on a cute button. Thread a needle with one strand in your choice of floss or sewing thread and double it over. Sew the button firmly in place. Leave the thread attached for the next part.
Step 5: Sew Down the Mushroom Spots

Image Credit: photo belongs to the author.
You need to stitch the spots into place. Any straight stitch or blanket stitch can work well for this felt applique. You don't need to sew around the spot sections which are right on the edge of the design.
Before sewing these down, I trim the spots around the edges with a small pair of scissors to neaten those off.
Step 6: Secure the Mushroom Cap Just Above the Stalk

Image Credit: photo belongs to the author.
At this point, it is a good idea to sew the small section of the mushroom cap which is above the stalk. I am using blanket stitch because I intend to sew blanket stitch all around the design. But you could use a running stitch instead.
I choose a thread color to match the mushroom cap felt. If you have another sewing needle to use, you can leave this thread dangling to use later when you sew around the outside of your design.
Step 7: Decide if You Want a Felt Mushroom Ornament, Brooch or Something Else

Image Credit: photo belongs to the author.
Now is the time to finish adding any other details on to the front of your mini mushroom plush. Perhaps you want to add on some beading or some embroidery.
You can get a few ideas from looking at my finished samples near the end of the page. So finish the front design first.
📘 LEARN how to turn your felt mushroom into a hanging ornament here and also how to turn your design into a brooch pin here.
Next decide if you want to turn your mushroom into a hanging ornament, a wearable brooch pin or something else. Maybe you just want it as a filled mushroom shape.
You need to decide now if you want your felt plush to be something other than just a plushie design so that you can add on the necessary parts. You need the back section of the mushroom ready for sewing to the front of your design.
Step 8: Sew Around the Stalk and Stuff This Part

Image Credit: photo belongs to the author.
Layer the front of the mushroom design over the plain back piece (A) and try to line up the edges as closely as possible. Pin if you prefer to keep these in place.
Thread a needle with one length of floss doubled over in a color which matches closely with the stalk section of the mushroom.
I've sewn around the edge of mine using blanket stitch but you use what stitch you prefer. Note that I sewed under the felt of the door along the bottom for neatness but you could just sew right over it.
When you get to the end of the stalk area, knot off your thread on the inside of the mushroom or on the reverse.
Stuff the stalk section with your fiber fill. Pull off small amounts of the stuffing and carefully push them inside the stalk to pad it out nicely.
You may find it helpful to use a blunt ended tool to help push the stuffing in. A round ended embossing stylus is what I normally use to help me with this.
Step 9: Sew Around the Mushroom Cap and Continue to Stuff

Image Credit: photo belongs to the author.
If you left your thread dangling on from step 6, you can use this to sew around the rest of the mushroom cap section. Otherwise, thread up your needle with thread to match up with the color of the cap felt.
Whatever stitch you chose to sew part of the mushroom cap in step 6 is the stitch you should now use to sew around the rest of the design.
When sewing around the edge, I prefer to sew under the felt of the spots that meet the edge but that does make the sewing more fiddly so you can sew right over these if you want.
Sew around to the top section of the cap and then stop so you can continue filling up and stuffing the plush design with some toy stuffing or fiber fill.
Step 10: Finish Stuffing and Sewing

Image Credit: photo belongs to the author.
Take a stuff and sew approach which means sewing a little, then stuffing a little to keep on padding out your felt plush mushroom ornament or brooch right until the end.
When finished, knot off your thread on the reverse of your design.
Get the Detailed Tutorial PLUS Printable Pattern in 3 Different Sizes

⭐ Get this design now in my Sellfy store.
My 17 page tutorial has 3 different pattern sizes ready for you to print and is available as an instant PDF download.
The instant download PDF has a detailed 17 page tutorial with text, photos and 3 different printable pattern sizes.
Pattern sizes are approx 3, 4 and 5 inches tall. I recommend that you start with the medium sized pattern (4 inch tall) if you are unsure which one to choose.
Completed Plush Felt Mushroom: Makes a Great Mini Ornament or Pin Brooch to Wear

Image Credit: photo belongs to the author.
Your finished little felt mushroom or toadstool makes a wonderful choice of felt hanging ornament to pop on the tree, on a stand or use as a sweet motif for a garland for a room scheme.
You can also turn it into a wearable brooch pin very easily that you can wear or add on to a bag as a cute accessory.

Image Credit: photo belongs to the author.
There are numerous ways to make your own design really unique. Here, I've used traditional mushroom colors of red and white. I popped a heart shaped button on as detail and added some simple embroidery and a few beads.
There is an addition of some gold colored sewing thread which works well with this color scheme.

Image Credit: photo belongs to the author.
On this design I added some Swarovski clear beads to the white spots as added sparkle. The door uses a tiny seed bead as a door knob and there is an addition of some simple embroidery with French knots as flowers.
Before sewing the back and front pieces together, I added some folded ribbon on the side with a white flower shaped button sewn on. This just adds another level of interest.
I hope you've got lots of ideas on how you are going to make your own felt mushroom design and the color scheme that you will use. You should also love my easy square pincushion tutorial that uses this mushroom motif.
Related Content You Should Also Love:
How to Make Ornaments Out of Felt
How to Make Plushies Out of Felt Beginner Guide
Mushroom Spool Pincushion Tutorial
All About Craft Felt
More on Sewing With Felt
How to Make Plushies Out of Felt Beginner Guide
Mushroom Spool Pincushion Tutorial
All About Craft Felt
More on Sewing With Felt
Page Last Updated:


Comments
Post a Comment
CraftyMarie is a craft themed website by Marie Williams Johnstone. I love to craft in the winter and garden in the summer. I make handmade cards, papercrafts, crochet and seasonal crafts. I enjoy many of the more traditional crafts and hobbies including sewing, embroidery and working with felt and fabric. Thanks for leaving me a comment. Comments do not show up until I approve them. Marie